Hello from the mountains of Kentucky! I am super excited to share a new recipe that I have been experimenting with and finally perfected it last week. I love a good moist banana bread. I have tried several vegan recipes with little to no luck with the right amount of moisture and sweetness. This recipe fits the bill for both. It’s quick, easy, and requires minimal ingredients and those that you probably already have in your pantry. It’s also delicious with a cup of hot tea!
Ingredients:
One large overly ripe organic banana or two small overripe bananas
2 cups all purpose flour (I like King Arthur’s unbleached flour)
1/2 tsp pink organic Himalayan salt
1/2 tsp anti-caking organic baking soda
1/2 tsp organic all spice
3/4 cup organic cane sugar
1/2 cup almond milk
1 tsp good quality Non-GMO vanilla extract
1 tsp organic apple cider vinegar
1/2 cup unsweetened applesauce
1/2 cup chopped organic walnuts
Add in options can be; chocolate chips, pecans, raisins, or cranberries.
Process:
Preheat oven to 350 degrees. Spray or butter a glass 8×8 baking dish. Line it with parchment paper and then spray or butter the paper.
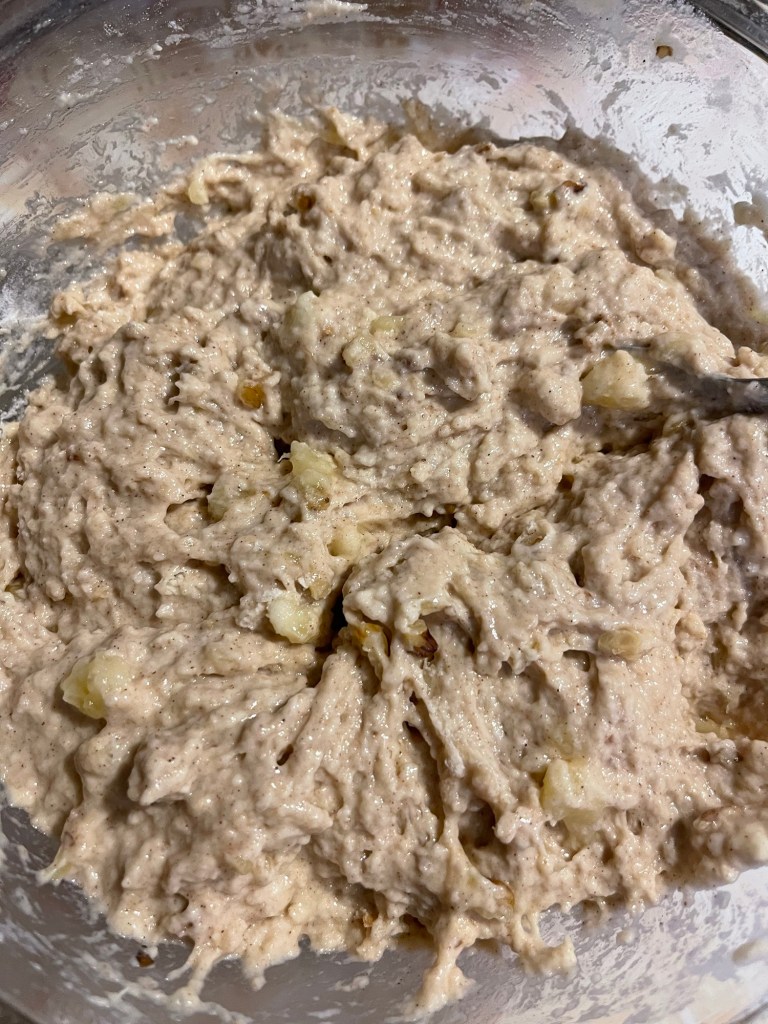
Mash the banana, vanilla, and sugar and mix well. Add salt, baking soda, flour, vinegar, and applesauce and fold the ingredients together without overmixing. Add the milk a little at a time and until the batter well. Fold in the walnuts. Add the bread mixture to the lined glass baking dish. I baked my bread for 45 minutes. I checked it at 30 minutes and determined it needed fifteen more minutes to be baked through and through.
Mixed ingredients
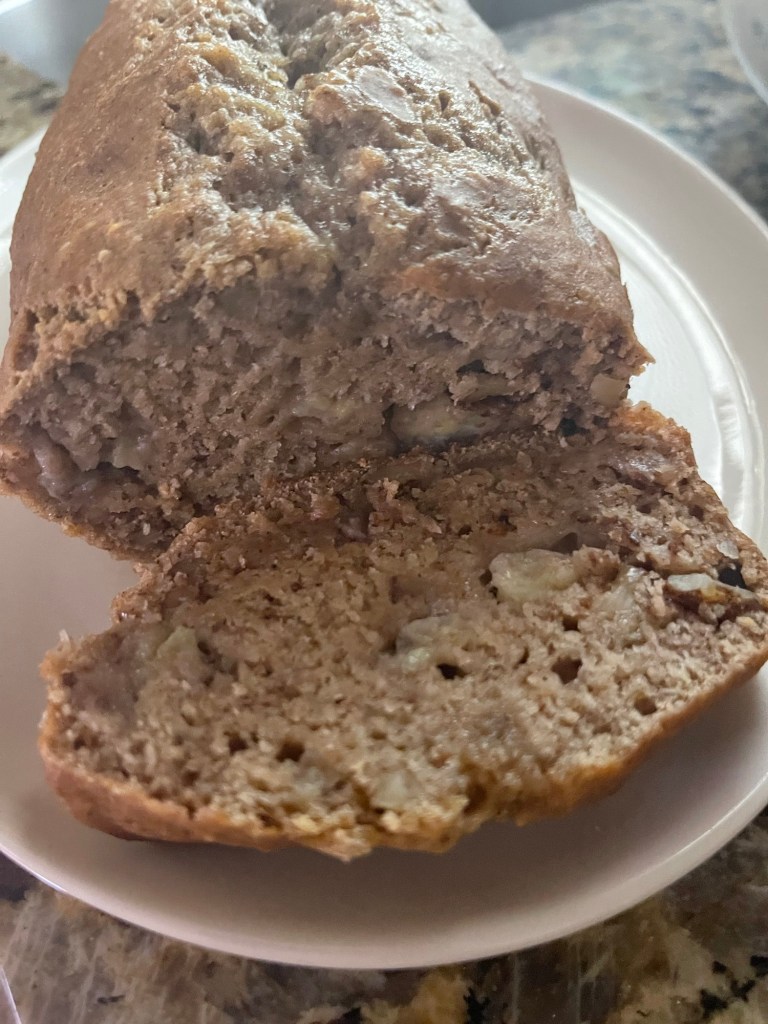
I removed my bread from the parchment paper and set it on a baking rack to cool for thirty minutes. Once the bread was cooled, I placed it in an airtight container. I have enjoyed this bread all week as a snack with my lunch, toasted for a light breakfast, and in the evenings with coffee or tea. It is tasty, moist, and not overly sweet but flavorful.
You may add more sugar or even honey for a little more sweetness. If you’re not a fan of walnuts, pecans are a great substitute. I like to toast this bread for breakfast. It’s delicious with a smear of honey or plant butter. Unsweetened dark chocolate chips are a great addition as well. Either way you eat it, as breakfast, a snack, or dessert, it’s a delicious bread.
For now, God bless from the mountains of Kentucky. Feel free to comment, like, and subscribe. I look forward to hearing from you.
Good afternoon from the mountains of Kentucky! Today feels like spring in the mountains. Easter Lillie’s are bloomed, some of the trees and bushes are budding, and I see green plants emerging through the flower bed covering. I am excited about spring as it always feels like an opportunity for new beginnings, time to plant, and time to enjoy the beautiful mountains that we are blessed with.
Summer in the mountains!
For those of you who are serious tea drinkers, and for those who enjoy a cup of tea from time time… you’ll enjoy my series, Tea Time Tuesday. It will be a reoccurring blog post that will include random topics ranging from making teas, uses of teas, to recipes that include tea in them, and occasional recipes for goodies to eat while drinking tea. I will also review books I’ve read while enjoying a cup of tea. While some posts might be simple ramblings or inspirational words. However, today’s post is about a topic that is worthy of conversation. Loose tea verses tea bags.
I’ve been an avid tea drinker for years. I like almost all flavors of teas. But, I do have a few favorites. I love a good chai tea with oat milk, and lavender. I drink peppermint tea almost every day. I like black teas and love a good chamomile tea with either honey or lavender and sometimes both. Regardless the tea I drink, I prefer loose leaf to tea bags. The tea that I grow and dry does not even compare to purchased teas, but there are times when I buy loose leaf, especially black tea and chamomile tea. So, why do I prefer loose leaf to bagged tea? Loose leaf is more flavorful, I don’t have to worry about how long it’s been shelved, I don’t have to wonder if the bags are good quality or could they be toxic. There are so many different reasons, but flavor and the ability to use a tea ball of loose leaf tea a second time, which is a great money and tea saver, especially if you purchase tea. If you don’t like a tea ball, you can always purchase organic tea bags that you can fill yourself. The organic tea bags are great for tea on the go. They store easily in my lunch bag that I carry to work.
I’m curious about your preferences. Which do you prefer bagged tea or loose leaf, and why? I would love to hear from you. For now, God bless from the mountains of Kentucky. I think I’ll enjoy a cup of tea and porch sit a little while on this beautiful spring-like day!
Good Monday from the mountains of Kentucky. I awoke early this morning to make time for prayer, reading scriptures, and a little quiet time before preparing for the busy day ahead. There’s something about the early morning hours that brings a sense of renewal to my spirit. The stillness of the still dark sky, a quiet house, and the ability to meditate and truly listen for the Lord’s voice. Having a healthy relationship with God is part of being physically happy and being spiritually happy, which helps us be better prepared for the day or days ahead.
Our pastor’s wife once spoke on the voice of God. It was inspiring, reassuring, and confirming. The voice of God can be heard, sensed, and felt. It can be heard through His word, anointed preaching, the stillness of the night, a distant cry of a Hawk, in our thoughts, through words of wisdom given from others, and many other ways. His voice can be loud, soft, bold, and it can also be sweet and tender through prophetic words. We cannot put limitations on God. He is the Great I Am. He is the Alpha, the beginning, the first, the Omega, and the last. He is everything in between. We must recognize Him and reverence Him for who He is. To hear Him, and or recognize Him, we must calm the voices in our heads.
God’ promises are the same today as they were yesterday!
We are in a spiritual warfare with the enemy. The only place he can access is our thoughts, which if we allow his ideas and discouragement to linger, can become toxic. At this point we have allowed the enemy’s voice to overpower His voice. I have learned to pray for a watchman over my heart and mind. The enemy has no right to invade our peace. We must command him to go in the name of Jesus! He trembles at the name of Jesus! Speak the name of Jesus with boldness. You have authority of the enemy. I have countless testimonies about the voice of God but will only share a few of those with you today.
Years ago a friend of mine was having a difficult season in her life and was praying for answers. She prayed, trusted the Lord and waited on Him. One evening as she was checking her mail as she did on any given evening, she asked the Lord for confirmation that He would work this situation out. She needed help. She needed answers. And an answer came. She described how a gentle soft wind suddenly swept over her. She knew in her heart the gentleness of the unexpected breeze was God reassuring her that it was going to be okay. She worried no more but waited on the hand of God to move in what seemed like an impossible situation. And… He did.
He is with us even in the eye of a storm!
During a horrific spring storm a couple of years ago. The trees were swaying in the wind, rain was pouring down, and the creek water was rising fast. The sky was dark and we were under dangerous storm warnings. I was at home alone and was walking the floor praying for protection for myself, my family, for our homes and for our neighbors. I began speaking the name of Jesus. I quoted scriptures and continued to pray as the storm around our homes was raging. It felt as the storm was mocking me and trying to intimidate me and dissipate my faith that the Lord would take care of us. As I quoted Psalms 91, while peering through the window of the back door, I saw a sight that stopped me in my tracks and words. Hovering ever so gently near a set of wind chimes was a tiny hummingbird. Beyond the porch the winds lapped, the rain poured and the creek waters raged. The wind chimes were stilled and tiny bird hovered gracefully. I knew at that moment that the Lord was saying, “I’ve got this, trust me. I will care for you as I care for the fragile hummingbird. Trust me.” I snapped a quick picture of the hummingbird and as quickly as it arrived, it was gone. I relaxed as I knew the Lord was in control. The storm finally ceased leaving behind little to no damage. Since that day, when the enemy tries to scare me or intimidate me, or make me doubt, I think about the tiny hummingbird and words of comfort that I felt. We now have feeders gracing our porch to feed the tiny birds that God used to show me that He was in control of all. He is our protector, our guide, and God almighty!
Taken through a screened window during a raging spring storm. The creek was a small stream minutes before this picture was taken.
Many years ago, when we were praying about buying our home, there was chaos surrounding the situation. Some family members wanted to sell their parents home place, while others didn’t. I knew the home that had been their home was supposed to be our forever earthly home. I prayed and was continually being pulled to and fro. First we could buy the home and then others would change their minds. I continued to pray for His will. I felt compelled to visit a church one Sunday evening that I visited occasionally. Not really knowing why I felt lead to go, I went. During the worship service an elderly lady came to pray for me. She had no reason to know that I was praying about the home.
As she prayed for me, I felt an instant comfort and a closeness to the Lord. She spoke in my ear and said the Lord told her to tell me that even as soon as the morning, He would move in this that I had before Him. The peace resonated throughout my being. I can’t really recall what happened in the remainder of the service, or what the sermon was even about. I was enveloped in His presence and already planning how I would prepare for the move! The move to our new home. The next morning a family member who was an heir of the land we wanted contacted us to let us know they had made the decision to sell the home. A few months later we were living in our new home where after twenty seven years, we still reside today. God is faithful!
Early spring garden on our forever earthly land. God is good!
The voice of God can be soft, gentle, loud, clear, concise, and sometimes He uses the simple things such as the hummingbird to speak to us. Nevertheless, we must be willing to hear and receive what the Lord is telling us. Once we recognize it, we have to stand firm in our faith that He will do what He says He will do. Keep in mind the Lord spoke to people throughout the Bible through animals, nature, audible voices, angels and much more. We are no different than those that heard the Lord’s voice all those years ago. We, too, are His children. Finally, God don’t change. He was, and is, and is to come. He is the Great I Am.
God’s creation. Fall in the mountains.
I hope you’ve enjoyed my testimony’s about God’s voice. Feel free to comment, like, and or follow. I am excited to share more testimony’s of His voice next week. For now, God bless from the mountains of Kentucky.
Good morning from the mountains of Kentucky. It’s a peaceful morning here with a slow drizzle falling softly to the greening earth. Spring is just around the corner and we are seeing glimpses of it daily. The yellow buttercups are in full bloom, spring onions are ready to be enjoyed with meals, and the peepers are alerting everyone of the presence in late evening hours. Daylight is lingering into the evening hours extending the day just a bit longer. In Kentucky we know that these wonderful signs of spring does not mean that winter will not rear it’s head until next winter. On the contrary. We will endure our season winters in upcoming weeks, but they don’t last. So, with that being said, let’s get on with food prepping for the week.
Breakfast:
Being that I follow a plant-based diet, I am preparing a tofu veggie scramble that can be enjoyed with fresh bread as toast, or on a wrap when eating on the go. If you do not follow a plant-based diet (vegan) you can simply use fresh eggs in place of the tofu. You can find my link for tofu scramble at Scrambled Tofu and Spring Daydreams This tofu scramble lasts for days in a covered dish in the refrigerator.
Tofu veggie scramble
Bread:
I posted a link last week for fresh bread. This loaf was enough bread for seven days of delicious eating whether it was for toast, sandwiches, as a bread with a meal, or simply bread and plant butter or with honey. You can find my bread recipe at Give Us This Day Our Daily Bread This bread is easy and delicious and contain only four to five ingredients depending on your preference. I store my bread with wax paper first, then cover the waxed paper with aluminum foil. I am searching for a good BPA bread keeper. If you know of one, feel free to drop a comment!
Fresh baked organic bread.
Taco Soup:
For an easy and convenient supper this week, I am preparing plant-based taco soup. Again, if you do not follow a vegan diet, you may substitute my recipe for chili with meat. I chose taco soup this week because of its versatility, and it mimics a good chili soup. I can have soup one night, or two, and have taco salads another night, or two, or burritos. Taco soup can become multiple dishes. As soup, I enjoy it with a plant-based grilled cheese, or with homemade bread, or even with some of my daughters homemade sour dough crackers! It stores in the fridge easy, travels to work well, and lasts for days covered in the fridge. If I have leftover soup, I use my small canner and can a jar or freeze a bag for a later time. You can find my plant-based taco soup recipe at Three Bean Plant Based Taco Soup
Plant-based taco soup
Rice as a Side:
Rice is so versatile that it can be included with breakfast, as a side, or even added to the taco soup or taco salad. I use the insta pot to make a batch of brown rice for the week. I add the measurement according to the bag, except I prepare my rice in vegetable stock. I add chop a half an onion fine, add chopped peppers of choice, and add a heaping spoon of salsa. I add a teaspoon of each of the following; garlic, pink salt, black pepper, white pepper, and paprika. I add a half teaspoon of cumin, cayenne and turmeric. Cover and pressure for ten minutes. I allow my rice to sit in the pot until the steak self-releases as this helps ensure a good texture. Fluff the rice and store in a coveted bowl in the fridge.
Snacks:
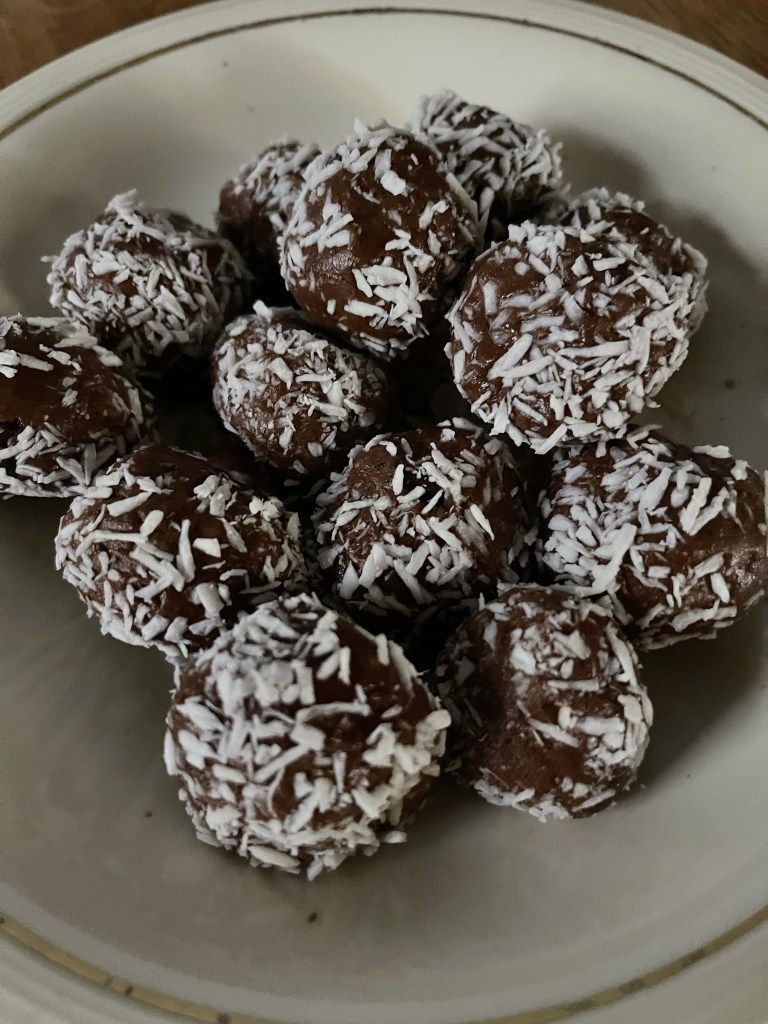
Snacks are easy to prep. Today I will be prepare vegan protein balls. The protein balls are sweet, delicious, travel well with me to work, and make a light late evening snack. You can find the recipe at the following link Vegan Chocolate Chip Coconut Protein Bites I am planning on baking zucchini bread this weekend as well. It’s a great choice as it allows me to have a second option for breakfast as well. You can fine one of my zucchini bread recipes at the following link Clean Apple Zucchini Bread
Protein balls
I have found that prepping for the week alleviates stress of trying to figure out what to eat, makes mornings much smoother when packing lunch for work, and allows me to have more time in the evenings as supper is basically prepared. But one of the greatest benefits of prepping for the week is it eliminates eating out, it ensures that I am eating healthy, and saves money on our food budget. It’s a win win situation that when carefully done can make a huge difference in your week. I also enjoy our daughter in-laws baked goods. You can access her shop and order on the following link https://bakesy.shop/b/batch-baked-goods
I hope you enjoy the recipes that are linked the post. Feel free to subscribe and share with friends and family. Also, comments are welcomed. God bless from the mountains of Kentucky! I am off to retrieve some spring onions to add to our supper.
Good morning from the mountains of Kentucky. It’s official! We are 22 days away from spring 2024. I am eager to say that I am very happy about that! When the butter cups are blooming, daylight lasts a little longer, and the birds are singing early in the morning, I begin to have spring fever. I am ready to sow seeds, plant crops, and enjoy the sunshine on my face. I am eager to share a new bread recipe with you that is clean, easy, and tastes delicious. But first, I would like to ask if you have ever looked at the list of ingredients on bread you buy from the grocery store? The ingredients are numerous and many that I can’t pronounce or have to search the internet to determine what they are. This is scary to say the least. Even most of the breads that are labeled as organic contains a long list of ingredients. The recipe that I am sharing today has basically five organic ingredients, of which one is water. Are you ready to take control of what you put inside your body? Let’s get started!
Ingredients:
3 1/2 cups of organic, unbleached all-purpose flour (I like King Arthur’s)
1 1/2 cups of warm filtered water 75 degrees
1 1/2 teaspoons of aluminum-free sea salt or pink Himalayan salt
2 teaspoons of organic non-caking yeast
1/4 to 1/2 cup of organic seeds of choice. I used pumpkin, flax, and hemp seeds. (This is optional)
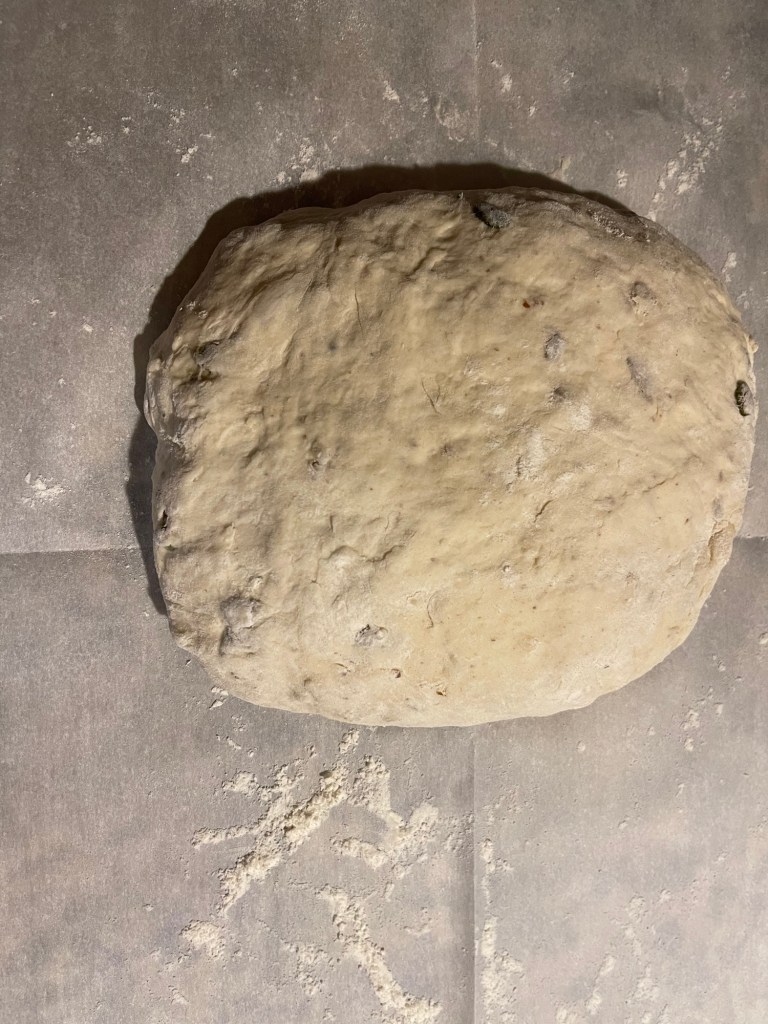
In a large glass mixing bowl mix the dry ingredients and add warm water slowly stirring as you add the water. I like to add the yeast to the warm water to help activate it and then add the water to the mix. I also like to mix by hand, but a stand mixer with a dough hook can be used. Gently fold in the seeds of choice. Once the dough is mixed set the bowl aside in a warm place and cover the bowl with a clean dish cloth. Let rise for two hours.
Freshly folded dough awaiting the oven to heat.
After two hours, turn your dough out onto a floured parchment paper or floured wood cutting board. Fold the dough each way into itself. Shape it into the shape the desired shape that you prefer your bread. Lightly dust a stone pizza stone and place it on the oven rack that you will bake your bread on. Preheat the oven and the pizza stone to 450 degrees. Add about two inches of water to a shallow glass cooking dish and place on the rack beneath the rack you’re going to bake the bread on. This will help your bread have a crispy exterior on top and a soft bottom. Allow your bread to continue to rise while the oven and stone are preheating. When the oven is preheated, score the top of the bread three to four times with a serrated knife. Remove the hot stone and carefully remove the dough and place it on the the hot stone. Bake for 25- 30 minutes, depending on how crusty you like your bread.
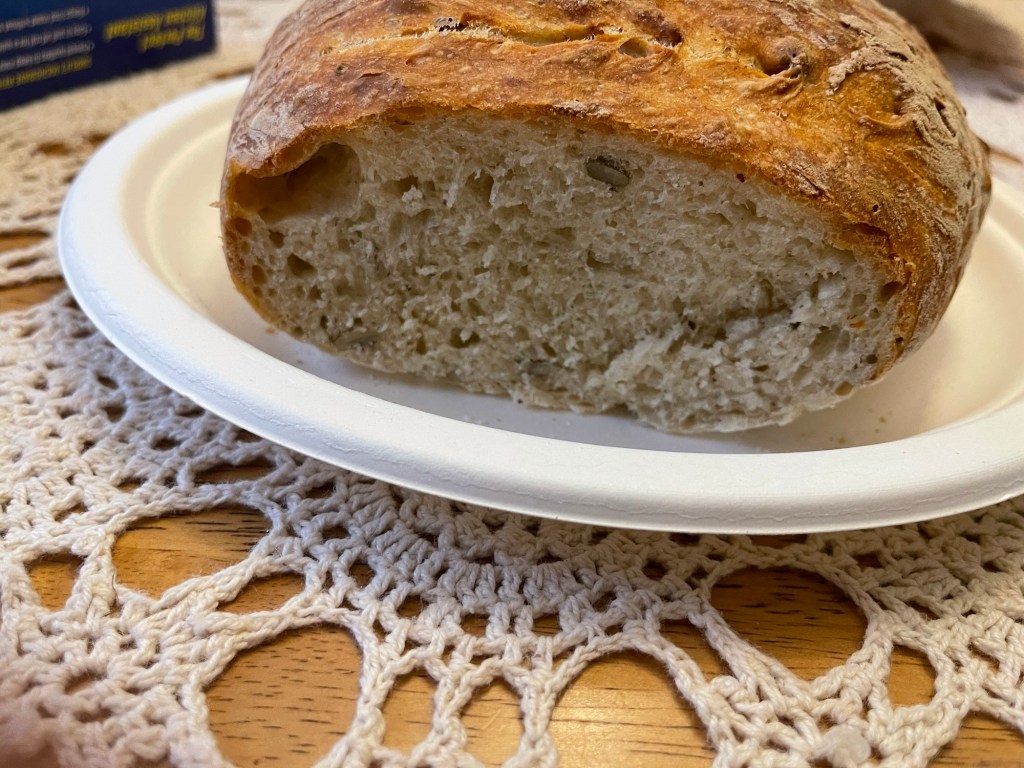
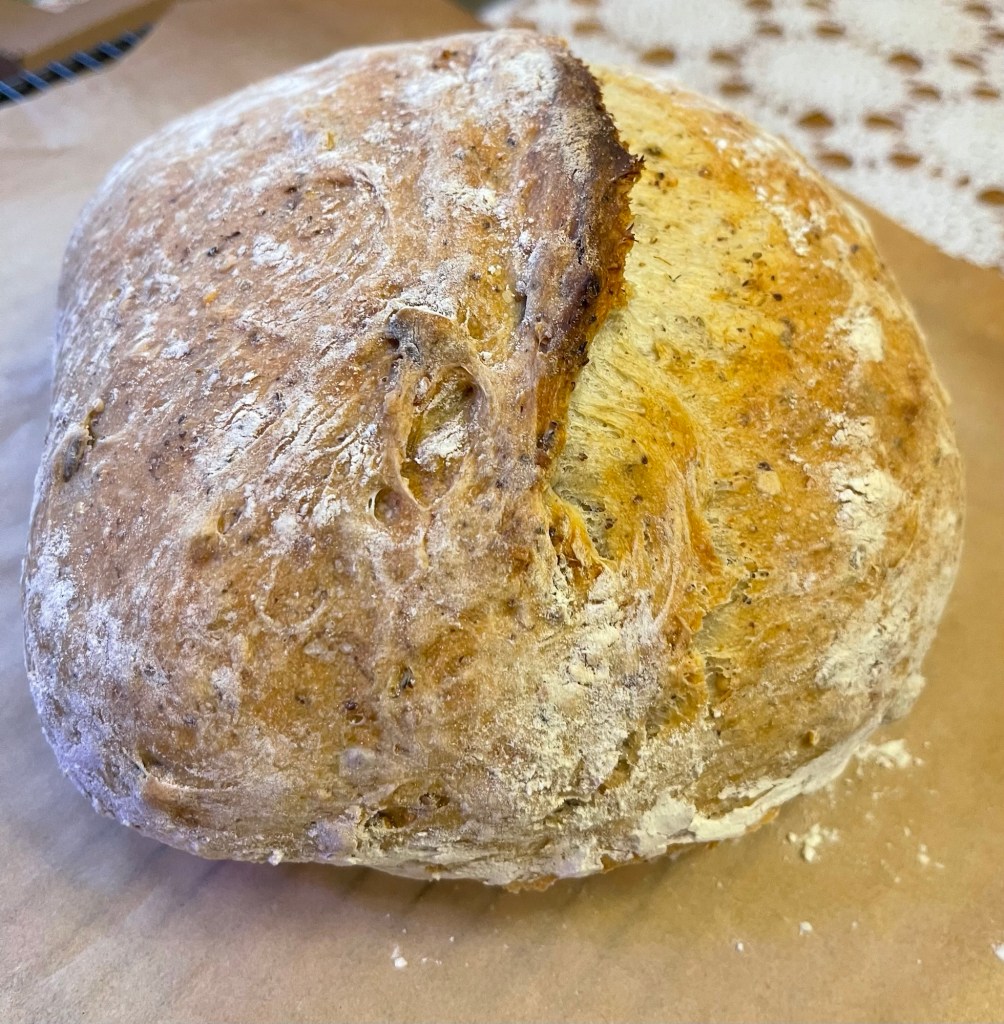
Fresh bread just out of the screaming hot oven still on the baking stone.
This bread can be made from wheat flour if desired or oat flour. The seeds are optional and can be exchanged for other seeds, or left out of the recipe. You may bake this bread in a preheated covered cast iron Dutch oven that is lined with parchment paper before adding the dough, or you may divide the dough into two small loaf pans.
Once the bread has baked transfer to a cooling rack and allow to completely cook before cutting. Sharp serrated bread knifes are great to cut the bread. This bread makes great sandwich bread, toast, French toast, as a side to supper dishes, toasted as crusty bread, or buttered as is. The inside is soft and airy and delicious. I love the texture of the baked pumpkin seeds within the bread. The possibilities are vast!
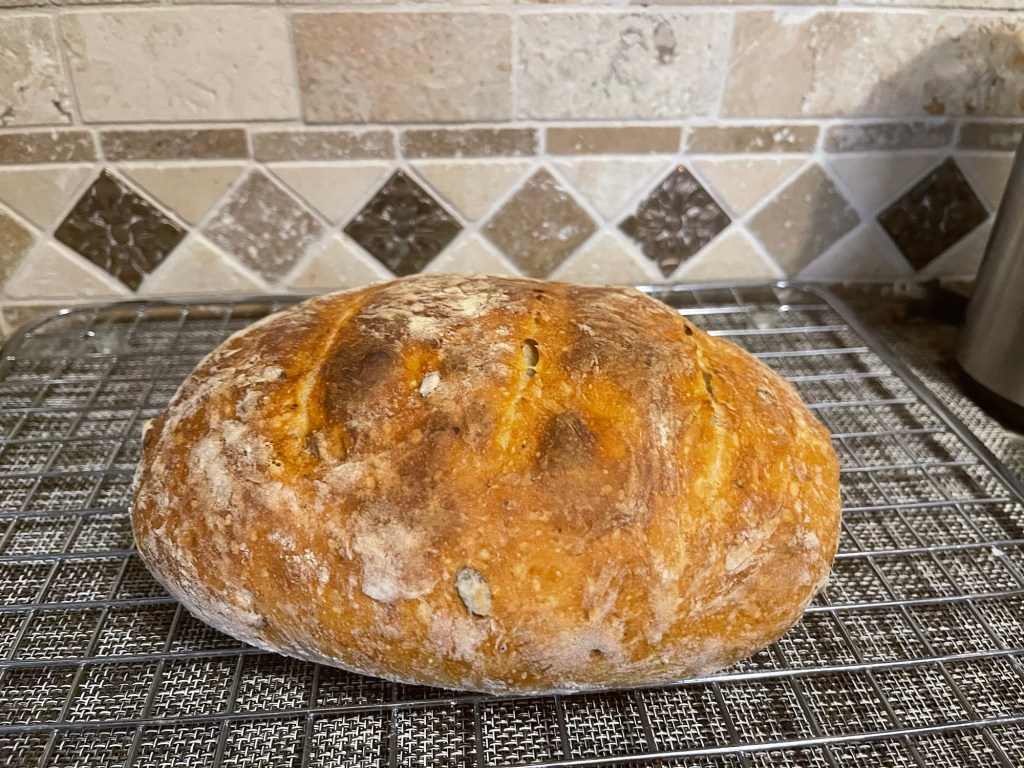
Cooling on the wire rack.
I hope you and your family enjoy this recipe. Every time I bake, I am reminded of one of my favorite components of the Lord’s Prayer.
Matthew 6:11 Give us this day our daily bread. (KJV)
The top is crusty, the bottom soft, and inside is airy. It’s delicious!
We should focus on this day, not days that have past, nor days that haven’t yet arrived. If we keep our focus on, this day, we do not get caught up in the what ifs, from yesterdays, or the what wills, of tomorrows. Keeping our focus on the Lord for this day encourages us to rely on Him more completely.
God bless, from the mountains of Kentucky. I welcome Feel feedback and or questions.
During COVID many people rediscovered the health benefits of elderberries. I, myself, started taking a good organic elderberry supplement to enhance my immune system. Finding organic elderberry syrup was difficult or ridiculously expensive at the time, and the supplement was not inexpensive. After paying for the supplement for a few years, I decided to try my hand at making elderberry syrup. I am very pleased with the results and inspired to share my recipe with my readers.
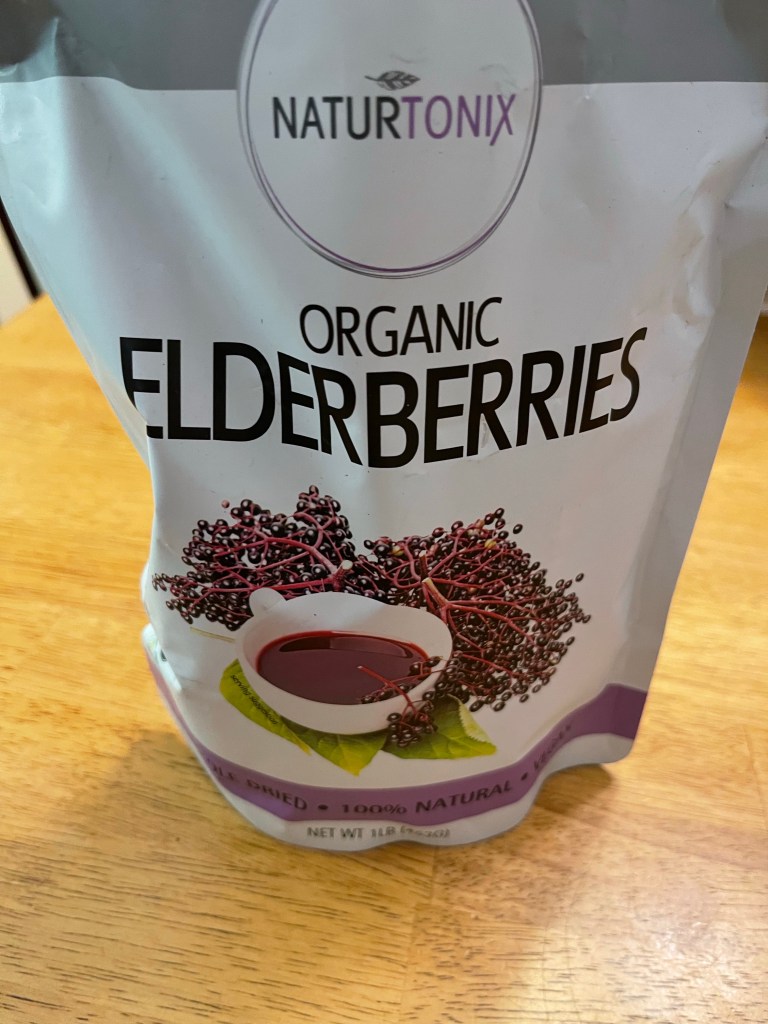
There were challenges along the way. But, with determination, I was able to overcome those. First, I wasn’t able to find someone with an elderberry tree that was willing to part with elderberries, so I did the next best thing. I looked on Amazon for organic dried elderberries. The ones pictured below had the best price, largest amount, and the best rating.
Dried organic elderberries from Amazon
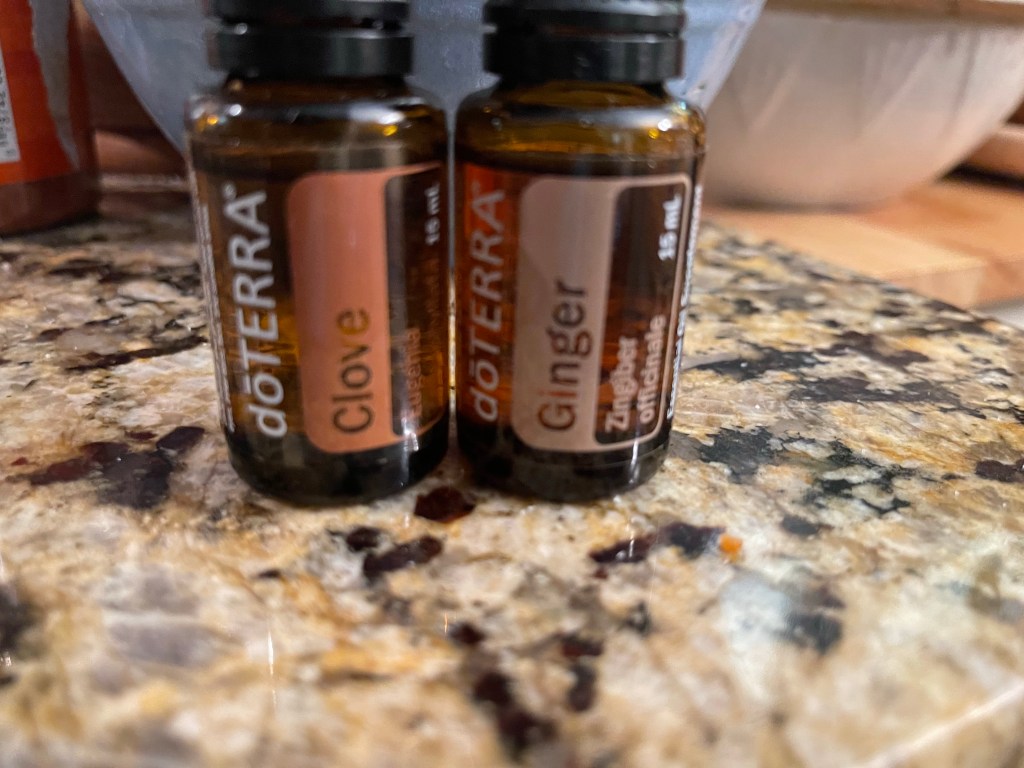
Next, I experimented with the amount of elderberries I would mix. After a bit of research and experimental tries, I decided the syrup would be tastier with some spices added. After a few batches, I decided on the addition of organic clove, organic ginger, organic cinnamon and local honey. With this in mind, I was ready to see if the taste was right. It was delicious!
Ingredients (makes a pint) 3/4 cup Dried elderberries 3 cups filtered water 1/2 tsp dried clove 1/2 tsp doTERRA clove essential oil 1/2 tsp doTERRA ginger essential oil 1/2 tsp dried ginger 1 tsp cinnamon Fresh honey to taste
Essential oils are optional. I love the benefits of them and the taste. Read the labels closely before using to ensure they’re consumable.
Process
Add the three cups of filtered water to a stainless steel saucepan. Add 3/4 cup dried elderberries. Add the remaining ingredients except the honey. Bring the ingredients to slow boil. Set a timer and boil the mixture for 45 minutes. After 45 minutes turn the burner off and cover the mixture and allow it to cool. When the mixture is completely cooled strain completely through a fine mesh strainer into a clear pint jar. Cheese cloth can be used as well. Add fresh honey to taste and stir well. Place a lid on the jar and for a better taste keep it refrigerated.
My fist jar after a couple of days of use.
I take a tablespoon a day. A pint typically lasts for two weeks. The taste is wonderful. Elderberry’s have a wide array of health benefits. I’m not sure if the elderberry syrup helps increase one’s sleep, but I have slept unusually well since I started using the syrup as a daily regimen.
I hope you enjoy this simple recipe. Feel free to comment or leave questions. For now, God bless from the mountains of Kentucky!
The leaves are beginning to turn in the mountains!
Hello, from the mountains of Kentucky. Can you feel fall in the air? Fall is one of my favorite seasons. When fall comes to the mountains, something magical happens. A carpet of beautiful foliage slowly emerges throughout the mountains. The colors are brilliant yellows, crisp oranges, and fiery reds, all mixed with hints of green lingering for a few more weeks. The foliage reminds me of my sister’s handmade quilts. My sister is a brilliant artist who creates gorgeous quilts from scrap materials of diverse colors. She is legally blind but still creates unique quilts by hand with tiny stitches. Not only is she legally blind, she is also totally colorblind. My children used to ask me if she saw things in color, just like a child to wonder. Yes, I would answer she sees in colors; she just can’t distinguish which color is which. So, her quilts come together in a stunning color scheme… just like the foliage in our mountains does in the fall.
A postage stamp quilt gifted to me by my sister. Each block is the size of an actual postage stamp!
When fall comes to the mountains, preserving and canning is usually near completion. Autumn, or fall, as we call it, is the time to go to the apple orchard to pick apples for tasty recipes, preserving, drying, and munching. We enjoyed the orchard this year as the temperature was comfortable; the crowd wasn’t as big as previous visits, and the fried apple pies were delicious. The grandkids had fun playing on the playground and games, while the adults enjoyed the atmosphere and sights. We used the apples we brought home for various dishes. Some of our favorite apple dishes during the fall include frying apples with breakfast or supper. We also peeled and dried many apples, resulting in three large containers of dehydrated apples for healthy snacks, frying, cakes, or pies. Nothing went to waste. We used all the apples, even down to the peels and cores, which the chickens enjoyed as a fall treat.
Picking applesGrandkids having fun at the orchard.
Seed saving is a common tradition within the mountains. Fall is the perfect time to save vegetable, fruit, herb, and flower seeds. The late-bearing acorn squash and peppers are the only vegetables left to be picked. We have a remnant of beans hanging on the fences drying to be used for seed next year. When collecting seeds, it is essential to use sources from plants that are healthy and produce the best vegetation or fruit. We collected seeds from the remaining vegetables and placed them on cheesecloth or white paper towels to dry. Once the seeds are dry, we put them in envelopes for storage. We recognize some sources in recycled brown jars/bottles containing organic vitamins. This is a brilliant method of recycling as well. Also, be sure to label your seeds to identify them when you’re ready to plant.
My seed box.
When fall comes to the mountains, so do pumpkins! Children and adults alike enjoy trips to the pumpkin patch to pick pumpkins, enjoy pumpkin treats, and enjoy the beauty of the mountains. Pumpkin spices and flavors are prominent in restaurants, store shelves, coffee shops, and more. Pumpkin spice is a favorite in the mountains. Many mountain families love pumpkin-flavored treats like coffee, pie, bread, butter, and cookies.
A trip to the pumpkin patch is always fun!
When fall comes to the mountains, it’s a time for family gatherings, cookouts, dinners, and a time to socialize and relax away from the world’s cares. Mountain cookouts usually have hot dogs, hamburgers, vegan burgers, marshmallows, chips, and some sides.. This is also a perfect time to include pumpkin cookies or pumpkin bread. Cookouts in the mountains are about the food and the socialization! Sitting by the campfire with loved ones, roasting marshmallows and sharing stories is the best way to enjoy fall in the Appalachian Mountains.
And finally, when fall comes to the mountains, it’s time to prepare for Thanksgiving and Christmas. Thanksgiving in the mountains is a time for family to come together for the day. Each person typically brings a side-dish to menu and everyone gathers at one house, which is typically my house. I love when all our family gathers together to relax with appetizers that consist of; my traditional cheese ball, peanut butter and chocolate buckeye candy, dips with chips, and of course banana and or pumpkin bread. We load Thanksgiving dinner with good food. Dinner usually includes the traditional dishes of turkey, usually prepared two ways. We roast one turkey in the oven and we smoke a second turkey outside in the smoker. A ham is prepared and complete with brown sugar and pineapples. The side dishes usually include mashed potatoes, green beans, fried corn, homemade cornbread stuffing/dressing, brown gravy, sweet potato casserole, and more. It’s a smorgasbord! A literal feast. Family members can be found eating around the dining room table and in the kitchen. We add tables for kids in the family room. After the dinner, dessert is available for those who have room, and those who do not! Dessert typically consists of peach cobbler, Butterfinger delight, carrot cake, cherry cheesecake, and other delicious recipes that family brings with them. Football can be found on the television and often-times, one of our favorite Christmas movies… The Christmas Story is on 24/7 on Thanksgiving and on one of the televisions. It’s also a time that most of the females are bargain shopping as the black Friday sales have begun! But, the best part of the day is the heartfelt prayer that is prayed before the meal begins, and the socializing during dinner and after. It’s a wonderful to catch up on what has been going on in the lives of our family.
When fall comes to the mountains of Kentucky… it’s more than the beautiful scenery. Fall is a time of hard work as we can preserve and clean up the garden. It’s a time of gathering seeds for the following year. Fall is a time of fellowship with friends, our church family, and our family. Fall is a time for campfires, holiday meals, and winter transition.
Late fall last year in the mountains!
I hope you’ve enjoyed this post and a little time in our small corner of the world. Feel free to follow and or comment. Get ready! I have an outstanding sweet potato recipe that I will post in a few days. You can prepare this cake vegan or non-vegan. It’s delicious. Well, let me give you a sneak peek at the cake!
Sweet potato pound cake… recipe coming soon!
For now, God bless, and happy fall from the mountains of Kentucky!
Good evening, from the mountains of Kentucky! I hope you are having a great start to your week! It’s a hot week in the mountains with temperatures soaring into the nineties. I don’t mind it. I’m savoring the last weeks of summer. With that being said, with the lingering days of summer vanishing swiftly, also comes the final rounds of canning. We have worked to stock and restock our pantry and canned goods from the harvest of our garden. Even though I wasn’t able to do much of the planting because of my hip replacement in June, I have enjoyed the labor of harvesting and canning. Let me say this: God is so good. He has truly been with me literally every step of my recovery. I am so thankful for how well I have progressed. I give Him all the glory for it. Now, to delve deeper into canning vegetable soup.
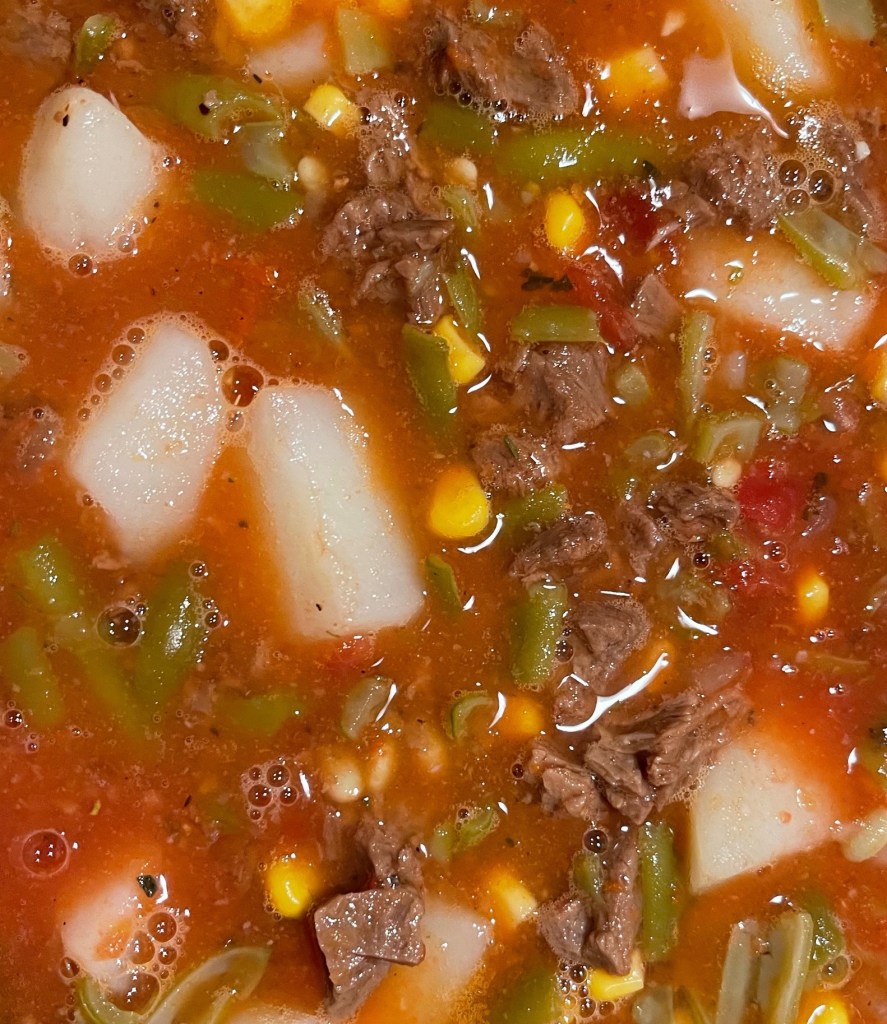
Recently, I decided I would use the lingering remnants of leftovers in our fridge and turn them into a savory vegan vegetable beef soup. You could easily change this recipe to be vegetable beef soup with real beef.
Vegan vegetable beef simmering on the stove.
Recipeingredients:
One bag of your choice of plant-based beef crumbles. I used a bag of Ultimate Beef pieces.
Half of a yellow onion
One small bell pepper of choice
One tablespoon minced garlic or fresh garlic
One cup of fresh diced tomatoes or organic canned diced tomatoes
One cup of organic vegetable broth
One tablespoon of organic extra virgin olive oil
Two cups of freshly cooked green beans or one can of organic green beans
One cup of fresh corn or one can of organic corn
One cup of frozen organic peas or one can of organic sweet peas
Four medium-size potatoes
One cup of fresh carrots or one can of organic carrots
One quart of freshly canned tomato juice or two-three cups of organic canned juice
Process:
If you are using beef, brown the beef and drain. If you are using vegan meatless meat, you can add to the onions and peppers while they are simmering.
Peel and cut potatoes to desired size. Add potatoes to saucepan of water with a pinch of salt and oil. Cook potatoes until the cut easily with fork or knife. If you’re using fresh carrots, you may either peel, slice and steam them, or cook them with the potatoes. Set potatoes aside.
Add a tablespoon of extra virgin olive oil to a large stock pot. I prefer cast iron to Teflon. Heat on low and add diced onions and peppers. Season with salt and pepper. Allow onions and peppers to become slightly translucent. Add drained beef or vegan meat and stir. I like to add a little extra seasoning at this stage to build flavor. I use a little cumin, paprika, salt, pepper, and turmeric. These are optional. After mixture is mixed well, add diced tomatoes. Drain potatoes and carrots and add to soup mixture. Stir in additional veggies to the soup mixture. Taste to season and add tomato juice. Allow soup to come to a soft boil, then reduce to low and simmer for two hours.
This soup is great served with crackers, cornbread, grilled cheese or vegan grilled cheese. Now to the canning process!
Sterilize jars, rings, and flats. Add warm soup to pint jars. This can be done in the dishwasher or by boiling them in the canne
add water to canner and warm on medium heat. Place canning funnel over pint jar, ladle warm soup into jars. Leave at least a half for head space. I like to wipe the rim of the jar, flat, and ring with a clean dish cloth or paper towel dipped in vinegar before sealing. This helps guard against possible bacteria. Place warm jars of soup in the canner and allow the water to come to a boil. When the water comes to a hard boil set the timer for thirty minutes.
when the time exhausts, turn the stove off and allow the water to simmer for about ten minutes. Remove the jars with the jar lifter. Set the jars on a dry folder to cool. As the jars cool, you should hear the coveted ping ensuring you that the jars are sealed! After the jars have cooled add the date to the lid.
This soup should have a shelf life for 18-24 months. Maybe longer! I’ve never found out as it usually lasts at my house for 10-11 months and it’s gone! This is a great soup to take along as lunch at work, if you have access to a microwave or one of the lunch size crock pots. It’s great for those nights when you don’t feel like cooking. It’s great served with cornbread or crackers. I personally love it with a vegan grilled cheese sandwich. You be the desired!
Don’t forget to add the date to the lids!
I hope you enjoy this soup as much as we do. Feel free to leave a comment or ask a question. As always, feel free to follow for more recipes and canning ideas. For now, God bless from the mountains of Kentucky! Thank you for stopping by my blog! Every reader is appreciated!
Hello, from the mountains of Kentucky. It’s been a bit stormy here today. Days like today make me want to curl up with a good book and read all day. In reality, that isn’t always possible, especially with the academic year about to begin. Our first day back on campus is only a couple of weeks away. Where did summer go?
With the abundance of cucumbers that it seems everyone has been blessed with this summer, I thought I should share my dill pickle recipe. Who doesn’t like a crispy dill pickle on their sandwich or on the side? Dills are great in potato salad, salads, on burgers, and I especially like them on a vegan chicken sandwich.
Ingredients:
4-5 pounds of pickling cucumbers 8 teaspoons of dill seeds 4 teaspoons of mustard seeds 5 cloves of whole garlic 8 teaspoons of whole peppercorns 4 cups of water 3 cups of white vinegar (5% acidity) 4 tablespoons of pickling salt or kosher salt 4 tablespoons of white sugar 8 teaspoons of pickle crisp 8 sprigs of fresh dill
Tools:
Water bath canner Jar lifter funnel Measuring cup Pint jars, rings, and flats A large stock pot
Process:
1. Boil jars, flats, and rings to sterilize them and also to safeguard your pickles from bacteria. Next, prepare your cucumbers by washing them. I like to scrub them to remove the sticky little ends of the skins. This also makes the skin of the cucumber smoother. Trim the ends of the cucumbers. Make sure to remove the flowering end. This end of the cucumber contains an enzyme that can soften the cucumber over time.
2. Prepare the brine by adding sugar, salt, and vinegar to the stockpot and bring to a slow boil. While you wait for the brine to boil, combine the pickling spices and add them in equal parts to the jars. Do not add the pickle crip to the spices. Add a sprig of fresh dill to each jar then add your cucumbers. You can slice them in either direction or slice them into spears. They’re also good as whole pickles, especially if the cucumbers are small ones.
3. Keep an eye on your brine. Once the salt and sugar have dissolved, place the funnel in the jars and pour the hot brine over the cucumbers, leaving at least a half inch from the rim. Add a teaspoon of pickle crip to each jar. Wipe the rims to ensure the rims with a dry cloth or paper towel. Add the flat and ring, but not too tight.
4. Add the jars to the canner and add warm water until the water is at least an inch or two above the jar lids. Slowly bring the water in the canner to a boil. Boil for ten minutes. Turn the stove off and leave the jars until the water settles down and then remove the jars with the jar lifter. Place the jars on a dry folded towel on a flat surface and wait for the sounds of the pinging jars to seal. Once the jars have cooled, add the date to the lids.
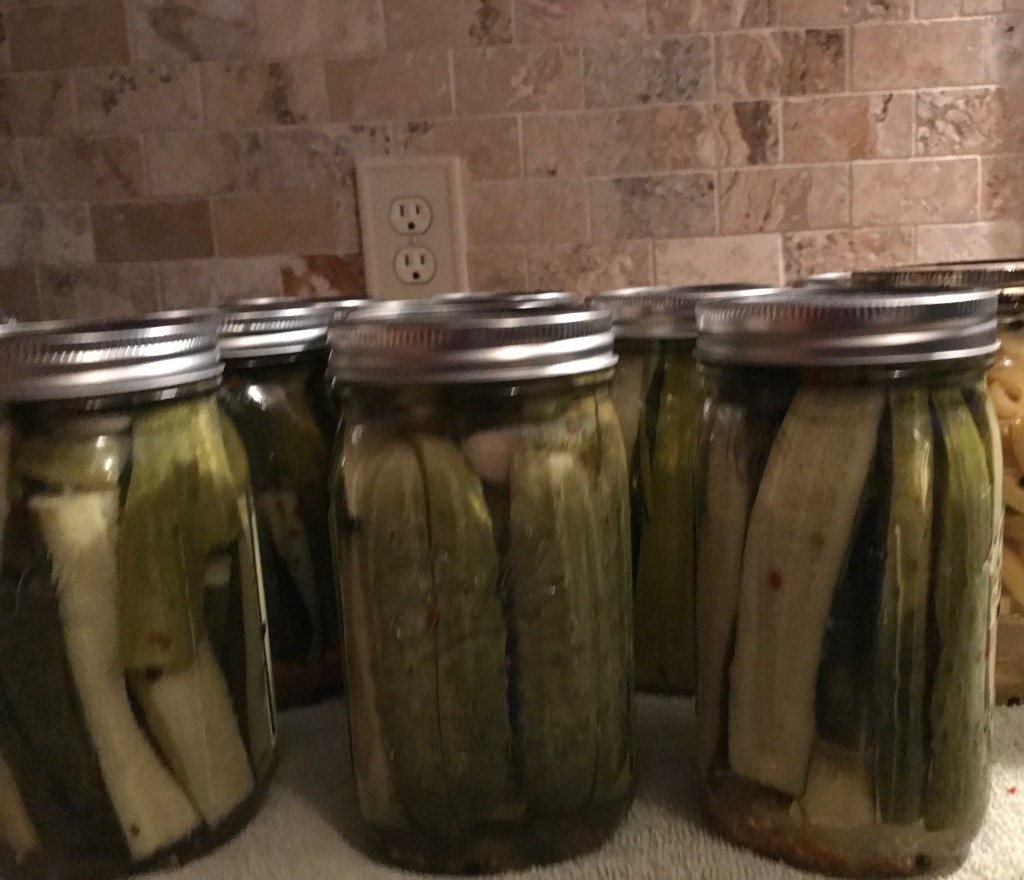
This recipe typically makes eight pints of pickles x. You can double the ingredients for quarts or for more pints. The projected shelf life of the pickle is typically one to two years. However, I have opened a jar beyond this timeframe and the pickles were still great. One of the keys to a longer shelf life is to ensure the vinegar is at least 5% acidity.
This is a pictures of sliced dill pickles in quart jars.
I hope you and your family love this recipe as much as we do. As always, feel free to follow or comment. For now, God bless, from the mountains of Kentucky.
Hello, from the mountains of Kentucky. Quick update on my recovery; Tuesday was week four since I had a total hip replacement. Let me say how good God is. I never encountered the pain that I was told I would have after surgery. Pain medicine was not required, for which I was happy. I don’t like to take medicines due to their negative side-effects on my body. I am in week four of physical therapy and walking without any assistance. I have exceeded the expectations of my surgeon and my therapist. Praise God, I feel better than I’ve felt in several years. I am resuming daily walking, a high-plant-protein diet, and loving time working in my herb garden. I am not yet working in the vegetable garden due to not being released to bend deeply or kneel. But, I have been canning! I should be ready to work in the garden when it’s harvest time. God is so good and He is ever-present. Now, onto the post! I just couldn’t help but brag about our God.
Fresh basil, oregano, and rosemary clipper today..
I’ve been cutting and harvesting herbs this morning and now I have a 1/4 bushel of peaches facing me. So, what do you do when you have this yummy fruit. The answer is to preserve for those cold winter days when the fruit-bearing season is over. I like to freeze peaches in small servings for oatmeal, as a healthy side of fruit, and for a quick serving of sorbet. But, today, I am planning for the uncertain days that lie ahead of us. With the prices of food in the grocery store, it’s a treat to walk downstairs and select home-canned food for supper and fresh canned peaches for a sweet treat. Now, let’s can those peaches!
Fresh peaches ready for canning!
Ingredients for Light Peaches:
1/4 quarter of fresh peaches
12 cups of water (bottled or filtered water is best)
2 cup of organic cane sugar (you may substitute with white sugar or honey)
Tools for Canning:
Stove Top Water Bath Canner
7-quart jars with rings and flats
Jar lifters to remove jars from the canner.
Canning funnel to make filling jars easier.
Stainless steel ladle for adding the simple syrup to jars.
Process:
Boiling jars, rings, and flats ensure safe canning.
Boil jars, rings, and flats and set aside. Mix the water and sugar in a stainless steel cooker. I have gotten away from all non-stick cookware and prefer stainless, glass, or cast iron. Place over medium heat and bring to a slow soft boil.
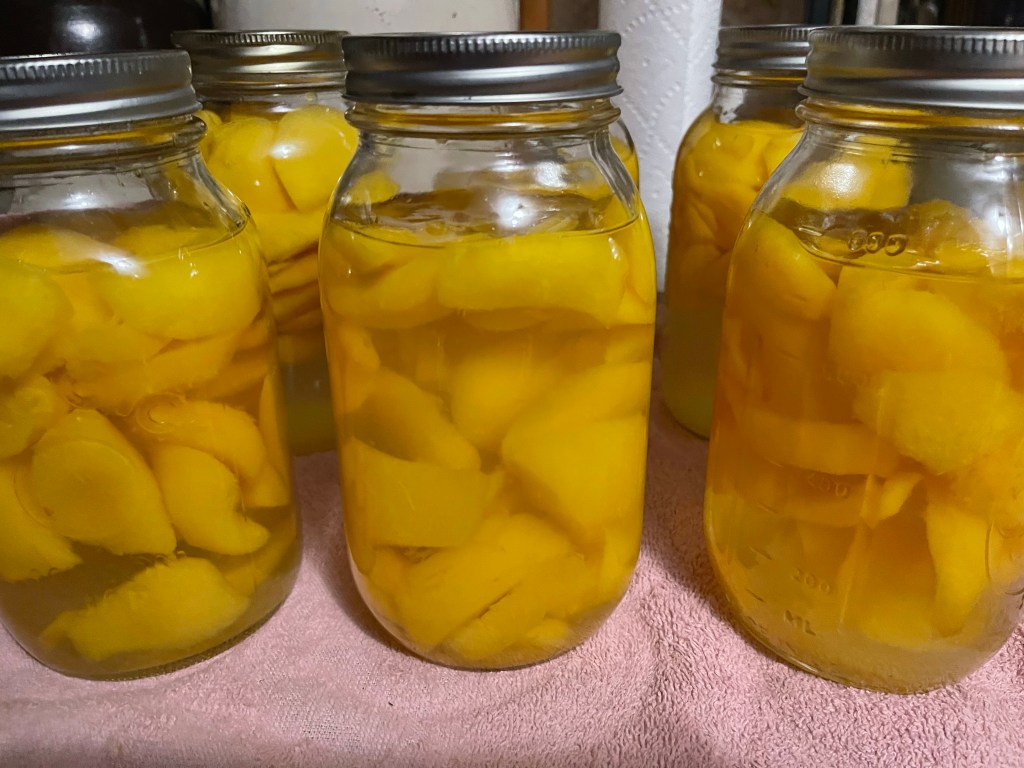
Peel the peaches and slice them to your preferred thickness. Add the peach slices to the clean jars not filling them. I like to leave room for more syrup. Place the canning funnel in the mouth of the jar and ladle the simple syrup into the jars leaving at least an inch space at the top. Wipe the rims thoroughly and place the sterilized flats and rings on the jars. Don’t tighten the rings too tight. Add hot water to the canner and place on top of the stove on medium to high heat. Place the jars in the canner. Make sure the water is at least an inch above the sealed jars. Slowly bring the water in the canner to a boil. When the water begins boiling set your timer for 25 minutes.
We don’t fill the jars to the top to allow for more syrup. Adding the simple syrup!
When the twenty-five minutes have exhausted, turn the stove off. Leave the peaches in the water for five to six minutes allowing the water to stop boiling. Using the jar lifters, carefully remove the jars of peaches from the canner. I like to place my jars on a folded towel on the counter. You should begin to hear the jars making that pinging sound to let you know the jars have sealed. Once the jars have cooled add the date to the flat with a permanent marker. After the jars have completely cooled, add the beautiful fruit to your pantry shelves. Don’t worry if your peaches have floated to the top. They’re still delicious, this happens when you do not pre-cook the peaches (raw pack) before canning them. Raw packing peaches is the easiest method of canning and does not require you to handle hot peaches. The shelf life is typically 12-18 months. I have found that the shelf life of this type raw packed peaches has lasted for two years, if the jars of peaches last that long. I also like to peel them and freeze them! Either way, results in delicious peaches year around.
Seven quarts of deliciousness!
I hope that you have enjoyed this post and will enjoy my method of preserving peaches during this uncertain time of the rise in prices and in some cases the lack of food on the shelves in many grocery stores. Canning your own food is one of the most rewarding experiences and benefits that you can encounter. If this is your first time canning and or preserving, stay the course, chin up, there will be failures and there will be successes, we’ve all experienced them both. Trust me, the good outweighs the bad. When the snow is flying, you’ll have delicious home-grown food awaiting you in your pantry.
God bless from the mountains of Kentucky. As always, feel free to follow my blog, and know that your comments are always welcome.
John 1:1 King James Version 1 In thebeginning was the Word, and the Word was with God, and the Word was God.