Hello, from the mountains of Kentucky! It’s a rainy day in the mountains, which always puts me in the cooking and cleaning mood! So, today I decided to begin cleaning the pantry out and realized that I had an abundance of oats and nuts that I needed to do something with. I went down a rabbit hole and started planning granola! The pantry didn’t get cleaned completely, but I did make some delicious granola! I hope you and your family enjoy this recipe as much as we do.
Ingredients:
Three cups of organic old fashioned oats
1/2 cup organic chopped walnuts
1/2 cup organic chopped almonds
1/2 cup organic chopped pecans
3 tbs organic raw pumpkin seeds
2 tbs organic sunflower seeds
1 tbs organic chia seeds
2 tbs organic ground flax seeds
3 tbs gogi berries or raisins
1/2 tsp pink Himalayan salt
1/2 cup of organic pure maple syrup or honey
1/2 cup smooth organic peanut butter
1/2 cup organic olive oil
Agave or honey for drizzling not mixing.
Mix all the dry ingredients and preheat the oven to 320 for convection. Mix the remaining ingredients over low heat until it comes together smoothly. Pour the wet ingredient into the bowl of dry and gently stir with a rubber spatula. When mixed spread out on a parchment lined baking sheet. Spread evenly and bake for 20 minutes. Remove and mix the granola with a metal spatula. Return to the oven and bake 20 more minutes. Take out of the oven and drizzle your choice of honey or agave and put under the broiler for just enough time for the granola to brown up lightly. Remove from the oven and allow it to cool completely on a wire rack.
Mixing the ingredients.Spreading the granola in a baking sheet.
Using the spatial mix the granola gently once it’s cool. Store the granola in a glass jar. Keeps for a couple of weeks if it is in an air tight container.
This is a two gallon jar! I’ve got another batch of granola to add to it.
I hope your family enjoys this tasty granola. I think it’s great alone as a snack and wonderful in a parfait. I also like it in a bowl with almond milk as a cereal.
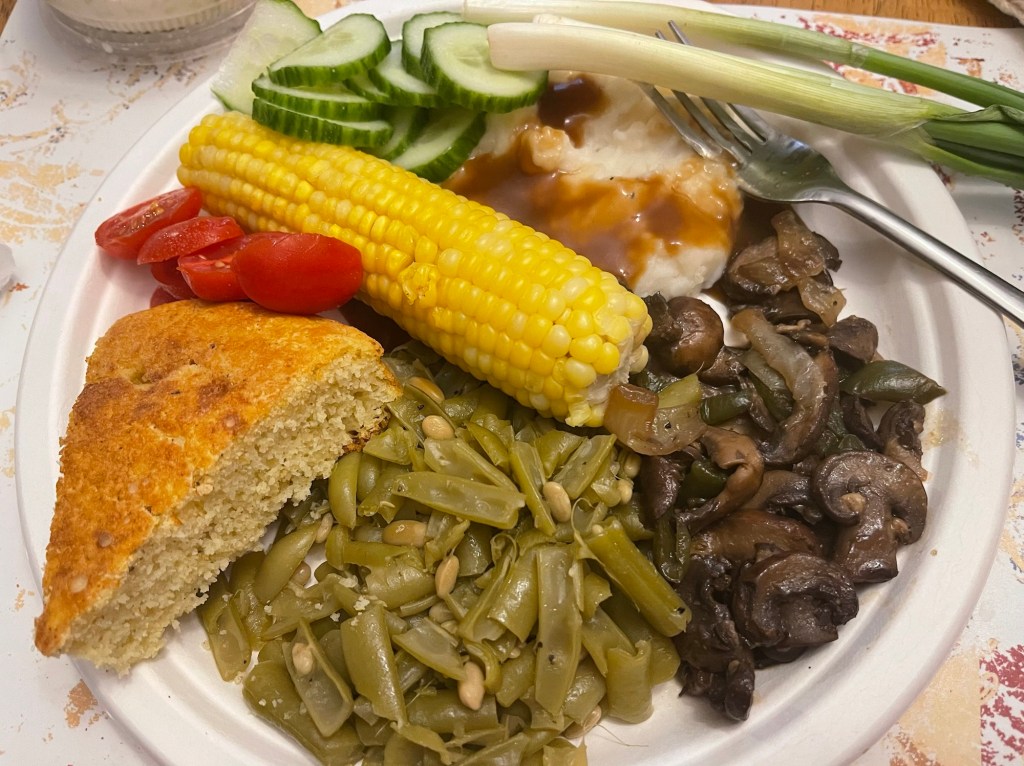
Dinner
Just for fun! A picture of dinner this evening. Fresh beans, corn, potatoes, onions, cucumbers and tomatoes with sautéed portobello mushrooms with peppers and onions and a slice of cornbread. Nothing better than veggies from our garden!
For now, God bless from the mountains of Kentucky! Don’t forget to like, comment, and or follow! We
Good morning from the mountains of Kentucky! I hope your day is a blessed one. I am excited to bring to you my new spinach wrap recipe that I’ve been working with for a couple of weeks. Saturday’s wraps were the success that I’ve been working toward! I hope you enjoy them as much as we do!
Ingredients:
3 cups fresh organic baby spinach
3 cups all-purpose flour (I prefer King Arthur unbleached or wheat)
1 1/2 teaspoon pink Himalayan salt
3-4 tablespoons organic extra virgin olive oil
1/3 cup cold filtered water (this can be modified if needed)
1 teaspoon fresh ground oregano
1 teaspoon fresh ground basil
1 teaspoon fresh ground parsley
1/2 teaspoon fresh ground black pepper
1/2 teaspoon organic ground garlic
Add one cup of spinach and one cup of flour to a food processor dicing it to allow room for an additional cup of each. Dice again and add the remaining spinach and flour. Add spices, and process adding oil slowly as the mixture mixes. Add water until you have a dough consistency. Sometimes the amount of water varies. Only add what you need. If the mixture is too wet, add an additional spoon of flour and mix. You can’t go wrong on this mixture if you achieve a doughy consistency. You can play with the oil as well. If you need more, add a tiny bit.
Fresh spinach is the best!!
Preheat a cast iron skillet. I use ceramic cast iron for this and it works great. Add a tiny spray of organic extra virgin olive oil to the pan to heat. While the pan is heating spoon out a large spoon of the mixture onto a floured dough sheet or parchment paper. Using flour on your hands roll the dough into a ball and then begin rolling the dough flat.
Ball of spinach dough.Second rolling of the wrap.
A second rolling of the wrap ensures the desired thickness of the wrap. You can sprinkle flour over the wrap to prevent it from sticking. Once you have achieved the desired thickness, lay your bread in the hot pan. It only takes about 1 1/2 minutes per side. While my bread is browning, I usually roll another piece of dough. Parchment paper, coffee filters, cheese cloth, or white paper towels between the wraps will help prevent them from sticking until they’re cooled.
Preparing the wrap! This is the thickness that I like!
Remove the bread and place on your choice of liner. Once the wraps are completely cooled, I place mine in an airtight container and keep them in the fridge for fresheners. This recipe usually yields eight to nine wraps. They taste great warmed with fresh veggies, a smear of peanut butter, as a side for Italian dishes, and extremely good with no dairy cheese melted on them.
You may substitute seasonings for Mexican seasonings, plain with a little salt and pepper, or with curry seasonings. The possibilities are endless. I hope you enjoy these as much as we do. I look forward to posting new wraps. I am currently working on a high fiber flax wrap. I would love to hear how you eat yours! Feel free to like, share, comment and follow. For now, God bless from the mountains of Kentucky!
Hello from the mountains of Kentucky! I am super excited to share a new recipe that I have been experimenting with and finally perfected it last week. I love a good moist banana bread. I have tried several vegan recipes with little to no luck with the right amount of moisture and sweetness. This recipe fits the bill for both. It’s quick, easy, and requires minimal ingredients and those that you probably already have in your pantry. It’s also delicious with a cup of hot tea!
Ingredients:
One large overly ripe organic banana or two small overripe bananas
2 cups all purpose flour (I like King Arthur’s unbleached flour)
1/2 tsp pink organic Himalayan salt
1/2 tsp anti-caking organic baking soda
1/2 tsp organic all spice
3/4 cup organic cane sugar
1/2 cup almond milk
1 tsp good quality Non-GMO vanilla extract
1 tsp organic apple cider vinegar
1/2 cup unsweetened applesauce
1/2 cup chopped organic walnuts
Add in options can be; chocolate chips, pecans, raisins, or cranberries.
Process:
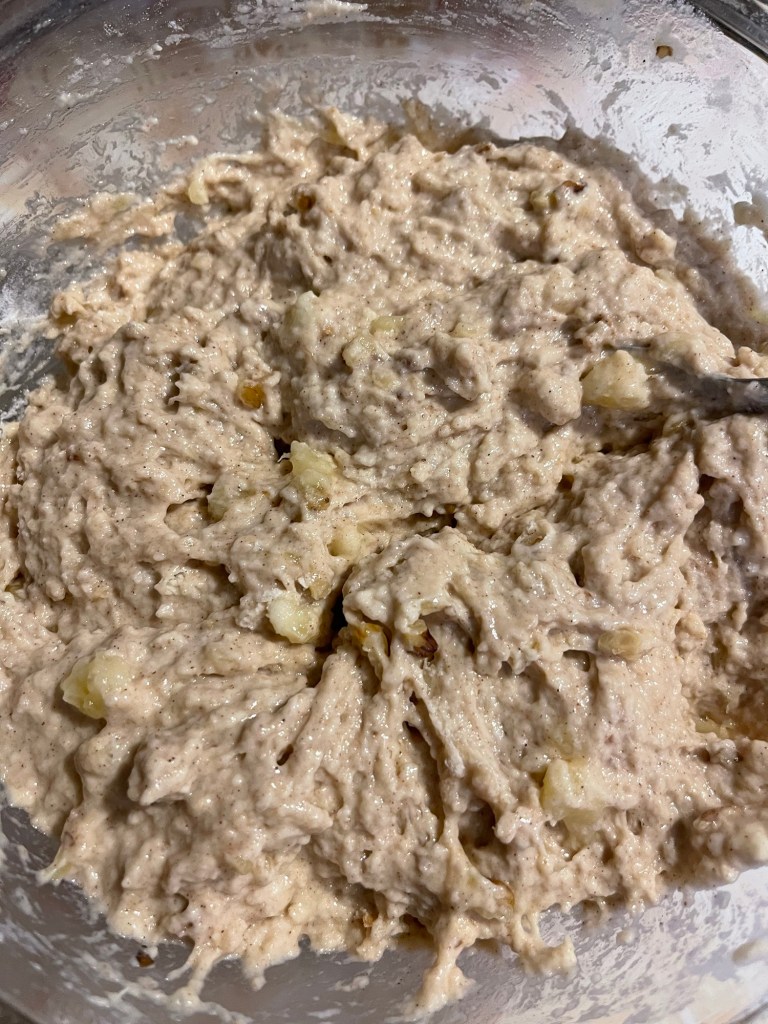
Preheat oven to 350 degrees. Spray or butter a glass 8×8 baking dish. Line it with parchment paper and then spray or butter the paper.
Mash the banana, vanilla, and sugar and mix well. Add salt, baking soda, flour, vinegar, and applesauce and fold the ingredients together without overmixing. Add the milk a little at a time and until the batter well. Fold in the walnuts. Add the bread mixture to the lined glass baking dish. I baked my bread for 45 minutes. I checked it at 30 minutes and determined it needed fifteen more minutes to be baked through and through.
Mixed ingredients
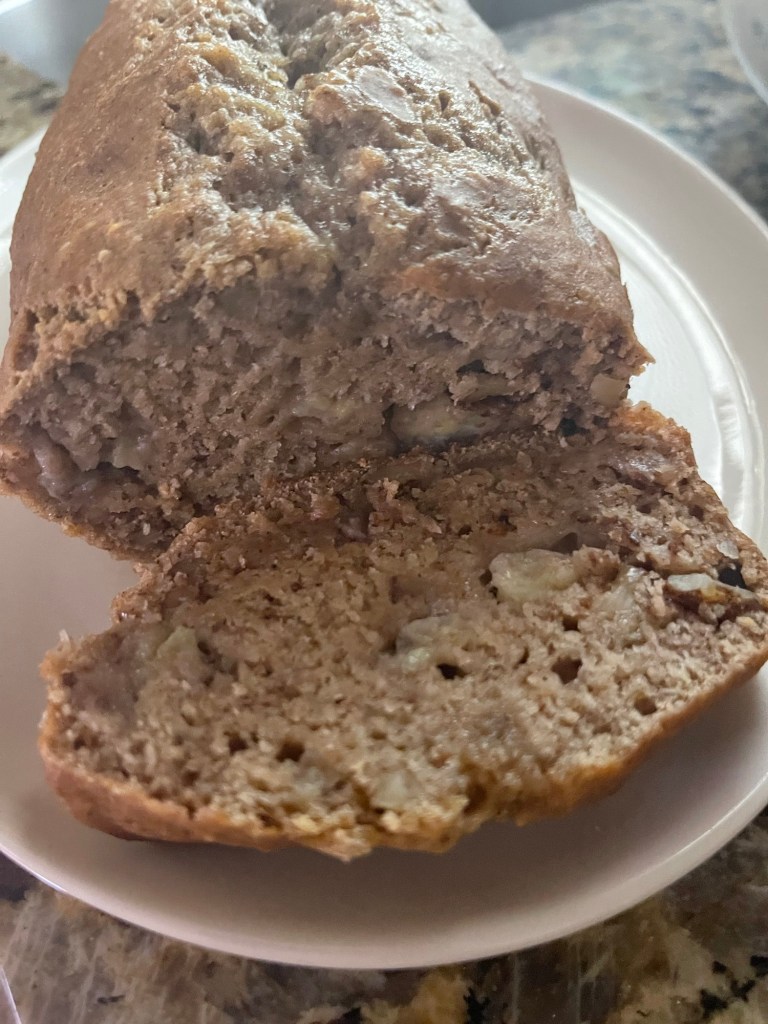
I removed my bread from the parchment paper and set it on a baking rack to cool for thirty minutes. Once the bread was cooled, I placed it in an airtight container. I have enjoyed this bread all week as a snack with my lunch, toasted for a light breakfast, and in the evenings with coffee or tea. It is tasty, moist, and not overly sweet but flavorful.
You may add more sugar or even honey for a little more sweetness. If you’re not a fan of walnuts, pecans are a great substitute. I like to toast this bread for breakfast. It’s delicious with a smear of honey or plant butter. Unsweetened dark chocolate chips are a great addition as well. Either way you eat it, as breakfast, a snack, or dessert, it’s a delicious bread.
For now, God bless from the mountains of Kentucky. Feel free to comment, like, and subscribe. I look forward to hearing from you.
Good morning from the mountains of Kentucky. It’s a peaceful morning here with a slow drizzle falling softly to the greening earth. Spring is just around the corner and we are seeing glimpses of it daily. The yellow buttercups are in full bloom, spring onions are ready to be enjoyed with meals, and the peepers are alerting everyone of the presence in late evening hours. Daylight is lingering into the evening hours extending the day just a bit longer. In Kentucky we know that these wonderful signs of spring does not mean that winter will not rear it’s head until next winter. On the contrary. We will endure our season winters in upcoming weeks, but they don’t last. So, with that being said, let’s get on with food prepping for the week.
Breakfast:
Being that I follow a plant-based diet, I am preparing a tofu veggie scramble that can be enjoyed with fresh bread as toast, or on a wrap when eating on the go. If you do not follow a plant-based diet (vegan) you can simply use fresh eggs in place of the tofu. You can find my link for tofu scramble at Scrambled Tofu and Spring Daydreams This tofu scramble lasts for days in a covered dish in the refrigerator.
Tofu veggie scramble
Bread:
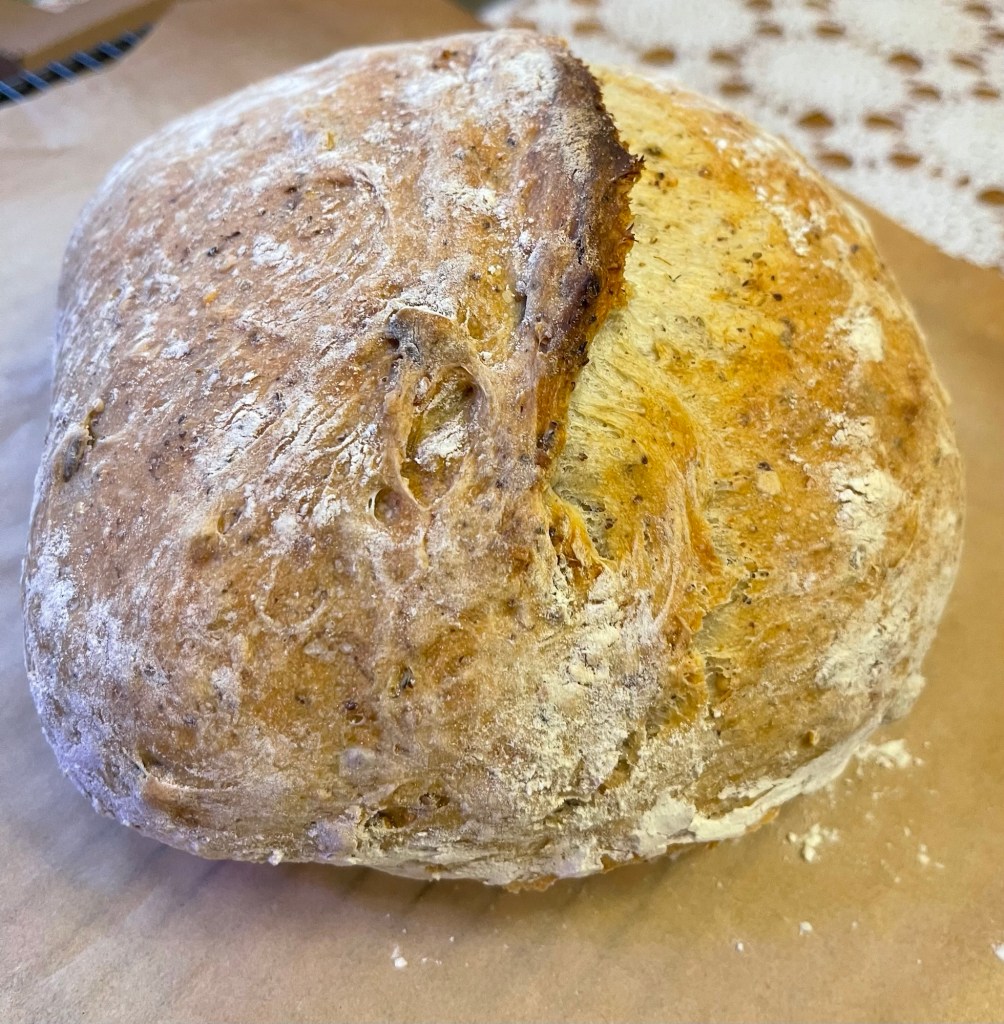
I posted a link last week for fresh bread. This loaf was enough bread for seven days of delicious eating whether it was for toast, sandwiches, as a bread with a meal, or simply bread and plant butter or with honey. You can find my bread recipe at Give Us This Day Our Daily Bread This bread is easy and delicious and contain only four to five ingredients depending on your preference. I store my bread with wax paper first, then cover the waxed paper with aluminum foil. I am searching for a good BPA bread keeper. If you know of one, feel free to drop a comment!
Fresh baked organic bread.
Taco Soup:
For an easy and convenient supper this week, I am preparing plant-based taco soup. Again, if you do not follow a vegan diet, you may substitute my recipe for chili with meat. I chose taco soup this week because of its versatility, and it mimics a good chili soup. I can have soup one night, or two, and have taco salads another night, or two, or burritos. Taco soup can become multiple dishes. As soup, I enjoy it with a plant-based grilled cheese, or with homemade bread, or even with some of my daughters homemade sour dough crackers! It stores in the fridge easy, travels to work well, and lasts for days covered in the fridge. If I have leftover soup, I use my small canner and can a jar or freeze a bag for a later time. You can find my plant-based taco soup recipe at Three Bean Plant Based Taco Soup
Plant-based taco soup
Rice as a Side:
Rice is so versatile that it can be included with breakfast, as a side, or even added to the taco soup or taco salad. I use the insta pot to make a batch of brown rice for the week. I add the measurement according to the bag, except I prepare my rice in vegetable stock. I add chop a half an onion fine, add chopped peppers of choice, and add a heaping spoon of salsa. I add a teaspoon of each of the following; garlic, pink salt, black pepper, white pepper, and paprika. I add a half teaspoon of cumin, cayenne and turmeric. Cover and pressure for ten minutes. I allow my rice to sit in the pot until the steak self-releases as this helps ensure a good texture. Fluff the rice and store in a coveted bowl in the fridge.
Snacks:
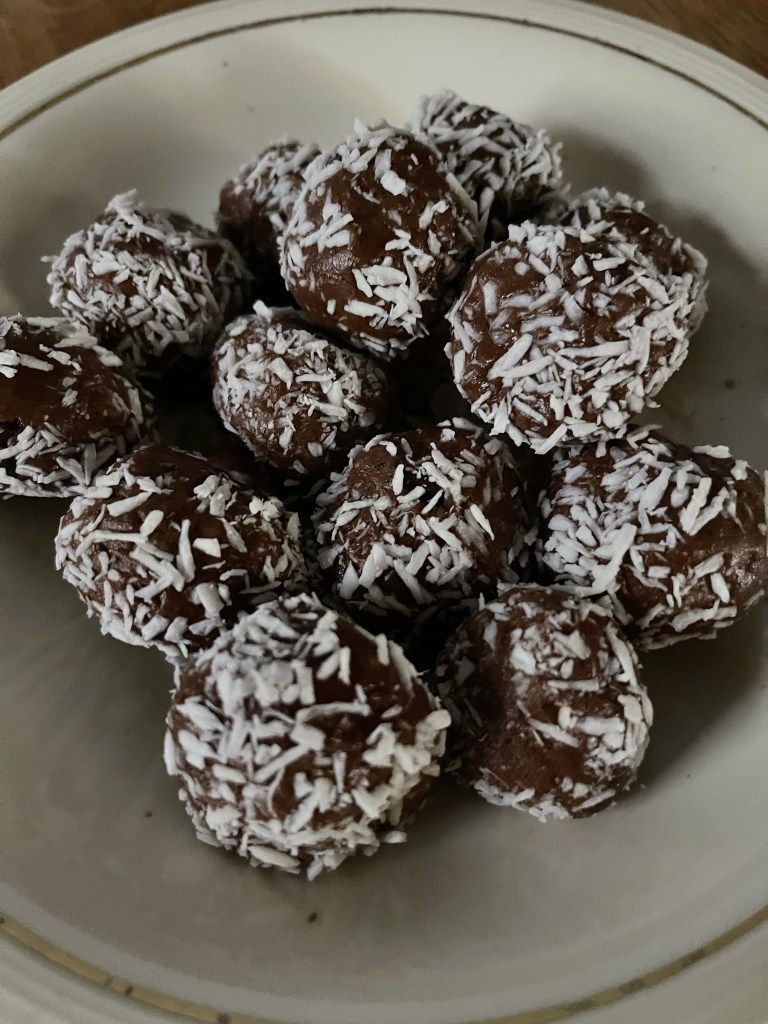
Snacks are easy to prep. Today I will be prepare vegan protein balls. The protein balls are sweet, delicious, travel well with me to work, and make a light late evening snack. You can find the recipe at the following link Vegan Chocolate Chip Coconut Protein Bites I am planning on baking zucchini bread this weekend as well. It’s a great choice as it allows me to have a second option for breakfast as well. You can fine one of my zucchini bread recipes at the following link Clean Apple Zucchini Bread
Protein balls
I have found that prepping for the week alleviates stress of trying to figure out what to eat, makes mornings much smoother when packing lunch for work, and allows me to have more time in the evenings as supper is basically prepared. But one of the greatest benefits of prepping for the week is it eliminates eating out, it ensures that I am eating healthy, and saves money on our food budget. It’s a win win situation that when carefully done can make a huge difference in your week. I also enjoy our daughter in-laws baked goods. You can access her shop and order on the following link https://bakesy.shop/b/batch-baked-goods
I hope you enjoy the recipes that are linked the post. Feel free to subscribe and share with friends and family. Also, comments are welcomed. God bless from the mountains of Kentucky! I am off to retrieve some spring onions to add to our supper.
Good morning from the mountains of Kentucky. It’s official! We are 22 days away from spring 2024. I am eager to say that I am very happy about that! When the butter cups are blooming, daylight lasts a little longer, and the birds are singing early in the morning, I begin to have spring fever. I am ready to sow seeds, plant crops, and enjoy the sunshine on my face. I am eager to share a new bread recipe with you that is clean, easy, and tastes delicious. But first, I would like to ask if you have ever looked at the list of ingredients on bread you buy from the grocery store? The ingredients are numerous and many that I can’t pronounce or have to search the internet to determine what they are. This is scary to say the least. Even most of the breads that are labeled as organic contains a long list of ingredients. The recipe that I am sharing today has basically five organic ingredients, of which one is water. Are you ready to take control of what you put inside your body? Let’s get started!
Ingredients:
3 1/2 cups of organic, unbleached all-purpose flour (I like King Arthur’s)
1 1/2 cups of warm filtered water 75 degrees
1 1/2 teaspoons of aluminum-free sea salt or pink Himalayan salt
2 teaspoons of organic non-caking yeast
1/4 to 1/2 cup of organic seeds of choice. I used pumpkin, flax, and hemp seeds. (This is optional)
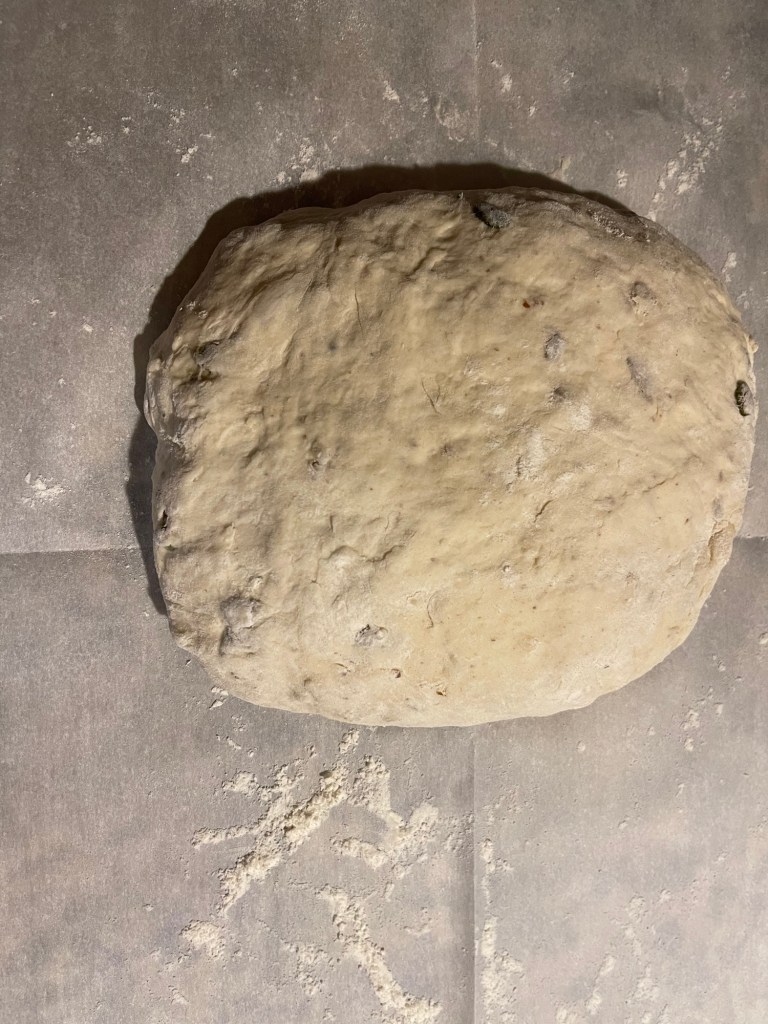
In a large glass mixing bowl mix the dry ingredients and add warm water slowly stirring as you add the water. I like to add the yeast to the warm water to help activate it and then add the water to the mix. I also like to mix by hand, but a stand mixer with a dough hook can be used. Gently fold in the seeds of choice. Once the dough is mixed set the bowl aside in a warm place and cover the bowl with a clean dish cloth. Let rise for two hours.
Freshly folded dough awaiting the oven to heat.
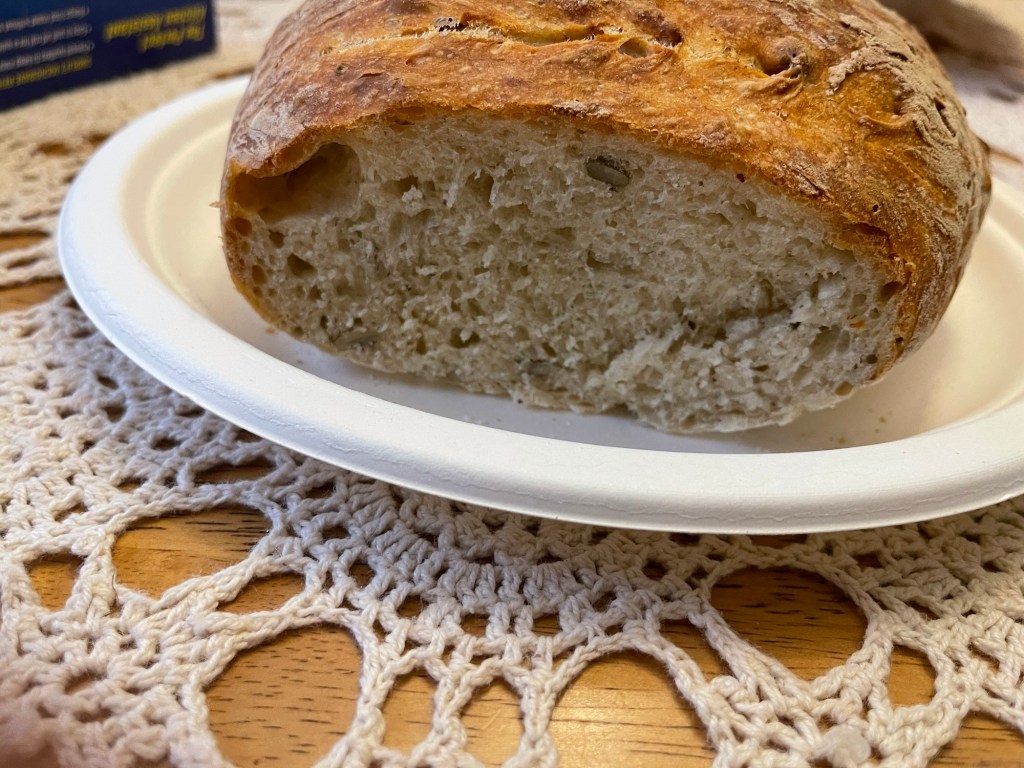
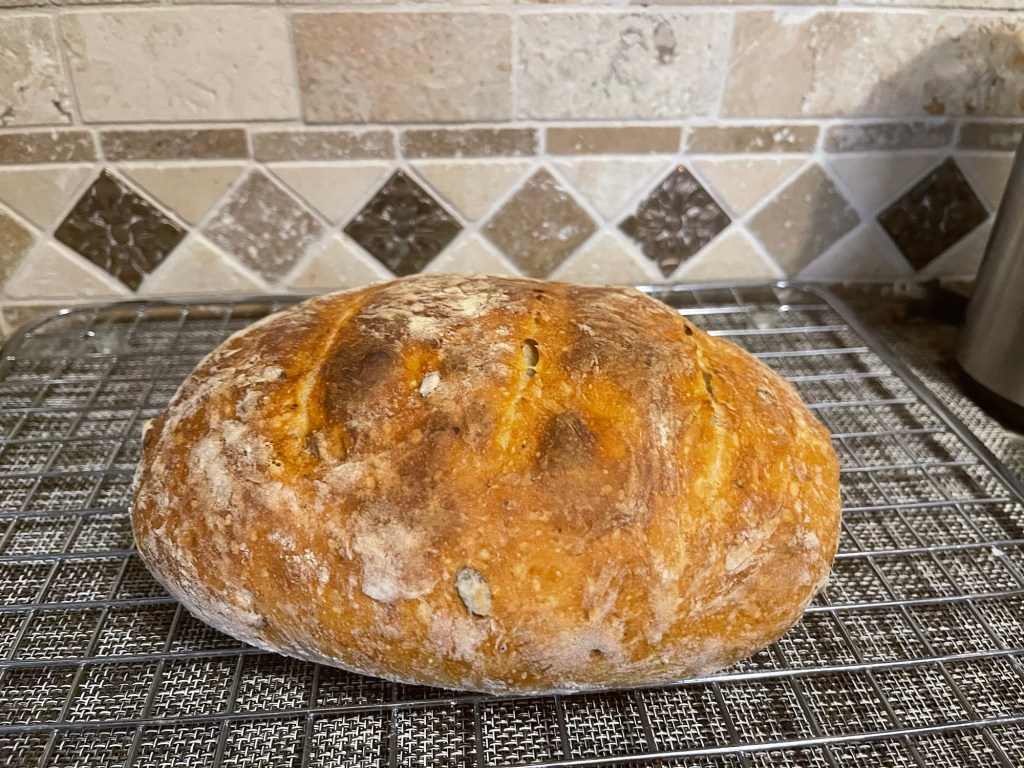
After two hours, turn your dough out onto a floured parchment paper or floured wood cutting board. Fold the dough each way into itself. Shape it into the shape the desired shape that you prefer your bread. Lightly dust a stone pizza stone and place it on the oven rack that you will bake your bread on. Preheat the oven and the pizza stone to 450 degrees. Add about two inches of water to a shallow glass cooking dish and place on the rack beneath the rack you’re going to bake the bread on. This will help your bread have a crispy exterior on top and a soft bottom. Allow your bread to continue to rise while the oven and stone are preheating. When the oven is preheated, score the top of the bread three to four times with a serrated knife. Remove the hot stone and carefully remove the dough and place it on the the hot stone. Bake for 25- 30 minutes, depending on how crusty you like your bread.
Fresh bread just out of the screaming hot oven still on the baking stone.
This bread can be made from wheat flour if desired or oat flour. The seeds are optional and can be exchanged for other seeds, or left out of the recipe. You may bake this bread in a preheated covered cast iron Dutch oven that is lined with parchment paper before adding the dough, or you may divide the dough into two small loaf pans.
Once the bread has baked transfer to a cooling rack and allow to completely cook before cutting. Sharp serrated bread knifes are great to cut the bread. This bread makes great sandwich bread, toast, French toast, as a side to supper dishes, toasted as crusty bread, or buttered as is. The inside is soft and airy and delicious. I love the texture of the baked pumpkin seeds within the bread. The possibilities are vast!
Cooling on the wire rack.
I hope you and your family enjoy this recipe. Every time I bake, I am reminded of one of my favorite components of the Lord’s Prayer.
Matthew 6:11 Give us this day our daily bread. (KJV)
The top is crusty, the bottom soft, and inside is airy. It’s delicious!
We should focus on this day, not days that have past, nor days that haven’t yet arrived. If we keep our focus on, this day, we do not get caught up in the what ifs, from yesterdays, or the what wills, of tomorrows. Keeping our focus on the Lord for this day encourages us to rely on Him more completely.
God bless, from the mountains of Kentucky. I welcome Feel feedback and or questions.
Hello, from the mountains of Kentucky. Quick update on my recovery; Tuesday was week four since I had a total hip replacement. Let me say how good God is. I never encountered the pain that I was told I would have after surgery. Pain medicine was not required, for which I was happy. I don’t like to take medicines due to their negative side-effects on my body. I am in week four of physical therapy and walking without any assistance. I have exceeded the expectations of my surgeon and my therapist. Praise God, I feel better than I’ve felt in several years. I am resuming daily walking, a high-plant-protein diet, and loving time working in my herb garden. I am not yet working in the vegetable garden due to not being released to bend deeply or kneel. But, I have been canning! I should be ready to work in the garden when it’s harvest time. God is so good and He is ever-present. Now, onto the post! I just couldn’t help but brag about our God.
Fresh basil, oregano, and rosemary clipper today..
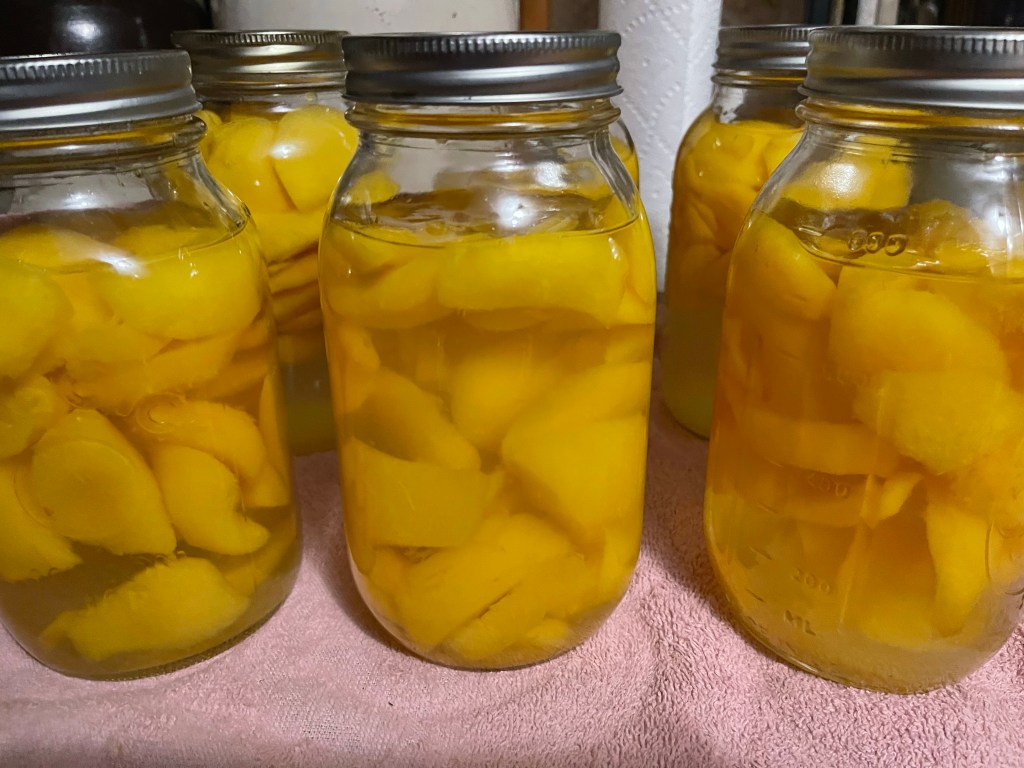
I’ve been cutting and harvesting herbs this morning and now I have a 1/4 bushel of peaches facing me. So, what do you do when you have this yummy fruit. The answer is to preserve for those cold winter days when the fruit-bearing season is over. I like to freeze peaches in small servings for oatmeal, as a healthy side of fruit, and for a quick serving of sorbet. But, today, I am planning for the uncertain days that lie ahead of us. With the prices of food in the grocery store, it’s a treat to walk downstairs and select home-canned food for supper and fresh canned peaches for a sweet treat. Now, let’s can those peaches!
Fresh peaches ready for canning!
Ingredients for Light Peaches:
1/4 quarter of fresh peaches
12 cups of water (bottled or filtered water is best)
2 cup of organic cane sugar (you may substitute with white sugar or honey)
Tools for Canning:
Stove Top Water Bath Canner
7-quart jars with rings and flats
Jar lifters to remove jars from the canner.
Canning funnel to make filling jars easier.
Stainless steel ladle for adding the simple syrup to jars.
Process:
Boiling jars, rings, and flats ensure safe canning.
Boil jars, rings, and flats and set aside. Mix the water and sugar in a stainless steel cooker. I have gotten away from all non-stick cookware and prefer stainless, glass, or cast iron. Place over medium heat and bring to a slow soft boil.
Peel the peaches and slice them to your preferred thickness. Add the peach slices to the clean jars not filling them. I like to leave room for more syrup. Place the canning funnel in the mouth of the jar and ladle the simple syrup into the jars leaving at least an inch space at the top. Wipe the rims thoroughly and place the sterilized flats and rings on the jars. Don’t tighten the rings too tight. Add hot water to the canner and place on top of the stove on medium to high heat. Place the jars in the canner. Make sure the water is at least an inch above the sealed jars. Slowly bring the water in the canner to a boil. When the water begins boiling set your timer for 25 minutes.
We don’t fill the jars to the top to allow for more syrup. Adding the simple syrup!
When the twenty-five minutes have exhausted, turn the stove off. Leave the peaches in the water for five to six minutes allowing the water to stop boiling. Using the jar lifters, carefully remove the jars of peaches from the canner. I like to place my jars on a folded towel on the counter. You should begin to hear the jars making that pinging sound to let you know the jars have sealed. Once the jars have cooled add the date to the flat with a permanent marker. After the jars have completely cooled, add the beautiful fruit to your pantry shelves. Don’t worry if your peaches have floated to the top. They’re still delicious, this happens when you do not pre-cook the peaches (raw pack) before canning them. Raw packing peaches is the easiest method of canning and does not require you to handle hot peaches. The shelf life is typically 12-18 months. I have found that the shelf life of this type raw packed peaches has lasted for two years, if the jars of peaches last that long. I also like to peel them and freeze them! Either way, results in delicious peaches year around.
Seven quarts of deliciousness!
I hope that you have enjoyed this post and will enjoy my method of preserving peaches during this uncertain time of the rise in prices and in some cases the lack of food on the shelves in many grocery stores. Canning your own food is one of the most rewarding experiences and benefits that you can encounter. If this is your first time canning and or preserving, stay the course, chin up, there will be failures and there will be successes, we’ve all experienced them both. Trust me, the good outweighs the bad. When the snow is flying, you’ll have delicious home-grown food awaiting you in your pantry.
God bless from the mountains of Kentucky. As always, feel free to follow my blog, and know that your comments are always welcome.
John 1:1 King James Version 1 In thebeginning was the Word, and the Word was with God, and the Word was God.
Hello, from the mountains of Kentucky! I hope you are having a wonderful day. Things have been quite hectic in our neck of the woods! As a college professor this is one of the busiest times of the year as we are deep into the fall semester. Each year brings growth and change, which are both welcomed, but not always easy. As famers, life has been extremely hectic as we are harvesting, preserving , and canning the remnants of our garden. As a part of a church family, it’s been a busy time of growth, and a sense of urgency to pray more for our country and family than ever before. We’ve also felt the need to preserve and can more than in years past. With that sense of urgency, we’ve actively been growing our pantry, and stocking our shelves with a little more than usual this year.
Making time for self-care, especially when life gets crazy is a must. I have found that taking the time early in the morning hours to sit quietly, reflect, meditate, pray, and journal has proven to be very therapeutic and healthy for my mind and spiritual well-being, which helps to maintain a healthy mind, heart, and soul. I enjoy crocheting, which is also very therapeutic. After prayer, devotion, and Bible study, a few minutes of crocheting is one of my times to reflect and meditate. Mornings are great for me as the house is quiet and the farm outside hasn’t come to life just yet.
Morning fog hovering in the still green mountains. Morning walks are the best! Crocheting and reflecting on the past and meditating on the day.
Holistic living is healthy and very satisfying way of life. I am often asked how I made the decision to lead a holistic life. I have been an advocate for clean eating for a great number of years, which made the transition somewhat easier. I chose clean eating for my health. My health was declining at a young age. My cholesterol was out of control, my blood pressure was extremely high, I was over weight, and I was border line diabetic. So, the journey began there! I decided that I would take back my health! I chose clean eating as many fad diets just didn’t work. Day by day, week by week, with the help and support of my family, church and friends, changes started happening! One by one I was able to stop taking meds for all of the above health issues, I lost 75, yes 75 pounds! I was finally in control of my diet and my health!
With the wonderful effects that clean eating had on my health, it evolved into my decisions to become a pescatarian, then gradually that evolved to becoming a vegetarian, which both added vitality and a new zeal for life in my thoughts and my body and evolved into an even cleaner diet. I’ve had trouble with digesting diary for years and had gradually made the change to almond milk and plant butter and cheese, which again made the transition easier. For nearly five years now, I’ve enjoyed a vegan/plant based diet, which has lead to an increase in my overall health, and a peace and satisfaction that I am making a difference in my overall well-being.
Enjoying the smell of mint drying in the kitchen.
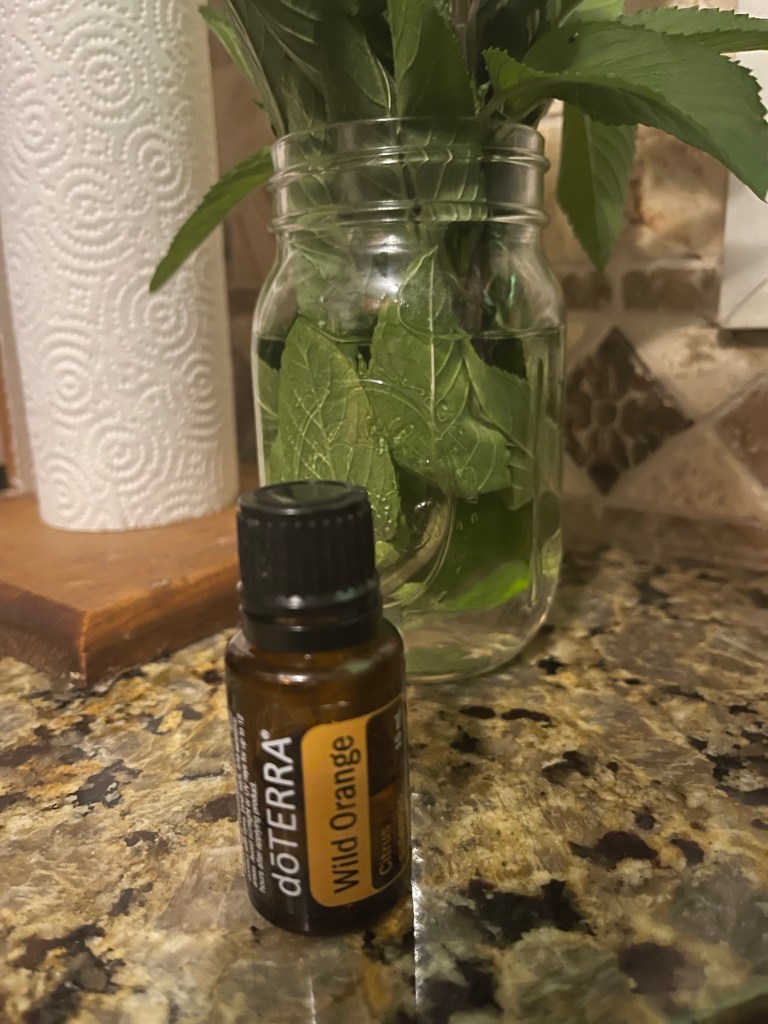
I am also a herbalist, and enjoyed growing our own herbs for cooking, making teas, and also for minor medial problems for years. I also love sharing them with family and friends. The most recent addition to living a cleaner and healthier life, was the decision to become a doTERRA essential oil consultant. I’ve used essential oils for years, and finally decided that I would become a consultant and purchase from myself rather than online markets. This line is the best that I’ve used thus far and it’s also a nice little supplemental income as well. With a holistic lifestyle come lots of questions. The primary questions I am asked are, why and how.
Fresh basil in the background and one of my favorite oils. Orange is very versatile.
The first question is the most common question. What inspired you to lead a holistic life? I always answer that question with a question. Why wouldn’t I? Then I begin to explain I chose this lifestyle for my health, my peace of mind, and simply put, for my life. I also add some details about the astounding amount of research revealing the high level of toxins, preservatives, and additives that basically poison the human body and our environment. These toxins are found in food, fast foods, shampoos, soaps, toothpaste, makeup, perfumes. detergents, cleaning products, air fresheners, candles, and even in our pet’s food. I’ll share another story in a different post of how we nearly lost my canine baby due to additives in what was supposed to be healthy doggie treats. That was a real eye-opener!
I always share one of the most informative books that I’ve ever read was, How Not to Die, written by Dr Gregor. There is so much information revealed within the covers of this book that confirmed my reasons for eating clean, and eating cleaner than I had been eating. His research also solidified my thoughts about why I had been food poisoned by fast food on more than one occasion, why we nearly lost our house dog, and why cleaning products and certain air fresheners lead to smothering and irritated sinuses. He exposes much about how these horrific toxins are actually allowed to be in our foods, pet foods, cleaning products, and even in medicines and vitamins that we think are helping us.
An eye-opening read!!! I encourage anyone who is interested in living a cleaner, more holistic life to read this book!
Secondly, I’m asked if it was a difficult transition. My answer is no. You don’t have to make the plunge and change everything at once. I made changes over a period time with my diet and I did the same thing with household items, hygiene items, and even my car air fresheners. I didn’t see the need to waste products that I already had on hand, so as I would empty an item, I would replace it with plant based, organic, and a cleaner item. First on the list, I would begin eliminating the toxins from my our home and our vehicles. My first elimination was laundry detergent. To prevent waste, after exhausting the last of my stock, I began using organic plant based detergents that didn’t require fabric softeners. There were some products that I had in my home that I could not convince myself to continue using. Those plug in air fresheners were tossed in the garbage, empty or not!
With the various air fresheners gone, I replaced them with diffusers for essential oils to help clean and purify the air and also bring a wide array of wonderful scents into the house. One by one I replaced our cleaning supplies with either organic plant based cleaning supplies or homemade supplies from natural ingredients. It’s quite amazing how many options are on the market and what’s even more amazing is the number of cleaners you can make using essential oils! I’ll share my bathroom cleaner soon! It cleans great, easy to make, and also prevents those toxic fumes that no one likes.
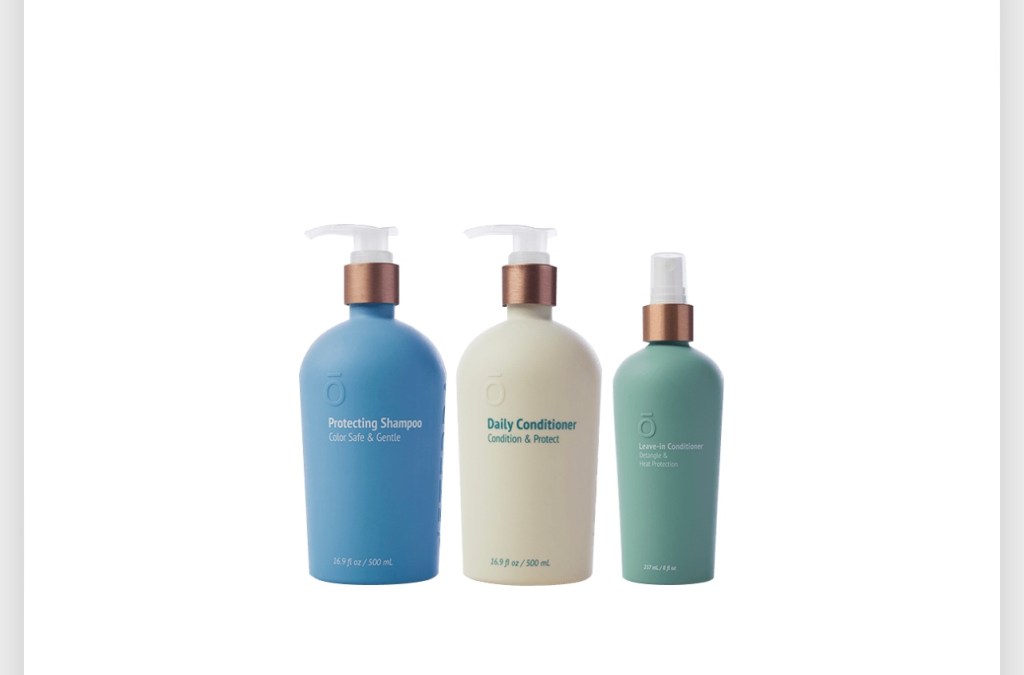
The next change was hair care products and tooth paste. doTERRA made that change easy for me as well. They have a wonderful plant based shampoo that incorporates essential oils, and a fantastic plant/based conditioner, and leave in conditioner that is excellent! I can’t even explain how wonderful my hair feels after using these products! My hair shines so much more than before and it feels less weighted. I also made the transition from usual tooth paste to a clean toxin free tooth paste from doTERRA. I chose this toothpaste simply because I’m a doTERRA consultant, and after trying it… it works! My teeth are clean and white and after reading the list of ingredients in my old toothpaste, it was an easy transition and one that I am happy I made.
doTERRA shampoo, conditioner, and leave-in conditioner. All natural!!!
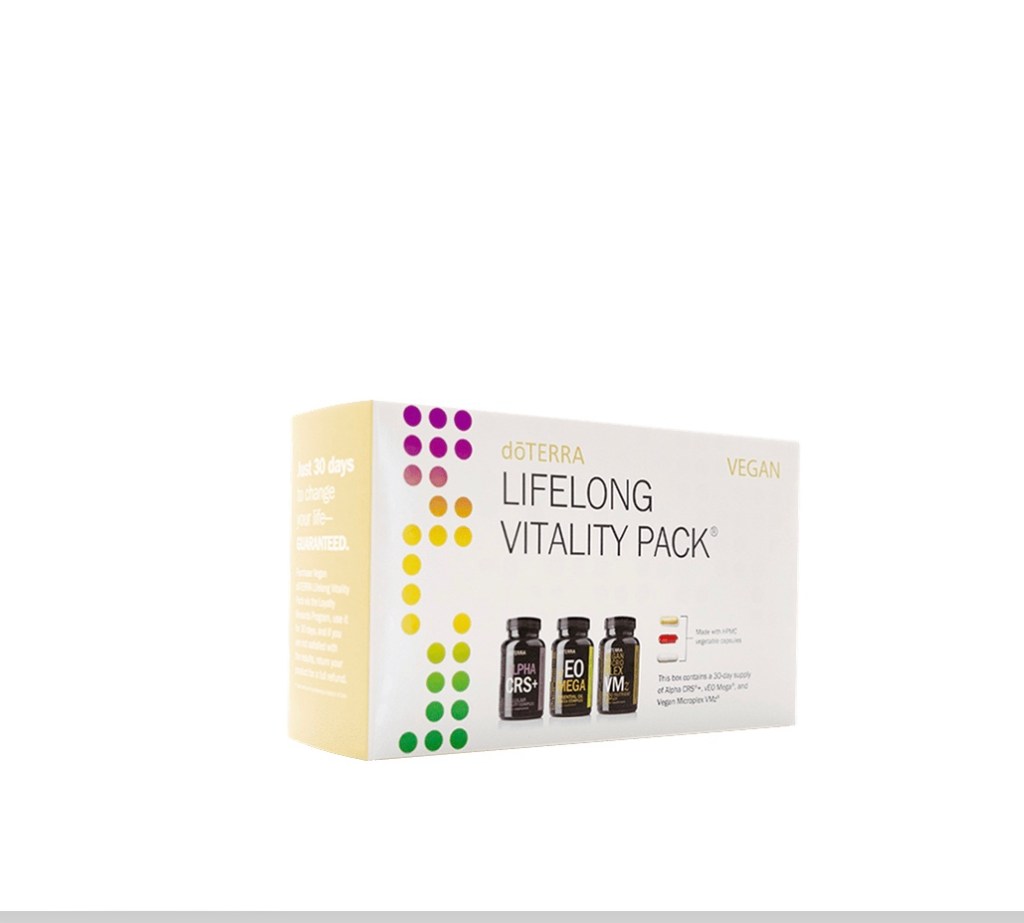
Finally, vitamins was the next item to begin changing. It was easy to switch vitamins with doTERRA. The vegan vitality pack is on my monthly auto order. I love these vitamins as they’re all plant based, no additives, or artificial colors added, and they’re in veggie capsules. Essential oils, homegrown herbs, and homemade teas helps with common cold symptoms, allergies, scrapes and minor abrasions. I could go on forever with the reasons why I chose a holistic lifestyle.
Vitality pack! This was a game-changer! Even though I already took vitamins and had for years… I noticed an immediate change in my stamina!!
I’m asked if I miss fast foods, soft drinks, and what in the world do I do about coffee. Number one, I don’t miss fast foods. As a matter of fact, the cleaner you eat, the less you even want fast foods. My husband and I now prefer food prepared at home ten to one over restaurant foods. I gave soft drinks up over twenty years ago for my own personal health and have never looked back. I’ll be honest, coffee change took a while. It took a little while and a lot of different coffees to find a good organic coffee that I truly enjoyed, but have finally found one that is very satisfying. I have also replaced much of the coffee that I drank during the day and evenings with organic and my homemade teas.
Delicious organic coffee from Amazon!!!
Finally, I’m asked if I feel better physically since making so many changes. Simply omitting meats and dairy from my diet was a game changer with my cholesterol and inflammation. Omitting artificial colors, scents, and toxic preservatives really made a positive impact on my allergies. Plant based vitamins, a good clean diet, and the removal of toxic smells in our home has made a positive impact on my overall health, stamina, and lead to a much more simple life that makes me happy knowing I am doing something to improve my quality of life, my families, and decreasing the chances of disease in our bodies.
Enjoy the simple things that bring joy and support your health. Organic lavender growing near our front door! Love to add to plant butter, cookies, teas, and more.
If you’re interested in holistic living, start slow. Remove one thing at a time. Don’t try to do it all at one time! You’ll become overwhelmed, which might result in giving up. Make one change and allow that change to become a routine. Once you feel grounded and content with that change, make a second change. As you empty or exhaust a supply of one particular item, replace it with a cleaner wholesome item. Read the labels, do the research, do a little soul searching, meditate, pray, and take holistic living one day and one change at a time.
Take time to enjoy the change. One change at a time and you’ll be more likely to stay the course. It’s so worth it!
I hope you’ve enjoyed this post. Feel free to leave comments. I enjoy reading comments and answering questions. For now, God bless from the mountains of Kentucky! Happy Fall!!!
Good evening from the mountains of Kentucky! It’s hard to believe that we are nearing the end of July. It seems we were just welcoming spring in only a few weeks ago. Summertime is a time of lots of work, fun, and more work, but one of my favorite seasons of the year. I love to plant seeds, water them, and watch them grow. I love to work in our flowers, herbs, and vegetable garden. I love the smell of freshly plowed dirt as much as any summer smell I can think of. The aroma of the fresh earth takes me home to a much simpler time growing up in the mountains. I loved the garden even as a child. I loved to walk through the garden barefoot. I have a confession, I’m guilty of this at times. Enough reminiscing; as I promised, I am excited to share my Savory Indian Relish recipe with you. This is one recipe that I plan on each year! It is awesome, and it is relatively easy to make.
Let’s get started! You’ll need the following ingredients:
Two large zucchinis
one large yellow onion
One large red bell pepper
One green or orange bell pepper
One medium size yellow summer squash
Two tablespoons salt
Two jalapeño peppers
Two cloves whole garlic
One tablespoon course black pepper
One tablespoon red pepper flakes
One tablespoon ground turmeric
One teaspoon cayenne pepper
One pinch nutmeg
Two teaspoons of mustard seeds
One cup of white sugar
Three cups white vinegar
Two cups of water
Process:Day One:
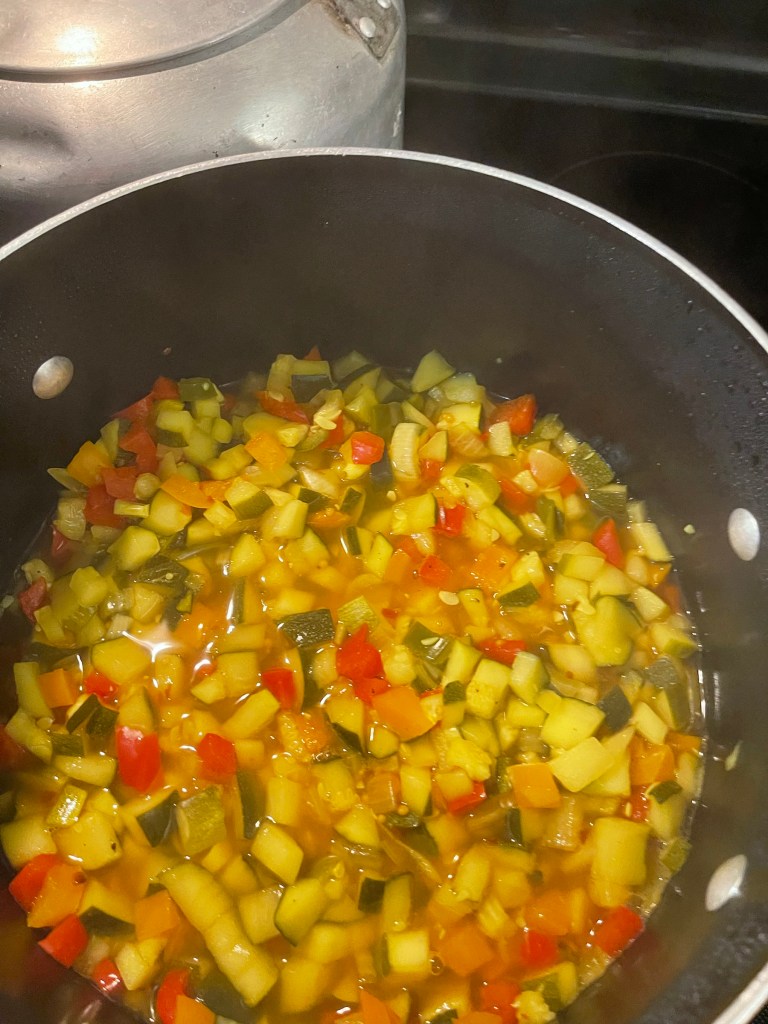
You’ll need a large bowl that has an air-tight lid. Wash and dry zucchini. There’s no need to peel the zucchini or squash. After drying them, dice them into small pieces. You can remove the seedy part of the zucchini if it’s big. Dice the onion, peppers, and squash into the bowl with the zucchini. I removed the seedy part of the squash and used primarily the meaty parts near the peel. Mix gently with your hands, sprinkle the salt over the diced veggies, and toss gently again. Cover the bowl and put the veggies in the fridge overnight. This will allow the moisture to come out of the veggies.
Day Two:
Wash and sterilize your jars, rings and flats. The dishwasher will sterilize them or boil them in the canner. Remove them with your tongs to prevent contamination. Next, take the bowl of veggies out of the fridge and using a colander rinse the veggies well two times and thoroughly drain. Dice garlic and jalapeño peppers into the veggies and toss. Be sure to wash your hands after slicing the jalapeño peppers. Avoid adding the seeds of the peppers as this might make the relish hotter than desired. In a large stock pot bring the water, vinegar, diced veggies, and remaining spices to a rolling boil. Reduce heat and simmer for ten minutes.
While the brine and veggies are simmering, set up your work area with the jars, flats, rings and a ladle. After ten minutes of simmering ladle the veggie and brine mix into the sterilized jars. Run a knife around the mix on the inside of the jar to remove any air bubbles. Be sure to leave at least a half inch of space for headspace. This will allow the jars to seal appropriately. Wipe the rims of the jars and place the flat and ring on the jars. There’s no need to tighten the lid really tight. A snug fit will be fine.
Place the jars of relish in the canner of warm water making sure the jars are covered with water. Allow the water to come up to a boil slowly. When the boil is rolling, set the timer for 25 minutes. When the time exhausts, turn the burner off and allow the water to reduce to a simmer on its on. After 15 minutes using your jar lifter, carefully remove the jars of relish and place them on a wooden cutting board or on a folded towel on the sink or table. Soon, you’ll hear that lovely sound of the jars sealing one by one. Once the jars have sealed, and cooled, you may choose to remove the rings for future use. Some people remove the rings and others leave the rings on jars, either way is fine. It’s the flat that seals the jars and once the flat is sealed, the ring really doesn’t serve a purpose. This is a great tip from the days of the depression when canning rings were hard to come by. It’s a great money saver.
Don’t forget to write the date on the lids. You’ll appreciate this date in the future when trying to determine which jar of deliciousness you should select for a tasty side for supper. I always like to use the jars with the oldest dates first. Most flats have a seal date of 18-24 months. Most will stay sealed longer though. I’ve opened jars that were six, seven, or eight years old that were perfectly fine.
I hope you enjoy this zesty and tangy relish. It is family favorite around our house. It’s great with soup beans, chili, tacos and many other dishes. Feel free to leave feedback. I love to hear from my readers. God bless from the mountains of Kentucky!
Hello, from the mountains of Kentucky! I hope your July is off to a beautiful start! We’ve had a blessed week with just enough rain to water our thirsty garden and make the zucchini, summer squash, and cucumbers explode. The number of gorgeous veggies awaiting my attention caused me to wake even earlier today. After having a hot cup of coffee, relaxing with my daily devotional, prayer, and another fascinating chapter of the word, I looked at the tasks that lay ahead of me for the day. Farming looks glamorous to those who see it as all the veggies you can eat, decreased payout at the grocery store, and the many wonderful health benefits. All of these benefits are true, but the work and the labor are also very real… but satisfying. Chores are a big part of planting, growing, maintaining, and harvesting the rewards. After reading a chapter of my chosen summer read, What the Wind Knows, it was time to get up and get started checking things off my list. Yes, I am a list maker! It helps me feel organized.
The day began with watering the herbs, which needed harvesting again. It’s been a great year for all of our herbs. I quickly clipped lavender blooms to dry for flavoring teas, and clipped various types of mint. After washing and drying the herbs, I quickly tied them in bundles to hang for drying. The aroma of fresh herbs drying in the kitchen makes me happy.
Fresh mint hanging in the kitchen! This is chocolate mint. It makes great tea! Lavender Blooms for flavoring Tea
Weekly household chores were next on the agenda. One by one, I checked them off my list. But, between chores… the squash, zucchini, and cucumbers were reoccurring thoughts. So, I decided to bake a little zucchini bread. I also vacuum sealed a few bags of sliced squash and zucchini for the freezer to enjoy this winter. Next on the list, was the sink full of cucumbers. Checking my time, I decided that I would have time to make seven quarts of spicy kosher dill pickles, which are always tasty any time of the year. If you’ve not tried my recipe for spicy kosher dills, you can follow the link below to learn more. These pickles are a family favorite, as well as a favorite among many of our neighbors. Canning Spicy Kosher Dill Pickles
We’ve had an abundance of summer squash and zucchini this year!
Now to proofread. My editor is expecting the final revisions of the last chapters to be ready later this week. I am in the homestretch of finishing this nearly year long project. I’m excited for my students to have this new workbook in their hands. It is designed to accompany the textbook I wrote in 2019. Thankfully, the abundance of rain we received over the last few weeks allowed me to work ahead of schedule, but also resulted in lots of weeds. That was another thing on the list to attend to. Hoeing usually means all hands on deck! Again, lots of hard work, but very satisfying work.
The zucchini kept calling my name! I ended up grating several zucchini for the freezer for bread this winter. I use a hand-held box grater and a glass measuring cup lined with white paper towel or cheese cloth. I grate the clean zucchini into the cup until the measuring cup is full. This is perfect for breads as my recipe calls for one full cup of grated zucchini. It also works well because the paper towel or cheesecloth is already holding the zucchini, and ready to be squeezed to remove the liquid before freezing. I felt better about having used several of the beautiful green bounty.
Three hours later, seven quarts of spicy kosher pickles are cooling and waiting to be taken to the basement for good eating this winter! Zucchini bread will be cooling soon. One loaf to eat and one for the freezer. Yes, you can freeze whole loaves of homemade bread. Allow the bread to completely cool, remove from loaf pan, and wrap twice with plastic wrap, then once with aluminum foil. Once the bread isfrozen, you can vacuum seal for reassurance of no frost gathering on the bread. When you’re ready to eat the bread, allow it to thaw in the fridge. Once it’s completely thawed, remove the vacuum seal and unwrap and enjoy. It’s amazing how moist the bread is.
Spicy Kosher Pickles
I hope you’ve enjoyed spending a little time with me in the mountains of Kentucky. It’s been a busy day, but one that makes me feel accomplished. Feel free to leave comments. I love to hear from my readers. I’ll share the vegan zucchini bread recipe soon. It’s a keeper. Also, I’m excited to share my new Indian relish recipe with you! I’m hoping to have it posted later this week. Check out the picture beneath the bread photo! God bless from the mountains of Kentucky.
Hello from the mountains of Kentucky!! It’s been a while since I’ve posted. It’s been a busy semester with lots of changes and some exciting news. I’ve just finished writing a lab workbook that aligns with the textbook I wrote in 2019. It should be on the market by the end of summer.
We’ve also been working hard to get our garden planted this spring. With all the rain and some vital equipment breaking down, it’s been a journey. But, we’re in the home stretch! Now comes the hard work, but also the wonderful rewards of fresh veggies!!
Delicious baked blueberry oatmeal
I’m anxious to share one of my favorite breakfasts with you! Baked oatmeal… but not traditional baked oatmeal. I stumbled upon this delicious and very easy recipe while experimenting with ingredients and on the search for something delicious, filling, vegan, and healthy!
I like Quaker Oats because they’re Non GMO
Ingredients include:
1 tsp organic cinnamon
1/2 cup old fashioned oatmeal
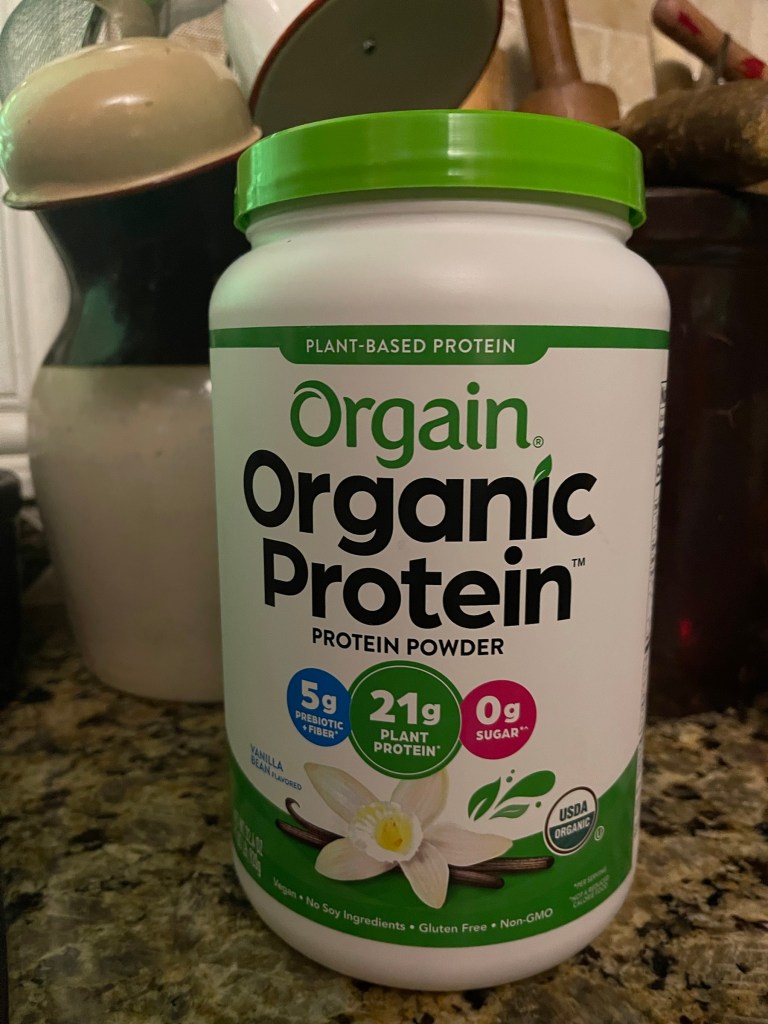
1-2 scoop organic vanilla protein powder
1 tsp organic ground flax
1/2 tsp organic chia seeds
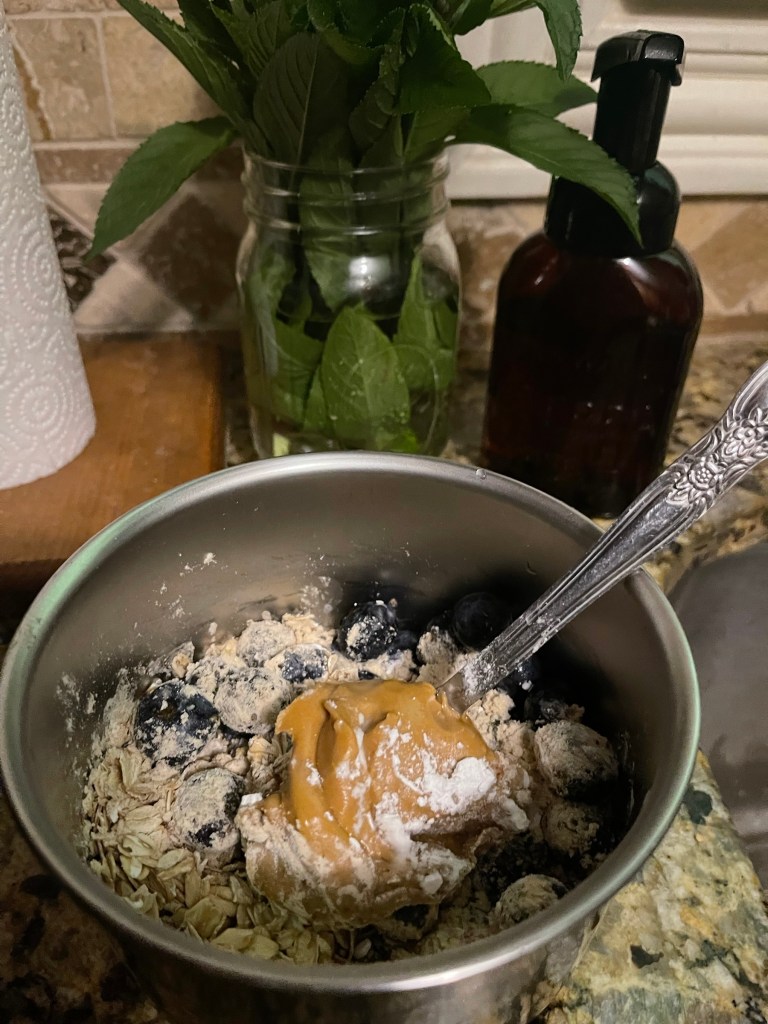
2 tbs organic smooth peanut butter or preferred nut butter
1 tsp baking powder
1 tbs organic raw agave or honey
A splash of plant milk (I prefer almond milk)
1/2 cup organic blueberries
My favorite plant-based protein powder! Add dry ingredients first and mix before adding moist ingredients.
Process:
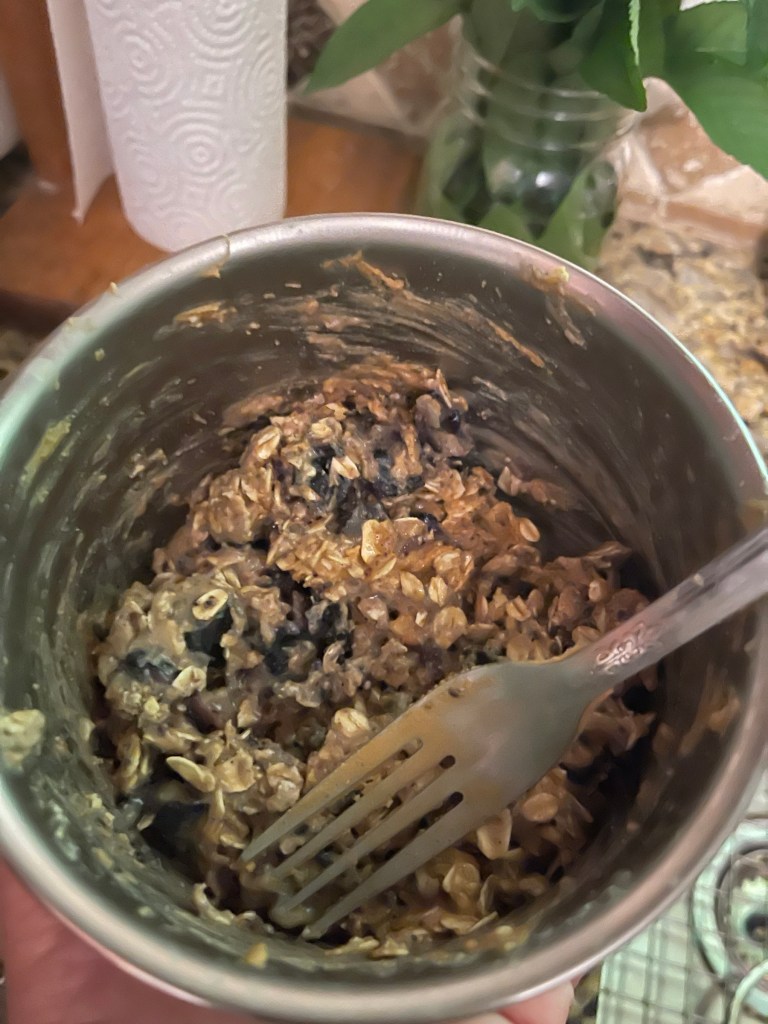
Before you begin mixing, preheat the air fryer for five minutes. My air fryer doesn’t have a temperature gage, but would assume a moderate temperature would work. Mix all the dry ingredients. Then one by one add the most ingredients. Wash the blueberries and add them as the last ingredient. I like to mash some of the blueberries for extra flavor. The mixture will look similar to a thick cookie dough.
Mixture after mixing all ingredients
Don’t worry about having a big fancy air fryer! my larger air fryer is actually taking up space in the basement! I love this small air fryer for individual servings and servings for two! It works just as well and easier to store away when finished. Empty the mixed ingredients in the pre-heated air fryer. I alway form mine into a larger patty and bake for ten minutes. Check oatmeal at the half way mark as all air fryers vary in baking time. When the oatmeal is browned to your preference, empty the oatmeal in a plate and flake the oatmeal up with a fork. I like to add a drizzle of organic maple syrup over my oats, but that’s just my preference. I also like some type of fresh fruit on the side.
A small air fryer works well for this dish!
There’s something delicious that happens when the peanut butter and protein powder bake together. The berries are tender and burst in your mouth! This is honestly more like a dessert fruit crumble than breakfast. I’ve made this with pumpkin instead of fruit and it’s quite awesome! check out the plate! This was a recent thrift find. I automatically grabbed it when I saw it. It is identified to the plates that my mom used when we were growing up. I enjoy reflecting on the meals she prepared while eating. It’s now my favorite breakfast plate.
One of my favorite breakfasts!
I hope you enjoy this delicious, quick, easy, plant based breakfast. Feel free to leave a comment or share your version of air fried baked oatmeal. For now, God bless from the mountains of Kentucky!