Hello from the mountains of Kentucky! I hope each of you had an amazing Christmas. We had a wonderful Christmas on the homestead with family and friends. God is good. Anyone that knows me knows that when Christmas is over… I start counting down the days till spring. I know, we shouldn’t wish our time away. I keep reminding myself of this. Take each day, savor it, as it is gift we never get back. However, I still get excited to see how many days till planting time! As of today, 78 days till calendar spring!
That being said, I am excited to bring anotherof my favorite herbs to you today. Last year, I completed the courses to finally earn my herbalism certification. During my studies, I learned about the common wild plant, yarrow.
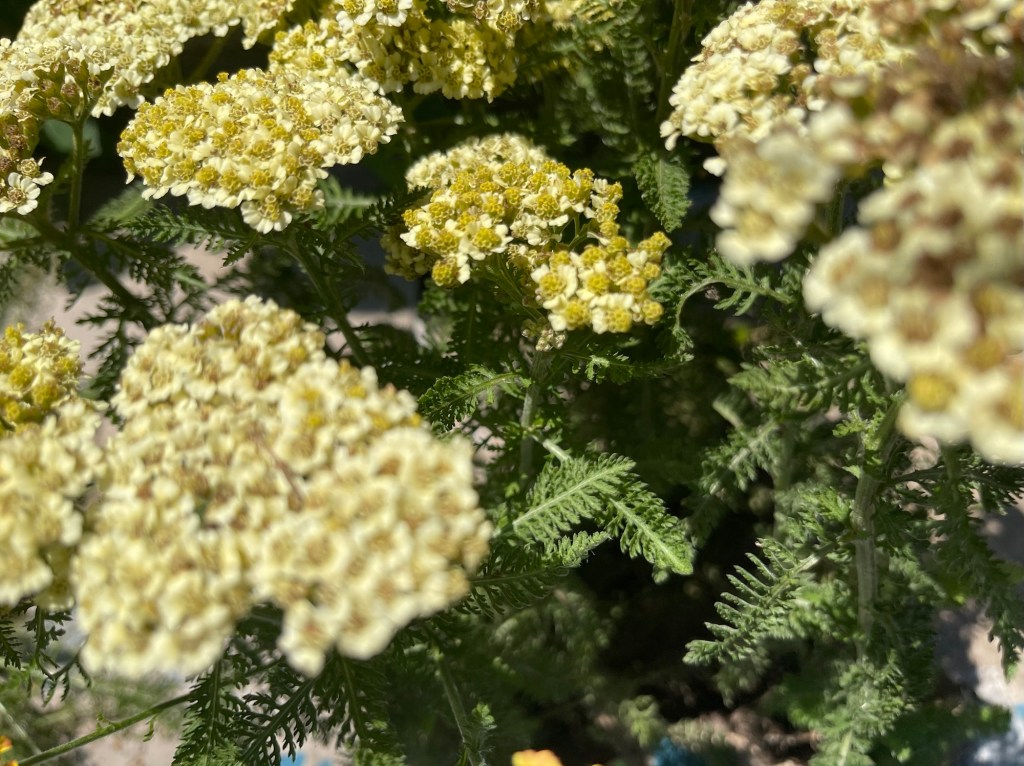
Close up picture of yarrow leaves.
Achillea millefolium, more commonly known as yarrow is a perennial herb that is a member of the daisy family. It is found in growing in the wild and sometimes will in your yard as birds carry the seeds far and wide. It grows up to three and a half feet tall. The leaves are dark green, fern like, but yarrow is more feathery. See above picture. It has been used for centuries for nose bleeds, minor cuts, thus becoming known in son areas as the nose-bleed plant. The blooms are more commonly white with tiny yellow centers. Some yarrow blooms are yellow in color. We grow both and both are beautiful in flower beds and landscaping. Both are equal in quality.
Pictures above is our yellow tallow in full bloom.
Yarrow leaves are safe to mix in salads and are quite tasty. The leaves can also be dried for teas. Yarrow is considered to be a safe herb, however it is not advised to ingest large amounts of yarrow on a regular basis as yarrow contains thujone, which can be toxic if consumed on a regular basis in large quantities.
Cut yarrow drying. Preparing for yarrow salve.
Yarrow is versatile and very useful as a topical herb. It can be used in topical oils, salves, or even just by picking the leaves and crushing them or chewing them to apply to a wound to help slow and even stop bleeding. As always seek medical attention for wounds that might require stitches.
Drying yarrow is not difficult. I dry it during the summer and fall. You may dry the blooms and the leaves for external use. Stay with the leaves for internal. I dry it in small batches by cutting it in the early morning hours while the air is cool. Rinse the leaves and pat them dry. Place the leaves and or blooms on a white cloth or paper towel and spread them out to allow air to circulate. Place them out of direct sunlight and allow to dry until the leaves are crumbly. Once dried the herb can be stored in a glass container away from the light to be used as needed.
Dried yarrow can be added to jojoba oil or fractionated coconut oil for an external oil to help heal wounds. I add a couple of heaping tbs of the dried herb to a half pint jar of either organic extra virgin olive oil, fractionated coconut oil, or jojoba oil. I prefer to use amber colored glass if possible. I allow the dried herb to stay in the oil of choice for two to three weeks in a dark cabinet. I then strain the oil into either a small spray bottle or dropper bottle, which makes it easier to carry with me. This oil is great for helping to heal scrapes, minor cuts, sooth burns, as a rinse for mouth sores, and other small abrasions.
I also like to add the oil to equal parts of shay and cocoa butter to make a slave that absorbs through the skin and can carried in small containers for emergencies. I will post this recipe and details of how to make the salve in an upcoming post.
I hope you have enjoyed reading about how we use yarrow. Feel free to comment, like, or subscribe. God bless each of you. Happy New Year, from the mountains of Kentucky!
Hello from the mountains of Kentucky! I hope your Thanksgiving was amazing and your Christmas will be even better. It’s been busy in our little part of the world as we finish our Christmas shopping, and decorating for our family celebration as Christmas is only days away. With preparing for the festivities I decided to bake some rustic herb bread using two of my top ten herbs, rosemary and thyme. I love experimenting and trying new flavors, new breads, and new recipes. I am excited to share a few of my favorite recipes and uses for my sixth favorite herb in my top ten posts, Rosemary. But first a little information about Rosemary.
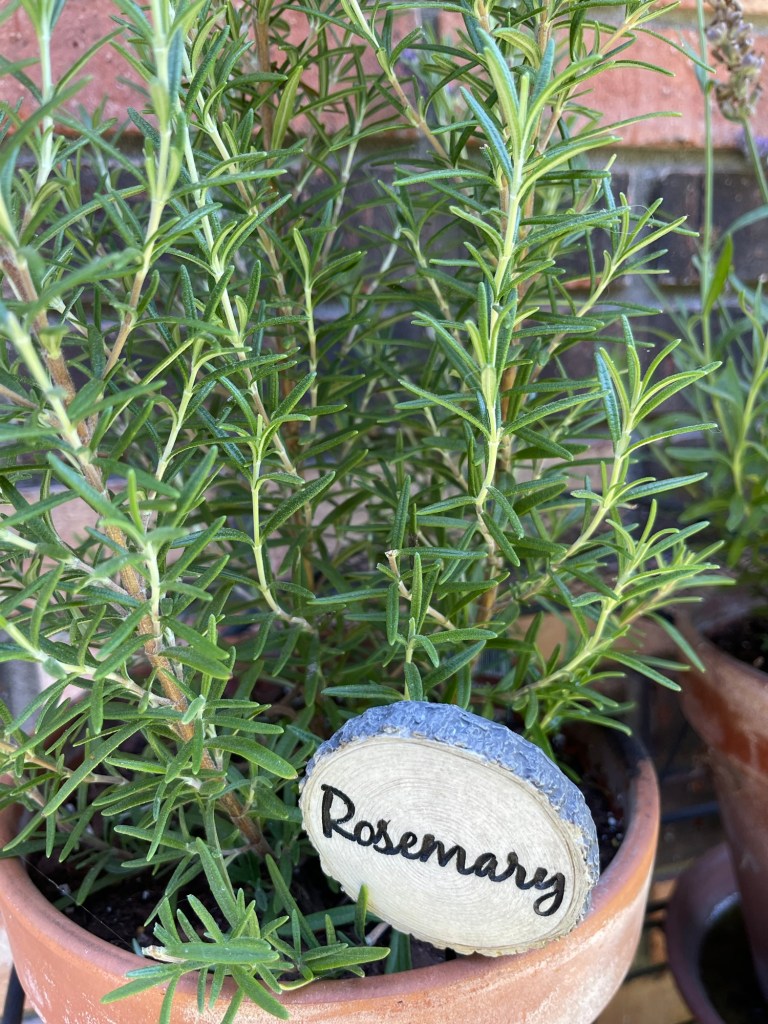
One of our smaller pots of rosemary .
Rosemary is an evergreen type of perennial herb that derives from the Mediterranean region. It is reasonably hardy in cooler temperatures as well. I usually pot some each year for quick access for recipes. I also grow several plants in our raised bed that winters over very well as we cover our bed during the winter months. It is easier to start the plant a plant than from a seedling. Rosemary is difficult to start from seed, but not impossible. This aromatic plant also withstands drought quite well. Keeping the rosemary pruned prevents the plant from becoming woody and stiff. Pruning will also help the plant to become more bushy and promote new growth.
Rosemary is a member of the sage family. It has a wonderful aroma that unique and pleasant. It flowers in the summer, but can flower more often in warmer climates. The flowers are small and light pinkish or white blooms. The height of this woodsy plant can vary in size, depending on the location and the amount of pruning. It’s fairly easy to grow, dry, and store. Its aromatic needles have many culinary and medicinal uses as well as uses for personal hygiene. Let’s get started with a few ways that we use rosemary on the homestead.
Rosemary can be used fresh or dried. I dry my rosemary by pruning the plant and washing the sprigs well to remove soil and possible insects that might be hiding. Gently pat to dry and place the herb on a white cloth in a shallow pan. If I have a larger amount, I add the herbs to my hanging rack, which hold much more. Place the herb away from direct sunlight and leave to dry until the sprigs are crisp. I store my dried rosemary on the stems in quart jars and strip the leaves as I need them.
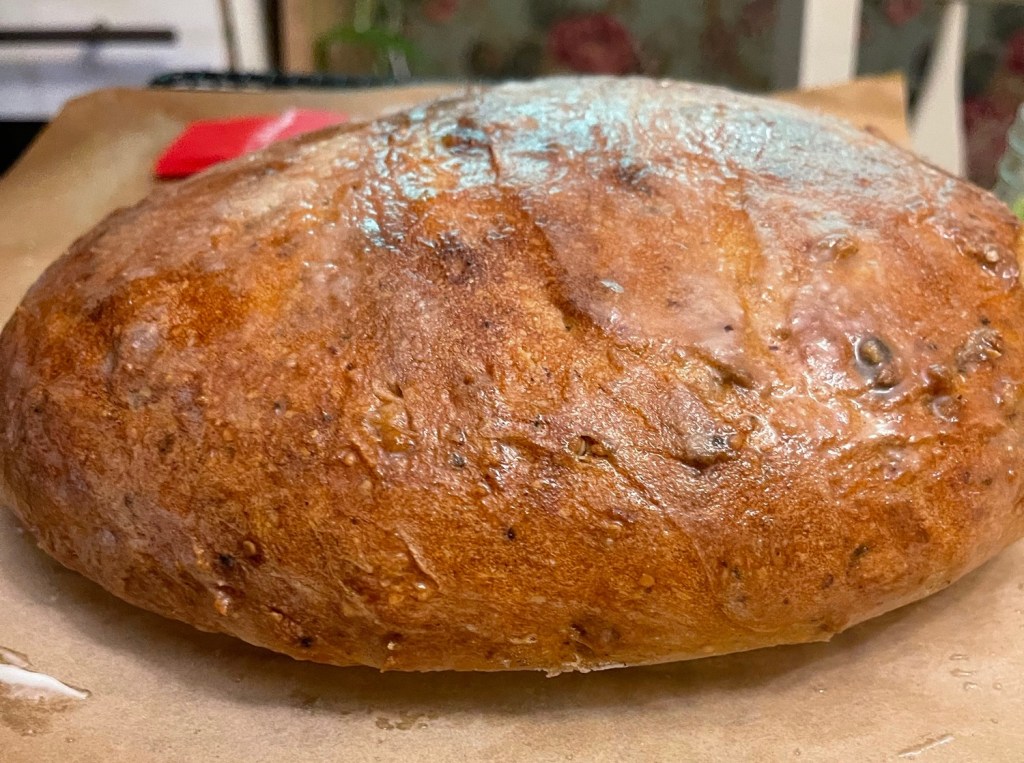
One of my favorite recipes for dried rosemary is my crusty herb bread. A small amount of this delicious crusty bread packs a punch of flavor. I use the following basic bread recipe Give Us This Day Our Daily Bread: Homemade Crusty Vegan Bread and add a tablespoon and a half of finely chopped rosemary and a tablespoon of dried thyme finally chopped as you add the seeds. The dried herbs work great as they are already dried and do not add any moisture to the bread as fresh herbs have the potential to do. This delicious bread is great toasted with most any Italian meal, or toasted to use as a dipping vessel for red pepper hummus. The possibilities are endless.
Seeded herb bread
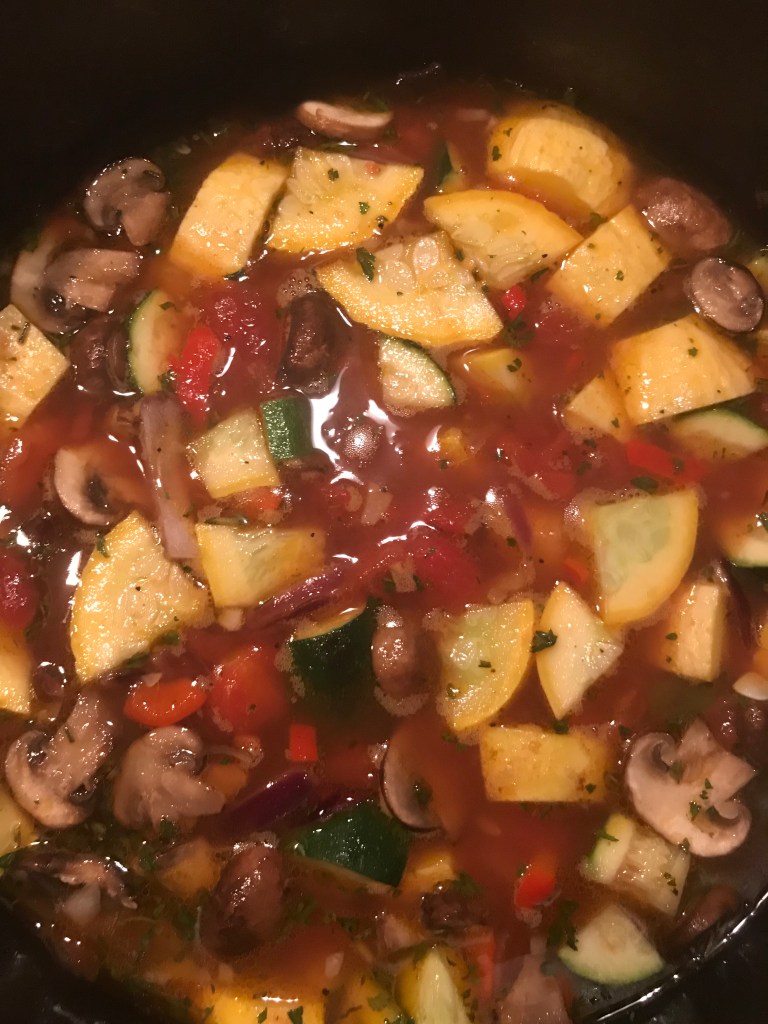
A second recipe that includes rosemary is our clean vegan summer squash soup. It is delicious year round, but tend to enjoy it most early fall or in the summer months when summer squash is at its peak. The following link will take you to this light , yet hardy soup. The herb bread above is a wonderful addition to this delicious soup. Clean Vegan Summer Squash Soup I also like to melt a slice of plant based provolone cheese on the herb bread for a little extra rich taste.
Summer squash soup
Rosemary makes a great flavoring for salt as well. This is an easy way to preserve the final sprigs of rosemary of the season and make a few stocking stuffers or gifts for those who love to cook with herbs. This delicious recipe can be prepared several ways, but my favorite is simply equal parts of fresh-cut rosemary and course kosher salt. Strip the leaves from the rosemary and add salt, pulse the mix in the food processor 8-10 times or you may use a spice grinder. You may also substitute the kosher salt with course sea salt. Pink Himalayan salt can also be used, but the shelf life doesn’t seem quite as long.
Once you add the fresh rosemary with the salt and grind set it aside on a parchment lined pan for about six hours to air dry. Add to a jar with a lid. Keeps indefinitely. Another method is to use dried rosemary pulsed in the spice grinder until desired consistency is achieved and add the mix to the preferred salt. This eliminates the drying process with fresh rosemary. Using this method allows you to use the salt immediately as the rosemary is already dried. Rosemary salt is a great addition to tofu scrambles, soups, and potatoes. For those that don’t follow a plant-based diet rosemary salt is great on eggs, pork, chicken, or lamb. The possibilities are endless. The ratio of salt to rosemary can be modified to taste.
I like to hand chop the rosemary. I’m a bit old-school. For this recipe I used 1/4 chopped rosemary.Shake the rosemary salt before each use to ensure it is distributed evenly.
Finally, rosemary has been thought to be a nourishing herb for strengthening and thickening hair. Rosemary can also be used in a variety of ways cosmetically. However, hair care is one of our favorites. Sprigs of dried rosemary can be added to a spray bottle of filtered water for rosemary water that can be sprayed daily on hair dry or damp hair to promote thickening and shine. Using dried herbs helps prevent mold from gathering in the bottle. I also prefer to use amber glass spray bottles. The dark color helps preserve the water and protect it from sunlight while also helping to eliminate plastic. Once you add the sprigs of dried rosemary to the water, allow it to sit for at least a week to intensify the aroma and the water to absorb the nutrients from the herb. Use as a refreshing spray to your hair, scalp, or skin.
Rosemary oil can be made from dried rosemary as well. Using throughly dried rosemary, add the sprigs to a glass bottle of oil. I prefer organic fractionated coconut oil for topical use. Seal the bottle and place in a dark cabinet for at least two weeks. After two weeks, strain the oil using cheesecloth adding the oils to either an amber colored glass spray bottle or dropper bottle. The rosemary oil can be used directly on then scalp to nourish the scalp and help promote hair growth. Once the oil is applied, massage scalp evenly for five-minutes then wrap hair with a towel or shower cap. Leave the oil on the hair for at least thirty minutes. Wash and rinse hair as usual. You may also spray hair lightly throughout to help mange dry or damaged hair. Finally, you can add a few drops of the rosemary oil to your favorite shampoo and or conditioner.
These are only a few of the great ways to use this powerhouse of an herb. Because of its diversity, I think a book could be written about rosemary. Other uses of rosemary include adding it to homemade body butter, laundry detergent, sachets, teas, and more. I hope to add more rosemary recipes in upcoming days. For now, God bless and Merry Christmas from the mountains of Kentucky. Feel free to like, share, subscribe and or follow our blog. Your support is appreciated. God bless!
Hello, from the mountains of Kentucky. The leaves have fallen, the mountains are bare, now void of their glorious fall attire. I tend to get a bit emotional this time of year as the vibrant colors of summer and fall disappear. This year more so than ever before. I have fallen into the yearly routine of Christmas shopping for our family, preparing to end another semester, while preparing for a new one. Life has been hectic, which helps me deal with the many emotions that flood my mind and fill my heart. I have found that a little quiet time with Jesus, a good cup of chamomile tea, and a spiritual read helps calm my racing mind and allows peace and precious memories to ease the pain.
Even still a busy week faces us on the homestead. It will be busy both inside and outside our home. As I prepare for our Thanksgiving dinner with family, I find myself reflecting on the empty spot in my life. I find myself missing my mom more each day. I look around my home and I see small reminders of her everywhere. From her delicate teacup that I cherish, to her favorite lamps that now adorn my nightstand and fireplace. From her favorite blanket, to her beloved Afghan. From the plant sent from friends in her remembrance, to her favored china cabinet that holds her favorite dishes, now in my living room. From her Bible on my shelf, to the handwritten notes she journaled daily. From the pictures she left behind, to her smile in the memories I will forever cherish in my heart. However hard it is to deal with loss, just as the peace lilly thrives and blooms, so must we.
My peace lilly a friend bought me after mom passed.
As the cold weather approaches, we are also busying ourself outside with cutting the last of the lavender, to be used in homemade body butter, as sachets, for tea, and for lavender cookies. Vegan Lavender Butter: A Sweet Herbal Treat From the Mountains… Extra sprigs of rosemary are cut for rosemary oil, cooking, and for shampoos. We are zipping up the covers on the raised herb beds to ensure the lavender, rosemary, and other perennial herbs last as long as possible this winter, while also ensuring their return next year. We had hoped to leave the ferns on the porch through Thanksgiving, but bitter cold temperatures are on the horizon, so they will make their usual journey to the basement for their winter stay. The ferns do well in the basement through the winter. I water them a little about once a month and bring them out in the spring. I usually give them a quick trim, and before long they are thriving and full of life.
Three year old fern thriving has been weathered over each winterthriving in the summer heat.
With my mind occupied with memories with our mom, I find it difficult to grasp just how quickly time passes. I feel as though we were planting a garden a short time ago. It seems as only a couple months ago we were taking down Christmas decorations, and now here we are preparing to put the Christmas tree up. Where does the time go? In the Bible, life is compared to a vapor on water. It’s true. Life has a way of vanishing right before our eyes. As I pondered the gift of time, the Lord impressed upon my heart that time was a mystery to His children. I was reminded that His time is not our time and our time is not His time. I know He has a plan for our future and His plan is perfect and we must trust His time, not our own. Sometimes we find ourselves trying to perfect His plan due to lack of understanding. My prayer is to acknowledge His plans, trust His Will, press forward, embrace each day, love deeply, reflect on the wonderful memories of my mom that I cherish in my heart, and live each day embracing life as my mom would want me to, for I know He has a plan. We must keep pressing forward.
As I am preparing the dough for our weekly bread, I find myself reflecting on days gone by when I helped my mom bake cookies for Christmas. I think I was five years old when we baked cookies for everyone, or so it seemed to a wide eyed five year old with visions of Christmas morning growing closer. Mommy always had a way of making the holidays special every year. As the years passed and our mother aged, she wasn’t able to cook and host big dinners any longer. Then a new tradition was birthed. She would take turns going from one siblings house to the other on Thanksgiving. It was a full day for her, but one that allowed her spend time with each of her children and their family. The day came when she was no longer able to drive and visit as much as she wanted to or had before. It was time, yet again, for a new tradition that lasted for more almost ten years. We would take Thanksgiving to her. She never went without, my sister, brother, and myself always brought her a smorgasbord of food from each of our dinners. We would visit and usually have a cup of coffee and reminisce with her while she ate her fill of her favorites. She always had had enough leftovers to last over the course of the next week. I laugh as I recall how she would run out of desserts first. She definitely had a sweet tooth.
Yes, Thanksgiving will be different this year. I will miss her as I prepare the dishes, adding extra love to ensure the sweet potato casserole is prepared just the way she liked it. As I scour my recipe books for a new and tasty dessert that she would have enjoyed. I will miss going to visit her. It will not be same not enjoying a cup of coffee while she enjoyed the dressing and the dark meat from the turkey. Dessert will not taste the same knowing she will not share it with me. But, just as the working of the dough brings life to the yeast, so must we keep working and looking up to Him. Give Us This Day Our Daily Bread: Homemade Crusty Vegan Bread He is our high tower, or refuge, and our all.
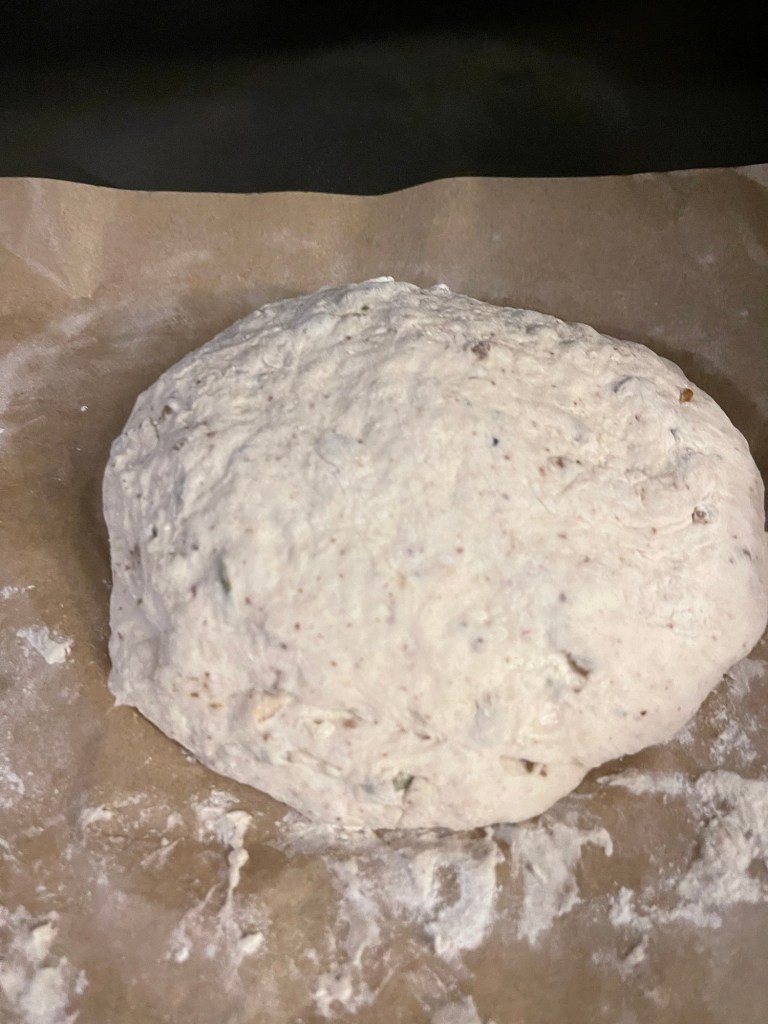
The beginning stage of the dough. Stage two rising.The finished product; seeded crusty artisan bread.
Even though the loss and void in my heart are vast, I am thankful thatour mom is no longer sick. I have the confidence knowing that she made it home to be with Jesus, and that we will see her again where we will live for eternity in Heaven where sickness does not exist. Even still, my heart aches for her each day. For now, I’ll cherish the memories of days gone by and keep working for the days to come. They say that time takes care of the pain. I haven’t found that to be true yet. But, I do know that my time is not God’s time and His timing is perfect, just as His plan for us is perfect.
In memory of our mom. Artist credit goes to my niece, Sabrina Smith.
God bless from the Mountains of Kentucky. This post is dedicated to the memory of our precious mother. We love and miss you, mommy. I pray that each of you have a wonderful and memorable Thanksgiving.
Hello, from the mountains of Kentucky! It’s a beautiful time of the year in the mountains. The trees are alive with beauty! I try to savor the gorgeous leaves as long as they cling to the trees before the freezing temperatures bring them down. Every season in the mountains brings unexplainable beauty, but I think spring and fall are my favorite seasons. Enough about the beautiful bounty and onto the topic at hand, canning carrots.
The beauty of the mountains! It never gets old.
Carrots are versatile and can be prepared in many ways. We love them raw, glazed, in stews, breads, soups, and as carrot soup. We grow enough carrots to enjoy, but not always enough to preserve. With the prices of groceries soaring, that will change in upcoming seasons. We were recently gifted with an abundance of carrots that would be nigh to impossible to eat raw, so we decided to can them! It was too easy not to do! we had several large bags of carrots. I’m not sure on the weight or amount.
Ingredients:
Carrots (we had several large bags)
Kosher salt or sea salt (do not use table salt as it may cause cloudy water to form in the jars.
Filtered water.
White vinegar
Preparation:
Remove leaves and tips from the carrots.
Scrape and rinse carrots.
Slice carrots however you desire. We sliced ours for soups and stews.
Add the carrot slices to a large bowl of filtered water.
Cover and refrigerate over night.
Remove the next morning and rinse the carrots.
Add carrots to filtered water in a large stock pot. Bring to a slow boil. Boil for five minutes.
While carrots are boiling wash and sterilize jars, rings and flats. We used pints.
Add water to canner and allow it to begin warming. We used a water bath canner. You can use the method of pressure canning.
Process:
Using a funnel in the top of the jar, add hot carrots and hot water from the stock pot to jars. Add 1/2 tsp of salt.
Wipe the rims of jars and rings with a white towel soaked in vinegar.
Add seal and ring.
Place hot jars in the warm water in the canner.
For water bath canning, allow jars to come to a slow boil and process for two hours. Allow jars to sit in the water when the stove is turned off for at least thirty minutes. Pressure canning time would be much less than water bath. Someone told me for pressure canning carrots they allowed theirs to process for thirty minutes.
Remove the jars with a jar lifter and set the carrots aside on a towel to protect the surface of the cabinet or table.
Once cooling process begins you should hear the coveted ping of the jars sealing.
Add dates to the lids or labels. Allow to cool and store with your other canned goods.
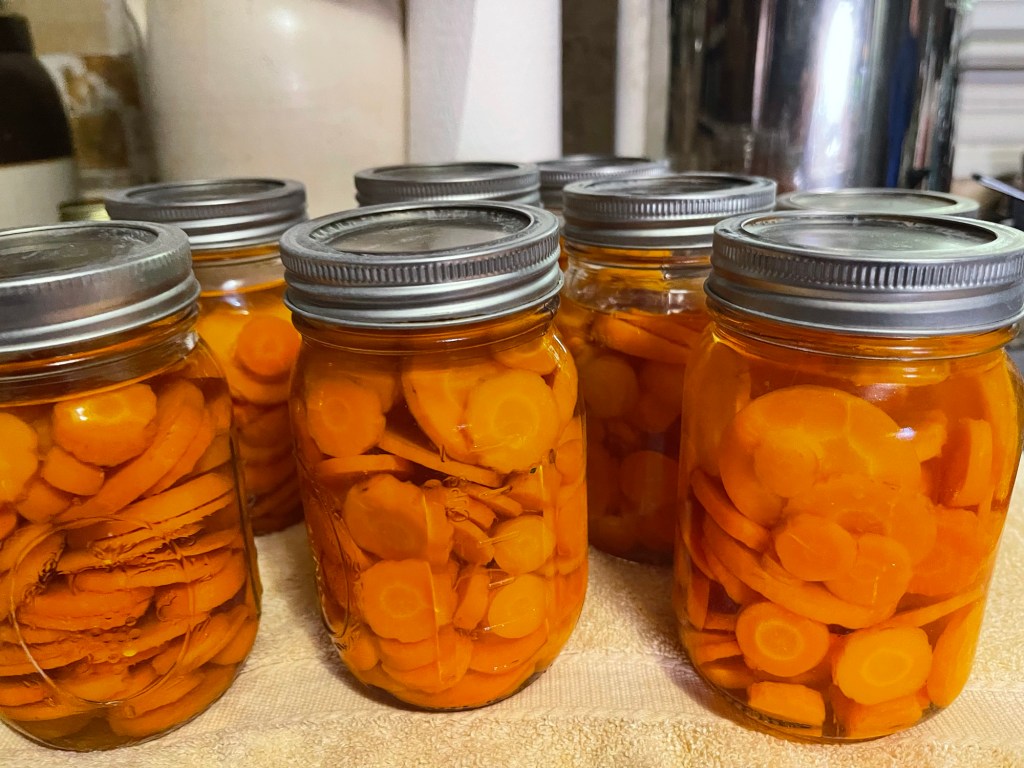
Canned carrots
The rabbits enjoyed the tips and pieces of carrots that we removed. The chickens enjoying the remains that were scraped away from the carrots. Everyone enjoyed some raw carrots and we will enjoy the canned carrots in many ways. I hope your family enjoys your canned carrots as much as we enjoy ours. Remember, when you find a sale on carrots, stock up and can them for the future! Thank you for stopping by! Remember to like, comment, and or subscribe! I am headed back to the kitchen to work up and preserve three large bags of kale! Recipe coming soon. Before you go, check out the following canning recipes that are time-tested! Canning Green Beans the Time-Tested Way (updated). We have canned beans like this for more than thirty years. Canning Savory Indian Relish this is a family favorite!! More recipes coming soon. Feel free to like, comment, subscribe or follow. God bless from our homestead in mountains of Kentucky!
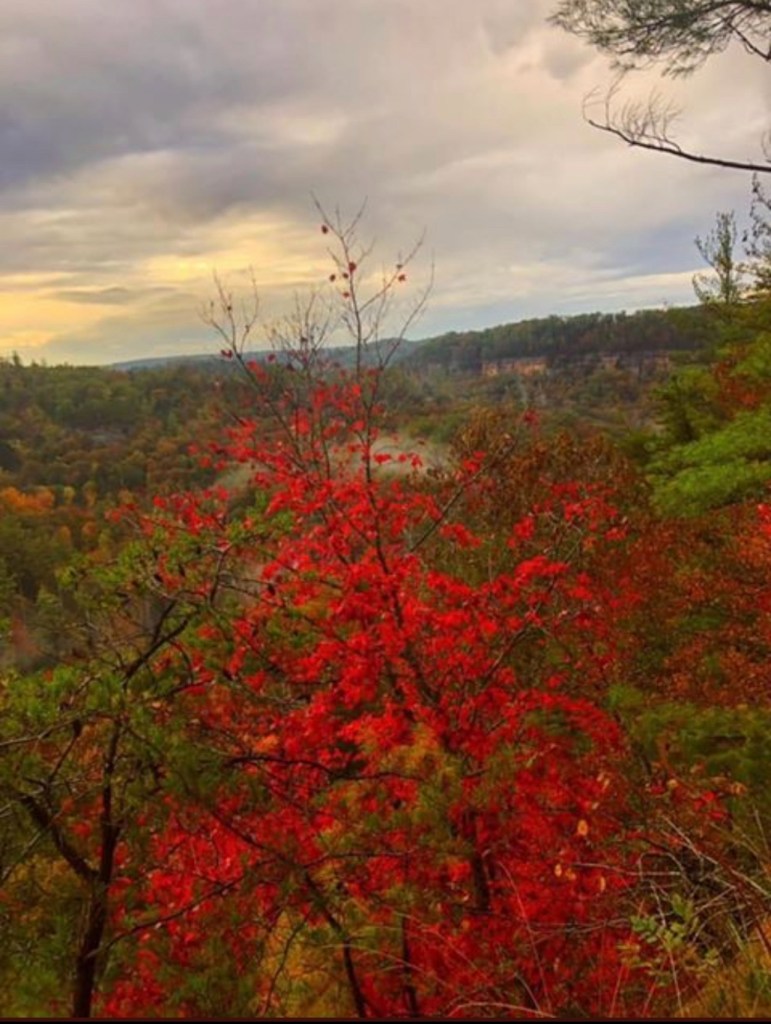
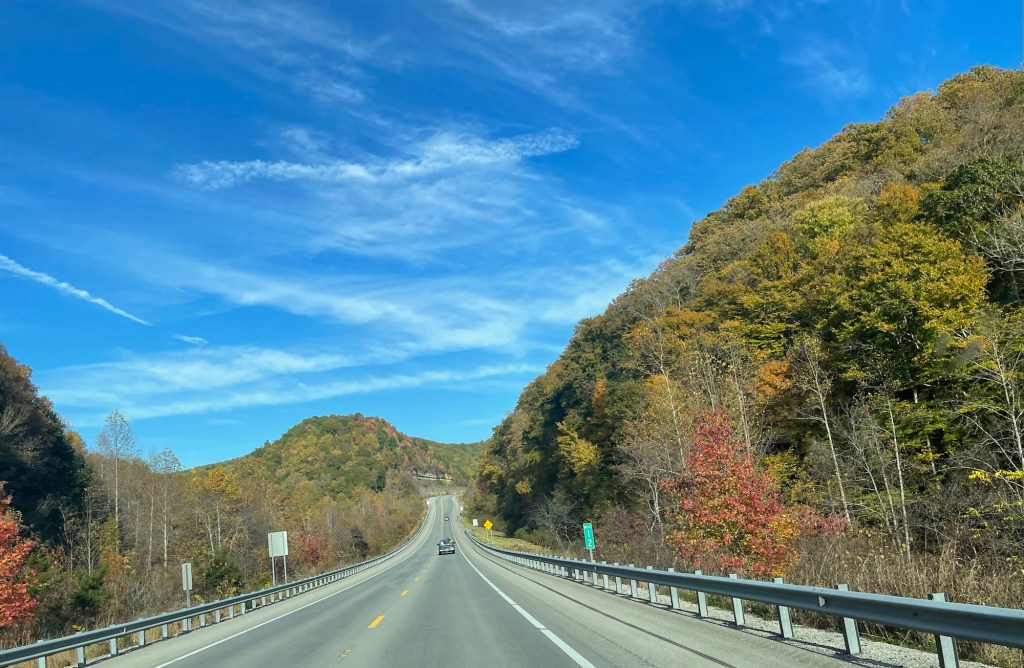
Hello from the mountains of Kentucky! Fall has arrived and with fall, comes cooler temperatures at night and in the mornings. With fall also comes a beautiful array of colorful leaves, mountain sceneries, and fall flowers. The beauty of our mountains is better experienced than described. Come along with me as I take you on a photographic journey through the mountains.
Taken while traveling to see our granddaughter.
I enjoy the drive and the scenery along the curvy mountain roads as we travel deeper into the southern Appalachian Mountains to visit one of our granddaughters.
The deeper south… the bigger the mountains. Another view of Pine Mountain. Traveling deeper south.
The deeper we travel in the mountains, the more amazed I am with each mile. God’s hand and miracles abound everywhere. The picture above is a view of Pine Mountain. The view is stunning in all seasons.
Brilliant red leaves on the homestead.
A glimpse of some of the beautiful colors in our own yard. Beauty abounds everywhere in the mountains in the fall.
Fall blooms!Kentucky’s famous Cumberland Falls during mid fall. Photo Credit Marvin Meyers.Another view of Cumberland Falls. Photo credit Liz Hubbard.
Cumberland Falls is a state park that boasts of its beautiful natural water fall, hiking trails, hidden caves, a gift shop and picnic area. It is located near a beautiful Inn where great food and lodging are available. The Falls are famous also for the moon bow. The bow appears at night certain times of the year.
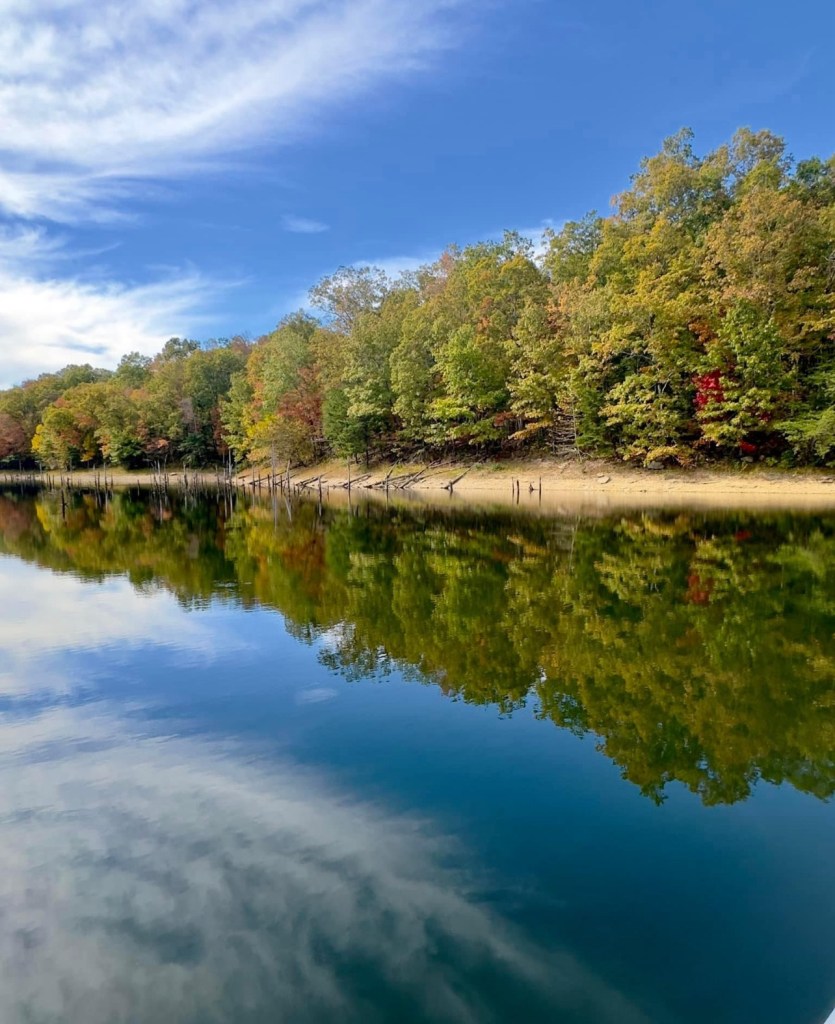
Laurel Lake Photo credit Denva Hoskins.
Laurel lake is a great place to fish, ride boats, relax on a pontoon, or ride jets across the water. It’s a common tourist attraction that brings people from far and near.
University of the Cumberlands. The campus is beautiful year around.
University of the Cumberlands is a private college that is nestled in the southern region of the state. Students from all over the world attend college here. The campus is beautiful regardless of the season.
View from the top of the mountains! Ride the trails and the scenery is gorgeous! Another beautiful view of the mountains.
Whether you ride a mountain trail or country road, or stop along the side of the road to enjoy the beauty, the view is breathing!
The backroads in the mountains.Beautiful fall colors from our driveway.Even the streams (creeks as we call them) are beautiful this time of year.
Creeks as we call them are staple for our homestead. We use it to water the garden, water the animals, and the grandkids love to play in the water. In the picture above it appears very small. However, when it rains a lot, it gets quite rapid. On the south side of the creek, there’s a hole deep enough and wide enough for the kids swim and fish in.
A glimpse from of the mountain tops behind our home.My drive home!
Whether you going or coming, the Kentucky mountains are beautiful during the fall season. I hope you have enjoyed God’s beautiful country in this small photographic journey through the Kentucky mountains. God bless! Feel free to like, subscribe, or comment.
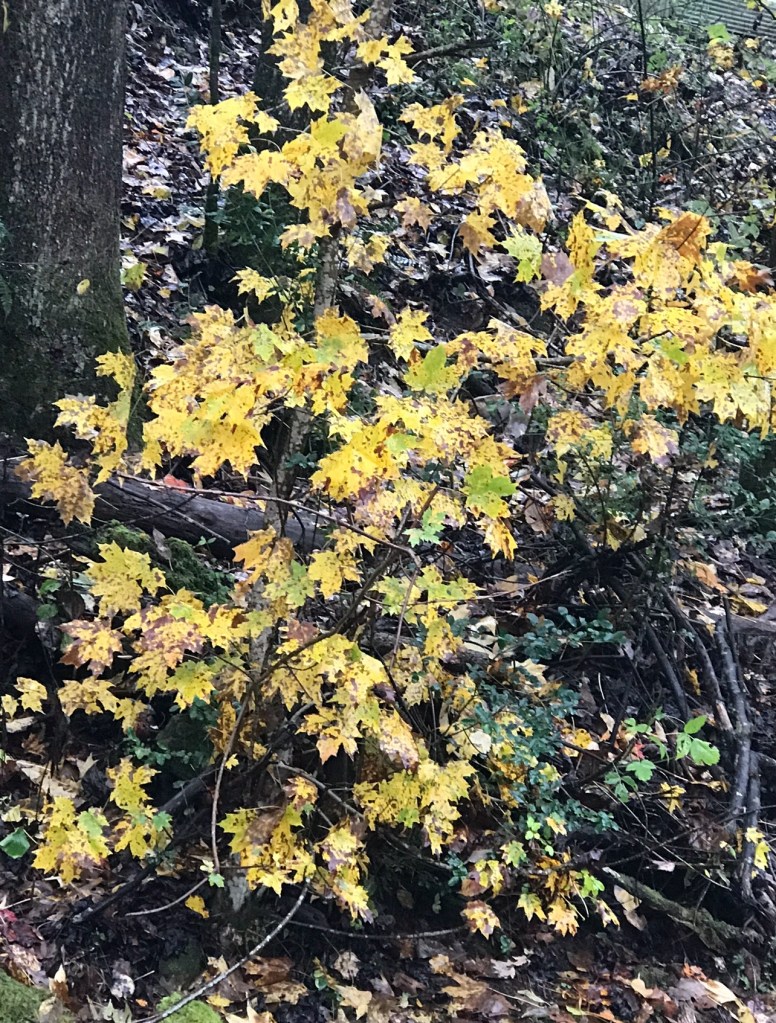
Good morning, from the mountains of Kentucky. Fall in the mountains is one of my favorite times of year. I love the vibrant colors of the mountains. The leaves go through change that ranges from green to yellow, to red, and orange. The colors remind me of my mamaw’s colorful patchwork quilts made from random scraps of fabric. I love the aroma of fall in the mountains as the leaves fall. The flavors change in our cooking, teas, diffusers, and in the local coffee shops. Lots of pumpkin spices, carrot cakes, pumpkin lattes, and more. I love the sweaters and boots that come with fall. It’s a beautiful time to live in the mountains of Appalachia.
Fall in the mountains.
Fall on the homestead is more than just pumpkin spice and colorful leaves, it’s a time of hard work. It is time to dig the late potatoes and onions. Once the potatoes are dug, they’ll be stored in the basement for winter potatoes and left overs will become seed potatoes next year. Once the onions are dug, they’ll be placed in a large box on the porch in filtered sunlight to allow the skins to dry. When the skins are dry, the onions are stored in the basement for the winter. Fall is also the time for cleaning up the garden, rolling up fence rows, clearing away the debris from spent plants, and rolling up plastic used to help prevent weeds. It’s also time to collect remaining plants for seeds.
Beautiful fall foliage
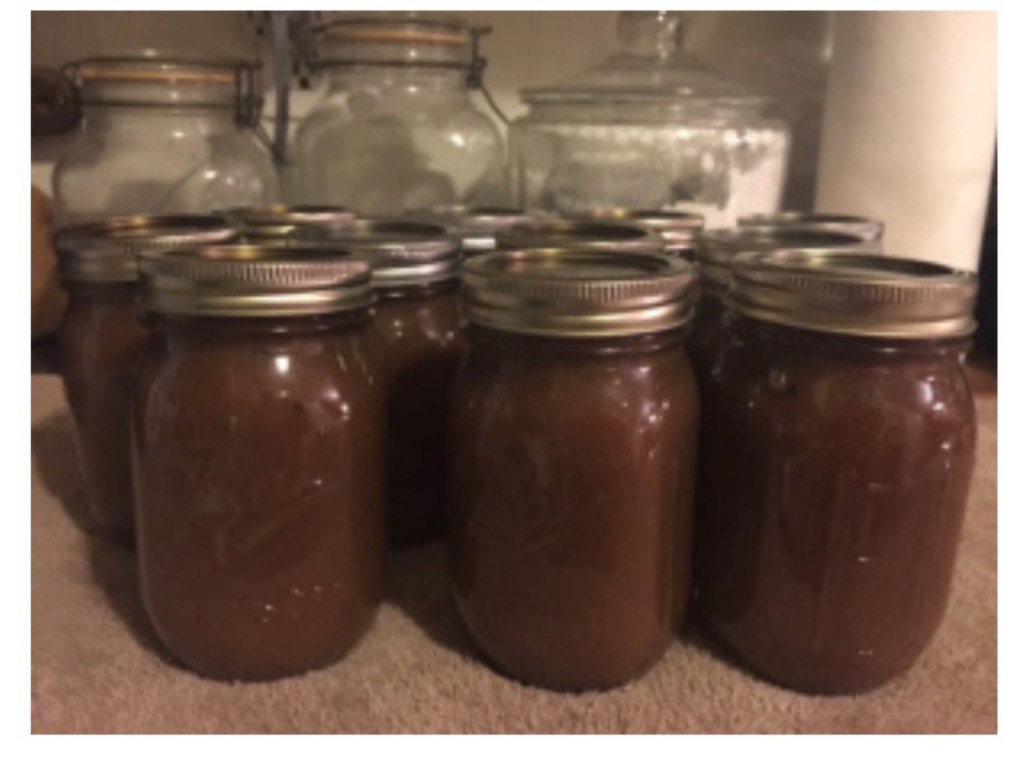
With the remnants of beans left on the fence, we pick the shriveled pods and place them in a large breathable box in the basement to continue drying for bean seed. Once the bean hulls have dried completely the beans are removed and allowed to dry an additional couple of days and then stored in a clean jar for seed next year. Don’t forget to always label your jars as it can get confusing which bean is which once they’re shelled. Fall is also a time to can delicious apple butter for the year. We usually can apple butter every other year. Apple for frying are put away yearly.
Homemade apple butter
Once the potatoes and onions are dug, the seeds are collected from remnant tomatoes, and beans and the garden is cleared from dying plants, it’s time to clear the ground and burn some wood in the garden to richen the soil with necessary magnesium, phosphate, zinc, and other nutrients required to grow a healthy garden. The land will then be plowed and the wood ash turned under the soil. We’ll then sew a cover crop for the winter.
Finally, fall is a time to collect herbs for drying. The herbs are dried for culinary purposes, oils, and salves. We’ve been richly blessed this year with an abundance of basil, oregano, yarrow, and sage all of which are delicious additions to dishes, oils, and for medicinal purposes. With all the outdoor work winding down, fall is also a time to reorganize the many jars of food we’ve preserved over the year with moving the fresher jars to the back of the shelves to ensure we are using the preciously canned jars first. It’s also a time to reorganize the spice and tea cabinets. Herbs and spices that are older than three years are emptied into the compost bin to help enrich the compost with antioxidants. Some of the older tea leaves are reserved for weak teas to water house plants.
Yarrow plant used for making salve.
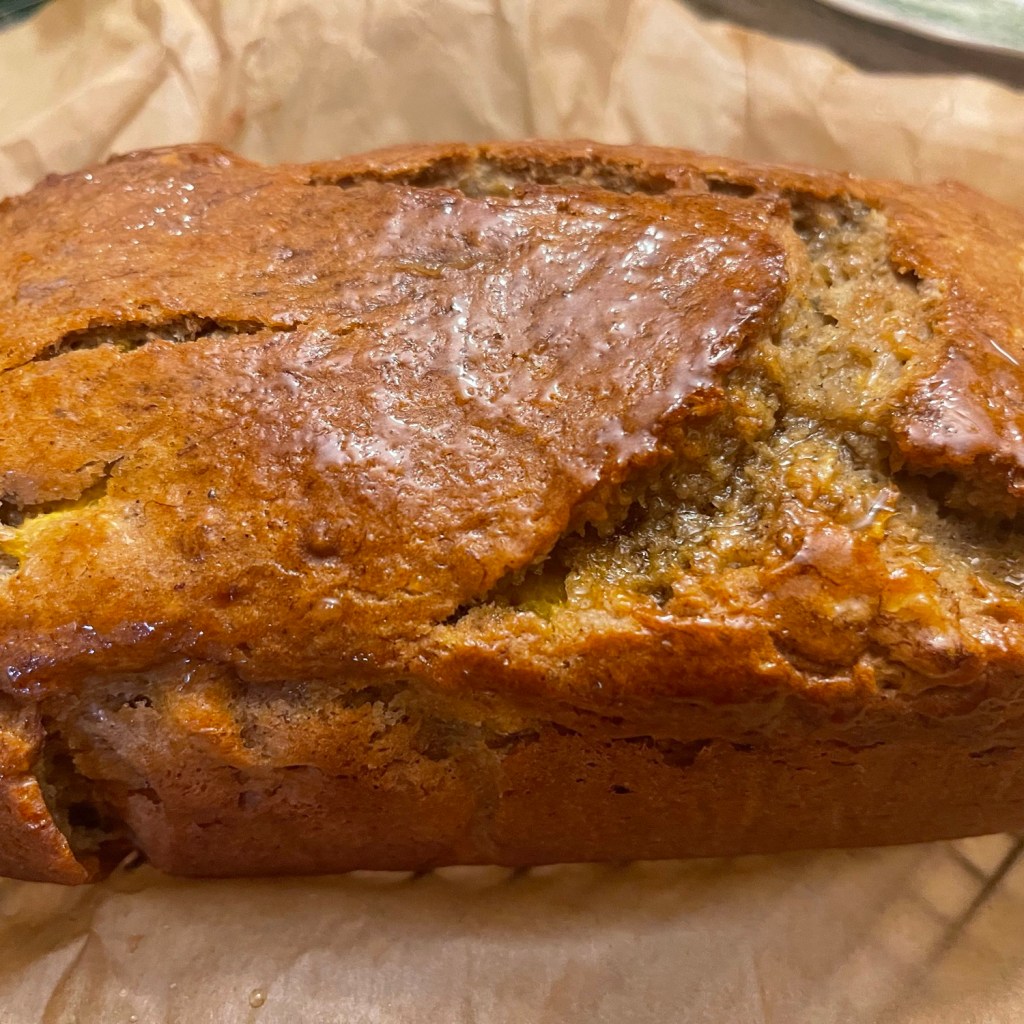
That’s just a few things that happens on the homestead in the fall. There’s more work, but also some fun activities. During the fall we have cookouts, nights with toasting marshmallows, roasting wieners, and big fall dinners for all the family. It’s a time that we enjoy baking pumpkin bread, and other fall favorites. Fall is when we dehydrate apples to enjoy during the winter. It’s also the best time to porch sit with a cup of tea or coffee and enjoy the beautiful fall leaves in the mountains.
Fresh baked peach bread
I hope you’ve enjoyed this glimpse into our life during the fall on the homestead. Feel free to like, subscribe, comment or follow. May the Lord bless you with a wonderful and peaceful fall. God bless from the mountains of Kentucky.
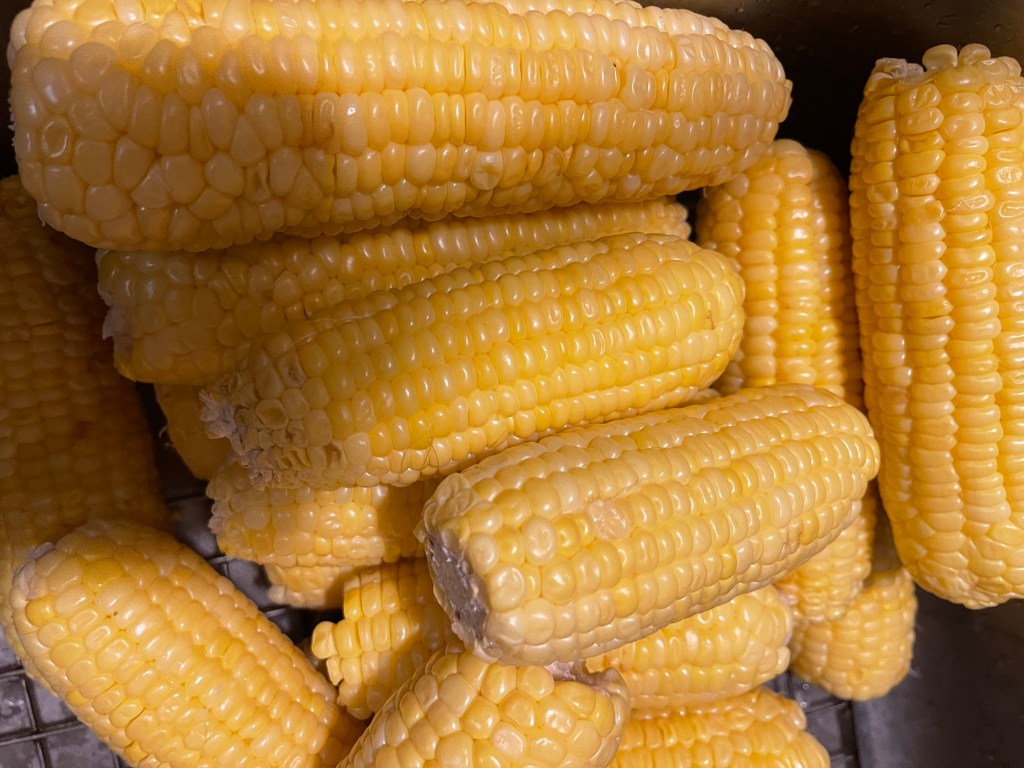
Good morning from the mountains of Kentucky. It’s the time of year that most are cleaning up the remainder of the remnants left in the garden. We too, are at that point. We have scattered tomatoes, and peppers still clinging to the vines and potatoes to yet to dig. Our corn is exhausted and finally put away in the freezer for the cold days of winter. I am excited to share how we preserve our corn so we have corn year around. Grab a cup of coffee or tea and discover how we preserve our corn.
The last ears of corn if the season.
Preserving corn was a tradition handed down to me by my mom and grandmother. I remember sitting on the porch helping them shuck corn in large quantities. Memories like those are vivid in my mind and remind me of the blessings of the knowledge of working the land. I cherish the memories and the gift of rich traditions and knowledge of homesteading and farming. Our heritage helps us save money, be self-sufficient, and provides fresh homegrown food for our family year around.
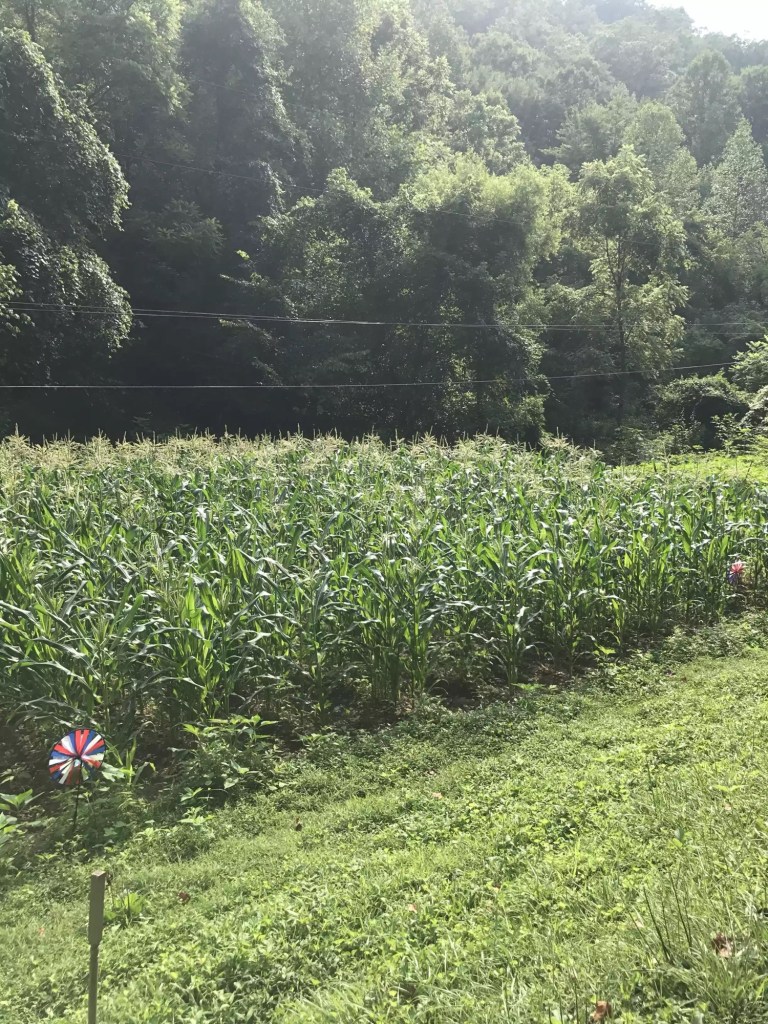
Our grandson enjoying roaming through theyoung corn.
Corn can be preserved on the cob or off the cob. Below is the steps for both methods.
Tools required:
Sharp knife
Large bowl or pan
Large Dutch oven
Vacuum sealer
Vacuum seal bags
Ingredients:
Corn
Butter
Sugar
Evaporated milk
After picking the corn, find a cool pace to shuck the corn. we usually clean ours on the porch in the evening shade. We then discard our shucks into the compost bin, which in turn later becomes fertilizer for our garden. We use a damp cloth to wipe down the corn as we shuck it to help remove stray silks. We freeze anywhere from 50 to 60 ears of corn per family each year. To freeze corn on the cob, we simply vacuum seal anywhere from four to eight ears and add it to the freezer. The key is vacuuming raw dry corn. It’s amazing how fresh the corn is when thawed and prepared. It tastes almost like fresh from the stalk! Do NOT boil corn prior to freezing! Raw is the best method of preserving.
Mid-season corn.
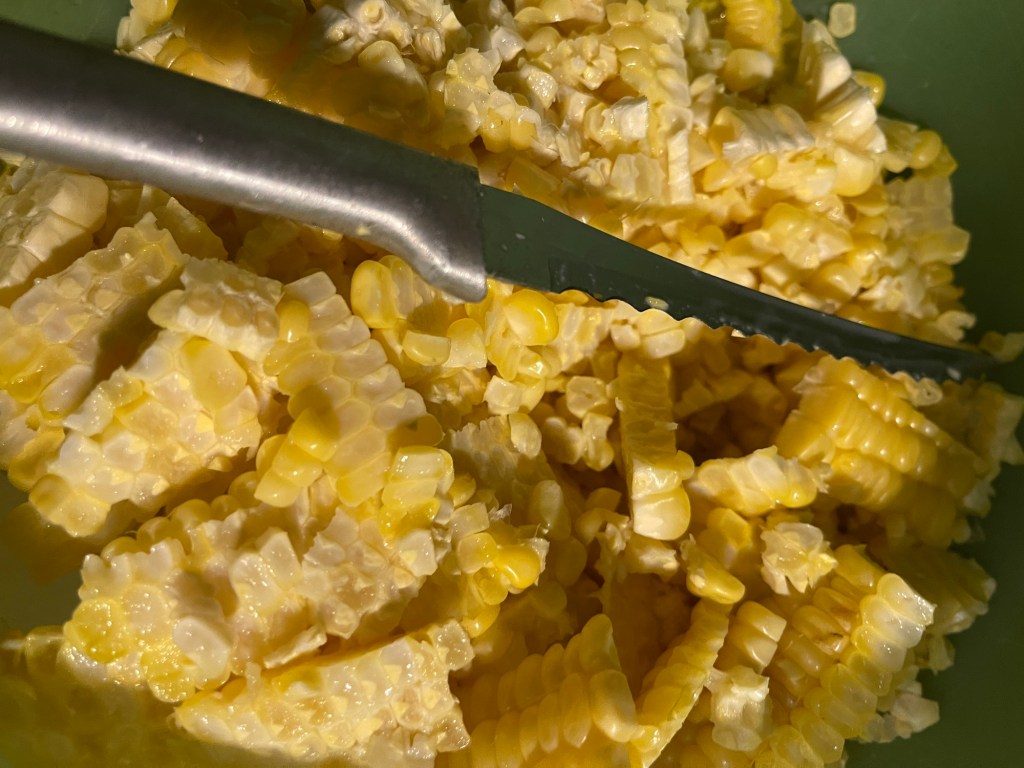
For cream style corn, the method is a bit more complicated but well worth the process! Once the corn is shucked the cutting begins. I like to used the knife picture below to cut the corn off the cob.
Cutting fresh corn from the cob.
I hold an ear of the corn with the larger end down in a large bowl and cut down the cob to remove the corn from the cob in large sections. Be sure to get all the corn off, including the creamy bits left beneath the kernels of corn as this is what creates the creaminess in the fried corn. Once the bowl or container is full pour the cutoff corn into a large stockpot. Heat on low heat to prevent the corn from scorching. I usually use 6-8 quart cast iron Dutch ovens to prepare corn. Add one cup of organic cane sugar, one large spoon of butter of choice. I use plant butter, but any good quality butter will work. If the corn is not creamy enough, add evaporated milk or plant milk for a vegan option until desired consistency is achieved. Allow corn mixture to cook on very low heat until kernels are tender. I usually simmer my corn on low for about ten minutes stirring frequently. Remove from heat. I allow my corn to cool and place in a covered bowl in the fridge overnight. Allowing it to cool makes it easier to handle when sealing in vacuum seal bags.
Simmering the cutoff corn.
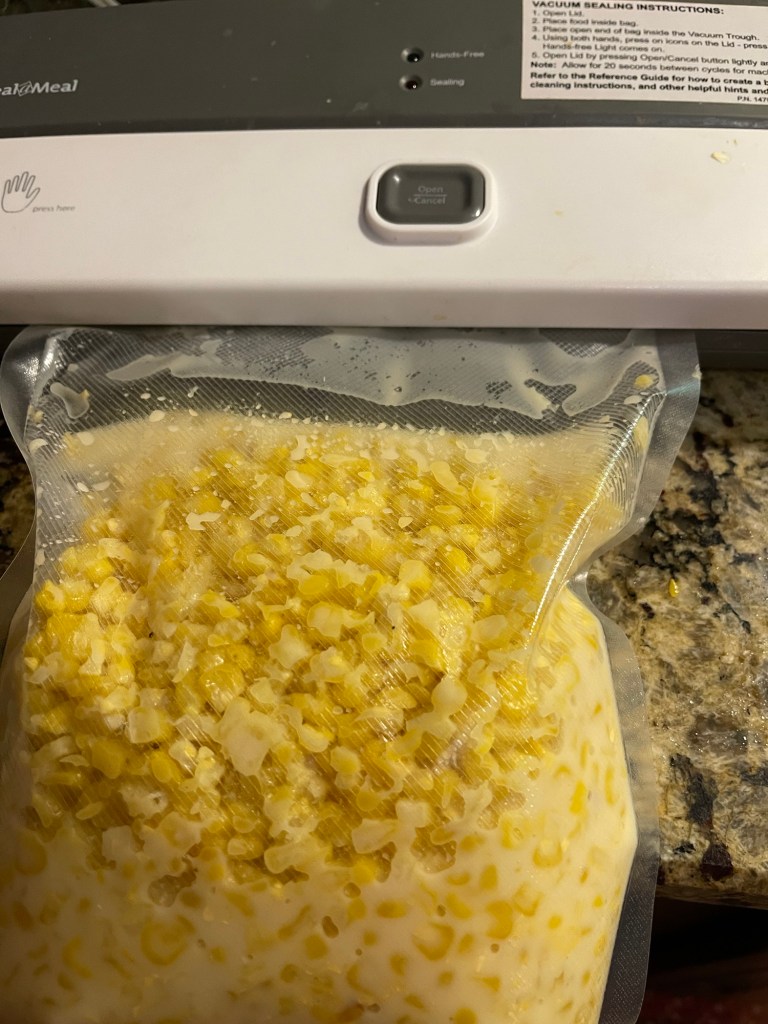
After the corn has cooled over night in the refrigerator, place the corn in desired size vacuum seal bags. Allow enough room between the corn and the edge of the bag for the seal to seal without pulling the liquid from the bag. I typically use quart and gallon bags. This allows me to have a variety of sizes. Either size I choose, I leave a couple of inches free from corn and press the air out and seal the edge of the bag with the vacuum sealer. If the bag begin vacuuming, you can remove a little of the corn and wipe the bag clean and start the sealing process over. The seal prevents air from gathering in the bag while in the freezer, thus allowing it to last longer. I have used zipper quart bags and they work okay, but the corn is not as fresh tasting as it is almost impossible to keep air out of the zip style bags.
TIP: to help with storing multiple bags of corn is to place a piece of wax paper or parchment paper between the bags before placing them in the freezer to prevent them from sticking or freezing together.
Sealing the bag, not vacuum sealing, just sealed. One batch finished.
We’ve kept corn frozen for a couple of years and found it to be as good on the third year as it was the first year. The key to great corn on the cob is not over boiling it. I have found that dropping the thawed ears of corn in warm water, bringing it up to a boil, and turning it off works best for me. I also thaw it sometimes and wrap a damp paper towel around an ear of corn, and microwave for one minute for a quick tasty ear of corn. I prepare the fried corn by thawing and warming it slowly in a skillet or pan.
I am sure you’ll love it either way you choose to prepare it. Corn is a staple in our home. We eat creamed, fried, boiled, grilled, and add it to soups and other delicious dishes. We enjoy eating what we have grown from seed to the table and knowing we are not putting artificial fertilizers into our body and saving money while eating our own fresh produce. God bless from the mountains of Kentucky. Feel free to like, leave a comment, or subscribe. Also, check out our podcast for more about our homestead. God bless!
Good morning, from the mountains of Kentucky! It’s the time of year that I am typically dehydrating apples. This year many of my harvesting plans have not gone as planned due to spending much time with my elderly mom in the hospital for the past five weeks. While at home yesterday, I noticed a small bowl of neglected apples sitting in the kitchen. They were long overdue being sliced, fried, or dehydrated. After sizing the situation up, I determined there wasn’t enough apples to unbox the big dehydrator, I didn’t want to fry them, so I decided to dehydrate them in the air fryer! There were just enough apples to make a small batch of dried apples! Here’s how I did it.
Ingredients:
Apples
Tools:
Air fryer & liner
Process:
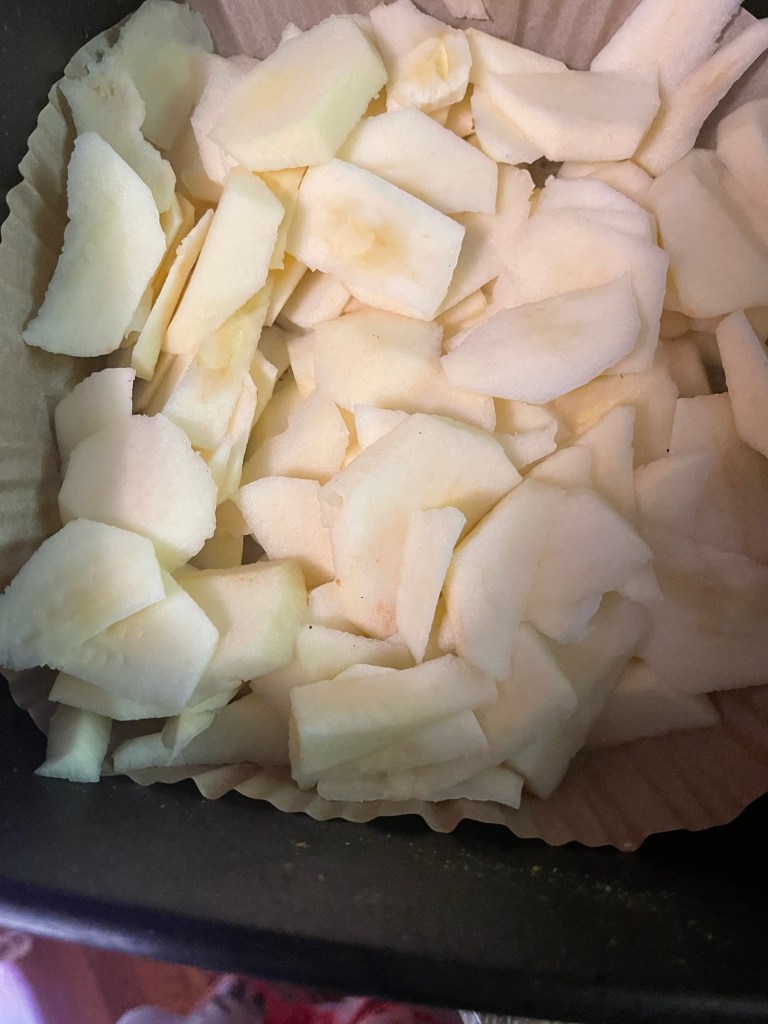
Wash, dry, and peel apples. Slice them to suit your preference. I prefer them to be sliced rather than cubed. Place a liner in the air fryer for easy removal and easy cleanup. Close the drawer, turn the air fryer on, press dehydrate, and push start.
My air fryer temperature for dehydrating is preset. So, I decided to experiment and use the suggested temperature and time. All I had to lose was seven or eight apples.
Ready to dry. Preset temp and time.
After about two hours, I checked the apples and they were doing wonderful. I continued to check the apples each hour until they reached the desired texture that I like. I stopped the apples at 5 1/2 hours. They were perfect to my liking. Delicious!
Delicious dried apple chips.
Dried apples can be seasoned prior to dehydrating by adding cinnamon, sugar, or whatever spice or seasoning you prefer. My family and myself prefer plain dried apples. They’re rich, sweet, and a bit tart. I used honey-crisp organic apples, because it’s what I had and what needed to be used. Dried apples make a wonderful healthy snack to take to work, school, long car rides, or on vacation. I also like to rehydrate them for frying, and they make an awesome apple stack cake. I typically dry a bushel in September in multiple batches in our large dehydrator, but for small batches, the air fryer was perfect. It doesn’t heat the kitchen up, doesn’t take too much space, not very noisy, and is a great way to salvage apples that may have lingered in the kitchen too long. It’s a money saver! With the price of groceries continually on the rise, cost cutting ideas are always appreciated!
I want to leave you with a scripture that has always blessed me. Zechariah 2:8 For thus saith the LORD of hosts; After the glory hath he sent me unto the nations which spoiled you: for he that toucheth you toucheth the apple of his eye. KKV
For now, God bless, from our homestead in the mountains of Kentucky. I hope you enjoy this short post, time saving, and money saving delicious recipe. Feel free to like, share, subscribe or follow. Head on over to listen to my podcast, Homesteading in the Mountains, on Apple Podcasts. My latest post is about growing, using, and dehydrating oregano.
Good morning, from the mountains of Kentucky. I hope you are having a wonderful day wherever you are. I am writing this morning from what has been my view for the past three weeks, the hospital. I may have mentioned in previous posts that my elderly mom was admitted to the hospital in July. She came in with multiple lingering complications, and a few new ones. She is eighty-six and a fighter, and a prayer warrior. Faith has been a part of what has carried her through the rough times of her life. I have learned much through staying with her during this extended three week stay.
ER visit that started this journey.
I have learned from the view from this side of the bed that my mom is an independent lady, who currently needs more help than she’s required in the majority of her adult life. She is a fighter who needs to be encouraged to keep fighting. She is brave, yet still has moments of fear. She has faith in Christ, yet the enemy has no mercy on the elderly, and inflicts fear at times with a vengeance. It’s difficult for her to accept help, yet gives grace to others freely. She is still my mom, yet needs me more than she ever has. Yes, I have learned by watching her struggle with simple tasks that once were easy, she is still a strong lady, but still needs assistance, compassion, understanding, patience, and encouragement.
Returning from a procedure to remove fluid from her lungs.
I have also learned from the view from this side that it takes a large village of professionals to care for a small frail lady. Skilled surgeons made critical repairs, while anastheoligists held my mom’s life in their hands. Compassionate nurses have held my mom’s hand, adminsitered meds, and cared for her with tender voices that soothed and comforted her, to techs that bathed and dressed her with dignity and gentleness. Radiologists that found veins through ultra-sonic views when the RN could not find a vein, to the physical therapy teams who have helped her to her feet, and are teaching her to walk again. Pulmonologists who removed excessive fluid from her lungs, helping her to breathe, while we patiently waited and breathe freely. I’ve learned to not take the simple things such as the ability to brush my hair, teeth, or feed myself so casually. These simple tasks are important… when these skills are stagnant, one feels helpless.
I learned and observed case management teams who shuffle appointments, referrals and deal with the headaches, red tape, and the hoops that insurance companies can the hurdles the companies create for the patients and family. I have witnessed this team make the patients and families lives a bit easier by handling all the minute details. I’ve experienced Chaplins who pray compassionate prayers and prayers of faith with the patients and the family. My view is filled with the wonderful people you meet along the way while you, the family member, does just what you are do… wait patiently for news and updates while supporting our family member who is on the opposite side of the view.
I have encountered countless physicians who explained diagnosis after diagnosis, procedures, expectations, and prognosis with a plan for the future, while gently encouraging my mom that God is always in control. While the teams of cooks prepare her food, maintenance ensures a clean room. Receptionists who guide, assist, and answer questions to offering a friendly smile. Coffee shop baristas that make that perfect cup of coffee, to the volunteers who bring snacks, prayer clothes, and offer a heartfelt prayer. From my view this was only a few of the many individuals who have whom I have met on this extended journey, and whom have worked so diligently to helping my mom make recover. I have leaned that there are many more pieces to this medicinal puzzle, too many to list one by one.
Having an x-ray in the room.
The view from my side looks much different than the view from her side. While I see the team of professionals working to provide the care she needs, my mom views them as annoying at times, blessings at others, familiar faces, and sometimes uncertain faces behind protective masks. I see the reality of fragile lives hanging in the balance. While some are hearing annoying bells and alarms, professionals are hearing urgent calls that a patient is in trouble. While she naps periodically throughout the day… I wonder what the future holds. Yes, the view from my side sees many individual diverse pieces to a puzzle that fits strategically into a position that is unique to his or her talent all working to toward the same purpose to help others heal and recover… and to comfort and support those of us who wait patiently on this side.
Eating breakfast in the hospital cafeteria while she has PT.
I felt the need to share this part of my heart with you today. I will leave you with the following; don’t take life for granted. One day my mom was doing laundry like any other day and the next day fighting for her life in ER. God has a purpose and a plan, we just have to trust him. Life is fragile and every day is a gift. When we are strong we are still weak. We can’t do everything by ourselves, and it’s okay to accept the help of others. Be kind and considerate as we do not know other’s stories or what they are going through. Smiles are free and contagious. God provides strength when we feel we don’t have any left. Take life one moment at a time.
God bless, from the mountains of Kentucky. Feel free to like, subscribe, comment, follow. As always, may the Lord bless you abundantly.
Hello from the mountains of Kentucky. I hope August is off to great start for you. It’s been a busy one for us as we head into harvesting season, and with my mom being in the hospital for past two weeks. I’ve spent much of my time with her and let the family tend most of the harvesting. However, I have been enjoyed picking beans, canning a couple dozen jars of those, preserved some pickles, and pickle relish. In reality, the harvesting and preserving has just begun. Now, onto the topic at hand, why we homestead.
Spreading two-year old manure over the garden.
I am often asked why we homestead. I wanted to share a few of the reasons why we chose and enjoy our way of life. Homesteading was a way of life for our grandparents, and great grandparents. Our parents also raised large gardens and homesteaded to an extent. It’s a way of life that we find rewarding in many ways. It’s a lot of hard work, but it’s work that comes with great rewards.
We homestead because we are blessed with land that is rich and fertile. The soil is perfect for growing a garden. We enjoy growing corn, beans, potatoes, tomatoes, peppers of all kinds, cucumbers, onions, zucchini, squash, cantaloupes, carrots, radishes, lettuce, kale, and other seasonal vegetables. We love having fresh organically grown fruit and vegetables in the warmer months and preserved vegetables for the winter months. Either way, growing, harvesting, and preserving our own produce ensures we are eating healthy food that is free from artificial fertilizers, and or pesticides.
Early spring garden.
We love to can, freeze, and dehydrate. Canning green beans is a favorite! Canning Green Beans the Time-Tested Way (updated) our family enjoys fresh tomato juice to make soups, pasta dishes, and more. If you’ve not tried home canned tomato juice, you don’t know what you’re missing. Canning Tomato Juice the Easy Way! Updated Information! Feel free to browse my website for canning pickled tomatoes, pickles, relish and more. Preserving veggies also reduces our grocery bills, and again, allows us to have our own homegrown organic veggies at our fingertips year round.
Our family also enjoys growing our own fruit. We have blackberry, raspberry, and blueberry bushes. We also grow strawberries and various types of melons. and have apple and peach trees. We also love growing, cooking, and preserving rhubarb. We love preserving jams, jellies, and pie fillings from the fruit and we can be found picking and eating it fresh.
Drying chocolate mint for teas. Blackberry jam made from wild blackberries our grandson picked.Fresh strawberry jam.
Homesteading is more than growing, harvesting, and preserving our own food. It’s about working the land to help it provide for us as well as our animals. It’s about taking pride in the land that the Lord has blessed us so abundantly with. We love to share our bounties with others and we enjoy bartering. If we have an abundance of cucumbers and someone else has an abundance of peppers, we may trade produce with each other to help the other person out.
Homesteading also allows us to be more self-sufficient by growing and harvesting our fruits and vegetables, raising our own chickens and ducks for eggs and meat, and growing and tending our herb garden to make teas, spices, and medicinal oils and poultices. it’s a way of life that allows us to share our bounties with our family, friends, neighbors, and church family.
Farm fresh eggs
Homesteading is a tradition that’s been passed down from generation to generation. Our parents and grandparents shared their knowledge of working the land with us as children, young adults, and they’re still sharing their words of wisdom with us through conversations, written journals, and precious memories from the past. My grandfather taught me much about fertilizing the land with natural fertilizer such as, rabbit and horse manure, compost, egg shells, and more. He taught me how to reduce waste and turn peelings, coffee grounds, egg shells, tea leaves, and veggie and fruit scraps into rich fertilizer by creating compost from all natural food scraps, dried leaves, wood chips from the chicken and duck run, and nature. Compost creates a rich fertilizer for the garden, and fruit trees.
Herbs are another large part of our homestead. Our herb garden expands each year with new herbs that we find useful for making great tasting teas, spices, and for medicinal uses. We enjoy growing a variety of basil, mints, oregano, chives, sage, lemon balm, bee balm, hyssop, yarrow, dill, echinacea, lavender, rosemary and more. Chocolate mint and peppermint are two of our favorite herbs for making hot and cold tea. Oregano, basil, and sage are among our favorites for spices. Chives make a great addition to most meals, and fresh dried sage makes Thanksgiving stuffing even more delicious. Head over to my podcast, Homesteading in the Mountains on Apple Podcasts to learn more about growing herbs, cooking with them, and using them and discover how I use them for medicinal purposes.
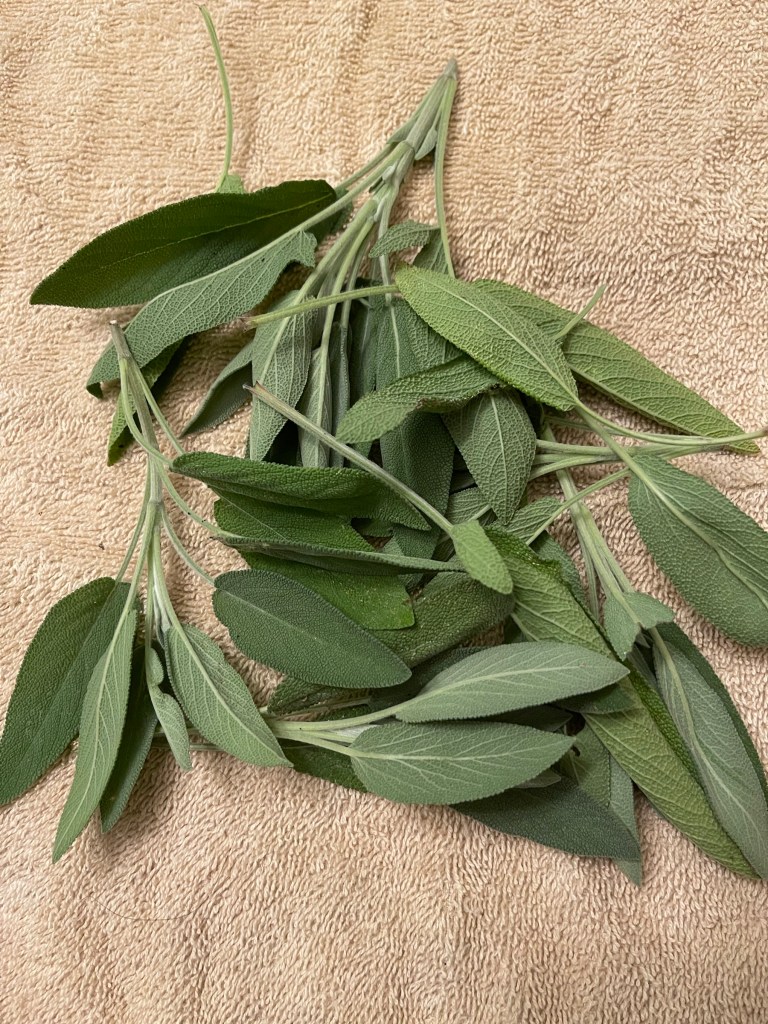
A few clippings of sage to dry and add to the spice jar.
Homesteading is something we take pride in. We also love to bake all of our breads from scratch. Our daughter bakes sourdough bread, white yeast bread for sandwiches, rolls, buns, and more. I like to bake artisan breads. We both enjoy baking biscuits and cornbread. Regardless the bread, cakes, or cookies, they’re delicious and do not contain all the added preservatives as processed bread. Either bread is a healthier choice that we enjoy with soups, as toast, for sandwiches, with meals, and if there’s an end piece left when baking day rolls around, we use it to make croutons for delicious soups and salads. The grandkids all enjoy the breads and the sweet treats. Baking helps keep our family healthier by consuming less processed foods. We also like to avoid food dyes, preservatives, and enjoy using organic flours and yeast to bake with.
Homesteading, has health benefits through consuming less processed foods, eating primarily organic foods, decreases our grocery bills, increases our income through selling produce and eggs. Increases our health through gaining exercise working the land all while being more self-sufficient, and proud of our hard work, our land, our harvest, and the fact of taking Better care of our nutritional needs and our families. Homesteading also allows us to work independently. I am a college professor and am on campus two days a weeks. I host a podcast and maintain this website as well as being an author of various books with one in works. I am also a doTERRA essential oil dealer. My husband is retired from welding for a major coal company in our area. Our daughter who shares the homestead with us homeschools, is self-employed as a Plexus consultant, and also an author. Her husband is self-employed, which helps him have time to work the land as well. Any way you look at it, homesteading is one of the most rewarding ways of life. We give our Lord, Jesus Christ, all the glory and praise for His blessings and the land and wisdom that He provides us with.
I hope you’ve enjoyed this post. I look forward to reading your comments. Feel free to like, comment, share, and or subscribe. God bless, from the mountains of Kentucky!