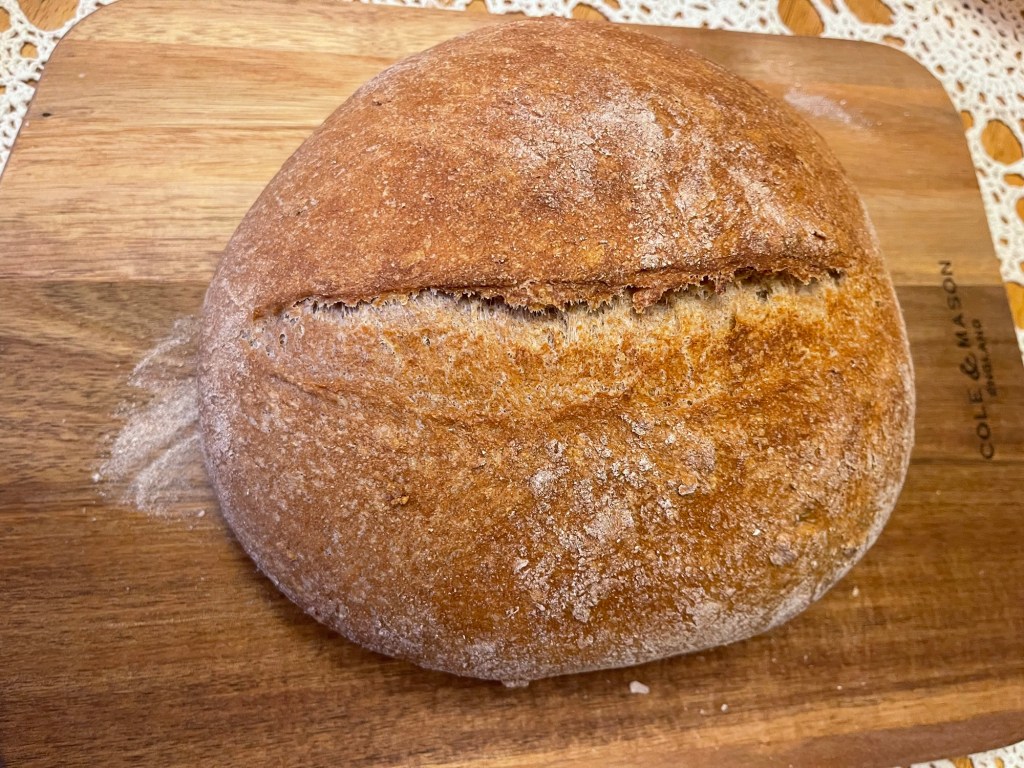
Hello, from the mountains of Kentucky! Today was baking day on our homestead. The day included banana bread, sour dough tortillas, and whole wheat bread. I am often asked why I bake. My answer is always the same. I love to bake, and I don’t like the ingredients in store bought bread. Have you read the bread labels? Even the bread that is supposed to be healthy has questionable ingredients. Let’s get into the whole wheat bread recipe!
Ingredients:
3 1/2 cups of King Arthur organic whole wheat flour
2 1/2 teaspoons quick rise organic yeast
2 teaspoons pink Himalayan fine sat
1 1/2 cups of warm filtered water
2 teaspoons organic vital wheat gluten (optional)
Mix the dry ingredients in a large glass bowl. The vital wheat gluten is optional. It helps the bread to be fluffier and less dense. If you choose to use this ingredient it should be mixed with the dry ingredients. Heat the water to 78 degrees and add a little water at a time while mixing the ingredients with a danish dough whisk or a large wooden fork. Mix ingredients thoroughly. You may add a little water if the dough feels too dry. Don’t over mix the dough. When the dough is shaggy and sticky, cover the bowl of dough with glad wrap and place it in a warm place to rise for two hours.
After two hours the dough should be doubled in size. Add a cup of water to a large pan and place on the bottom oven rack. The steam from the water will help keep the bread crust tender. Place the cast iron Dutch oven with the lid on it in the oven on the middle rack. The pan of water should be below the Dutch oven. Set the oven to 450 and start the oven. Do not use the convection setting to bake the bread.
My bread Dutch oven
Scrape the dough out of the bowl onto a floured non-bleached parchment paper. Dust your hands and the dough with flour to make it easier to handle. Fold the dough from each side and shape the dough. Allow the dough to rise while the oven is preheating. When the oven reaches 450 score the top of the bread with a bread lame or a sharp knife. Carefully remove the Dutch oven and place the bread on top of the parchment paper inside the Dutch oven and cover with the hot lid. Bake for 25 minutes with the lid on. I usually take the lid off the Dutch oven and bake for an additional three to five minutes allowing the bread to brown, if needed.
Carefully remove the Dutch oven from the oven. Using the edges of the parchment paper lift the bread out of the Dutch oven and place it on a cooling rack. Cover the bread with a clean dish towel. Allow the bread to cool for at least 30 minutes before cutting.
Feel free to like, follow, or subscribe to our blog. Also, head over to the Apple Podcasts and search out our podcast, Homesteading in the Mountains! I am anxious to share how to grown your own micro-greens in an upcoming post! I hope you and your family enjoy this bread as much as we do! God bless, from our homestead to yours! Happy baking!
Hello, from the mountains of Kentucky! I hope your February is going well! It’s hard to believe that we spring is so close! Where does the time go? So, I recently started a new journey on the homestead. Our daughter was always the only sourdough baker on our homestead… until she gifted me a starter of sourdough. My initial reaction was that I did not have time to babysit this starter. I thought I would forget to feed it and it would die. I wasn’t sure that I wanted to learn a new process of bread baking. Well… I was wrong on all counts.
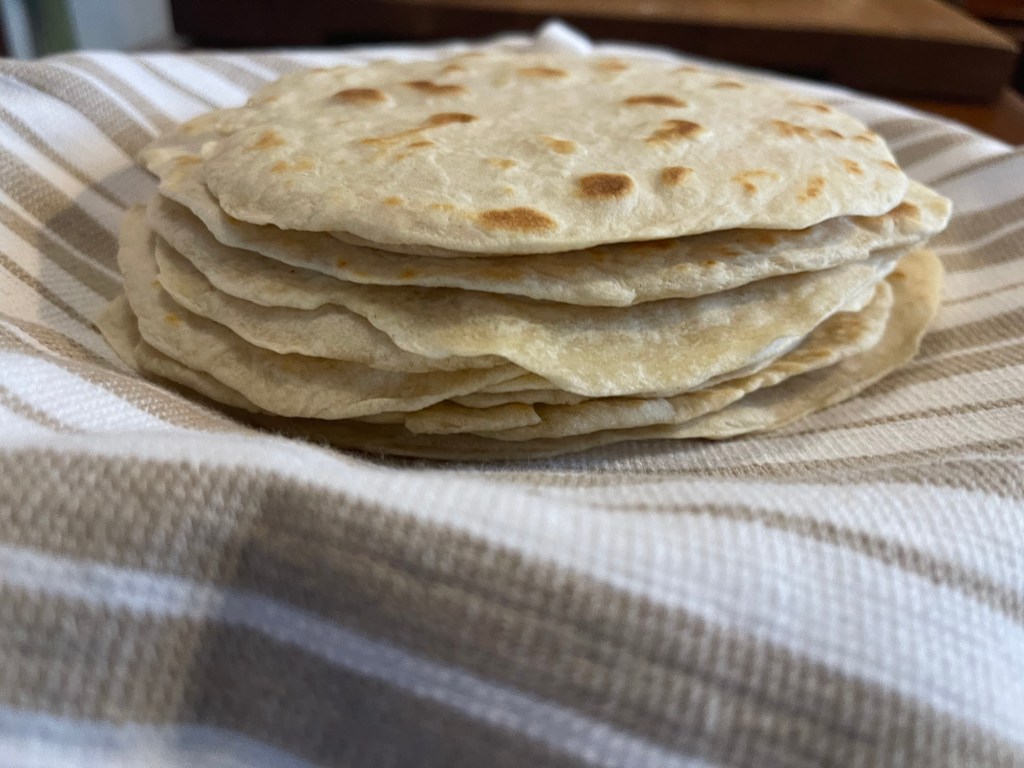
I discovered that I have a few minutes each day to discard from the starter and feed the remaining starter. It wasn’t a very difficult process to fall into routine with. What I didn’t realize was that each day I would have the gift of the sourdough discard to do something with. I didn’t realize that I could make pancakes, muffins, breads, cakes or gift it to others. I also learned that I could save my discard in the fridge, and I learned to make tortillas with it! This sourdough starter turned out to be the gift that keeps on giving. Let’s get started with making sourdough tortillas!
INGREDIENTS:
1 cup of sourdough discard
3 cups of unbleached all purpose flour
1 1/2 tsp. Salt (I use organic pink fine Himalayan salt)
1/4 cup extra light extra virgin olive oil
3/4 cup warm filtered water (70 – 75 degrees)
Add the ingredients in a large glass bowl. Mix with either a large wooden fork or with your hands. I prefer to work the ingredients into dough by using my hands. I find working dough with my hands to be a satisfying experience. Once all the ingredients are in the bowl, work the dough into a ball. Knead and stretch the dough and fold it several times.
When the dough is no longer shaggy and feels soft to the touch, put the dough on a floured parchment paper, or floured surface. Work the dough by kneading it a few more times. Cut it into six pieces then divid each of the six to make twelve total balls of dough.
Next, heat a skillet over medium heat until it very hot. I used a ceramic coated cast iron skillet to fry the tortillas in. It worked fine. While the skillet was heating on medium heat, I rolled each of the six pieces of dough into small balls. I floured the parchment paper and then rolled one ball at a time until I reached the desired size and depth of each the tortilla.
Rolling the small balls of dough for tortilla.
I fried each tortilla for approximately one minute on each side. I adjusted the heat of the skillet after about six of the tortillas to prevent burning the bread. The tortillas fried equally as fast as the first tortillas as the skillet remained hot.
I used unbleached coffee filters to separate the warm tortillas. I had a box of the filters I had purchased that are too large for our coffee pot. So instead of wasting them, they acted as a great vessel to prevent the tortillas from sticking to each other. Once all twelve tortillas were fried, I allowed them to completely cool and then stored them in a gallon zip lock bag. The tortillas can also be stored in a large bowl with an air tight seal. The second time I made tortillas I did not use the coffee filters to separate. Instead, I stacked them and wrapped them with a clean cotton dish towel. Once they were all fried, I wrapped the stack of them in wax paper and put them an air tight container. Both ways worked well.
We have used the tortillas as wraps, to dip hummus with, and for fajitas. One thing to keep in mind is the taste of the tortillas do not take on a strong taste of sourdough unless you let the dough rest for several hours prior to rolling and frying. Allowing it to stay covered for several hours ensures the starter/dough ferments. If you make the tortillas as soon as you mix them, there will be a slight sourdough taste on the backside of each bite. If you rest the dough, the tortillas will have a strong sourdough taste. Either way, they’re delicious!
I hope you and your family enjoys this recipe as much as we do. The temperature is frigid in the mountains today’ it’s a low 25 degrees this morning. Knowing that it’s 29 days until spring makes me happy! I’m ready to get out and work in the gardens. Don’t forget to head over to our podcast, Homesteading in the Mountains, on Apple Podcasts. God bless from our homestead! Feel free to follow, like, or comment!
Hello, from the mountains of Kentucky. Snow still covers the ground on the homestead. While it has melted in a lot of places, it lingers here. Our farm lies down between two mountains resulting in us being behind the north side of the mountain. Our farm is located in what Appalachian people call a holler! We don’t mind it… I can’t imagine living anywhere else. Our homestead is the property in the end of the holler. No one above us, in front of us, or behind us. We love the privacy and lack of a of seeing traffic passing by. We have one neighbor who can see the lower end of our land, which helps with insurance and to keep an eye on our property if we’re gone. All that being said, I am excited to bring a new recipe that is gluten free, dairy free, and vegan it can easily be changed to non-vegan as well.
I was challenged with creating a dessert for our daughter’s birthday, that our youngest grandson could eat. He has recently become gluten and dairy intolerant. He tested negative for celiac disease and allergy tests are scheduled to help diagnose the problem. Until an official medical diagnosis is made, we’ve strived to remove both dairy and gluten from his diet, as this is what seemed to give him the most trouble. Our efforts seem to be working. We also discovered while on this gluten free journey that many spices contain gluten. I have used organic spices for years and was happy to learn that the majority of organic spices are gluten free. However, we must always read the labels to be for sure. With all that being said, I am excited as we move forward to post gluten free recipes that are also dairy free and vegan in upcoming posts. Here we go with a first, which was a huge success! Carrot Cake!!!
Cake Ingredients:
Egg substitute equaling 4 eggs ( I like just egg)
1 1/2 cups of organic cane sugar
2/3 cup of organic light brown sugar
2 tsp of pure vanilla extract
1 cup of melted organic unrefined coconut oil
1/2 cup of sweetened almond milk with a tsp of organic white vinegar (you may sub for buttermilk if not following a plant based diet)
1/2 cup drained crushed pineapple in pure juice no sugar added
2 tbs of pineapple juice from pineapples
2 1/4 cup of gluten free King Arthur’s organic flour (may sub for all purpose flour)
1 1/2 tsp good quality non caking baking powder
1 tsp non caking baking soda
1 tsp organic cinnamon
1/4 tsp organic ginger
1/4 tsp of organic nutmeg
1/2 tsp non caking salt (I like pink Himalayan)
2 1/2 cups finely grated organic carrots
1/2 cup organic pecans finely chopped (optional)
1/2 cup choice organic raisins (optional) I like dark raisins but you may use golden
Frosting Ingredients:
3 cups sifted organic confection sugar
1 stick (equals 1/2 cup) of Country Crock plant butter
8 ounces of organic plant based cream cheese (I like the Simple Truth brand)
Ingredients can be substituted for non-vegan cake.
Process:
Preheat oven to 350, spray and line a 13×9 glass baking pan with unbleached parchment paper. Mix vinegar into milk and set aside. Mix sugar, eggs or egg substitute, oil, vanilla, pineapples, milk, and juice. In a separate bowl mix dry ingredients and then fold the dry ingredients into the wet ingredients. Fold in the carrots, pecans, and raisins. Gently stir and when well mixed pour into the prepped cake pan.
Gently tap the pan of batter on the counter top to decrease air bubbles. Bake on the middle rack. Bake for forty minutes. Due to difference in oven temperatures test at 30 minutes with a skewer for doneness. If the skewer comes out clean, the cake is done. If the cake is not ready, return to oven and check again at 35, etc. Bake until the skewer comes out clean when resting for doneness. I baked in a Pyrex glass baking pan, which is thicker. My cake was done at 42 minutes.
Unfrosted cake
When the cake is baked, set it on a cooling rack. Wait until cake is completely cool before frosting. While the cake is cooling, make the frosting.
Process:
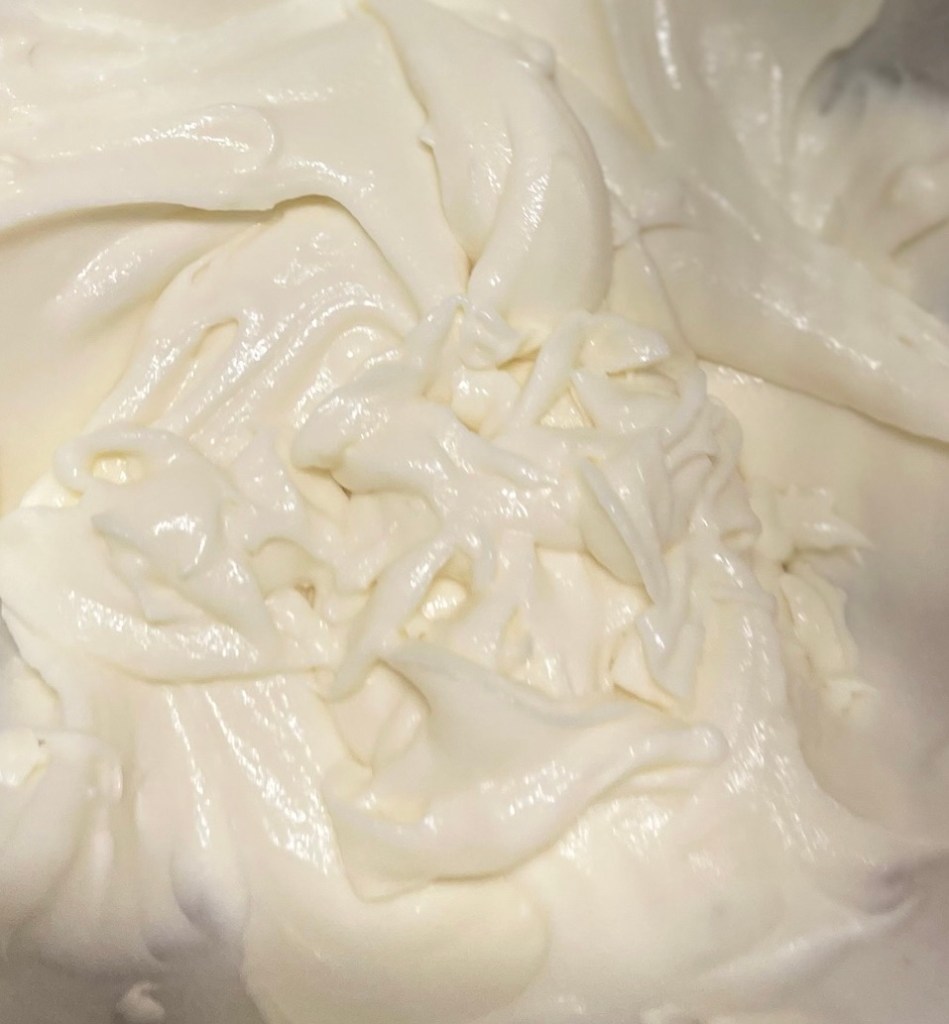
Mix room temperature plant-based butter, room temperature plant-based cream cheese, and three sifted cups of confection sugar on slow in a stand mixer. Once the sugar is incorporated, speed the mixer up to create a fluffier frosting.
Frosting is ready for the cake!
When the cake is completely cooled, using a rubber spatula, frost the cake. (Optional) Sprinkle chopped pecans over the top.
Top of frosted cake. I didn’t add pecans to the top.
I was amazed how creamy the frosting turned out. It is smooth, creamy, and tart enough to be delicious. The frosting didn’t have a phony taste like store bought frosting often has. I couldn’t wait to taste the cake after it was frosted. I actually didn’t wait until our daughter’s birthday dinner. I tasted the corner of the cake and was super happy with the results! I explained to her why a tiny little piece was missing from one of the corners. She understood and said she would’ve done the same.
Plant-based gluten free carrot cake.
The cake was a success! Everyone enjoyed it and loved the addition of the raisins. I had additional chopped pecans for those that wanted to add nuts to the top of their cake. The moisture level was off the charts! Had I not told everyone the cake was non dairy, plant-based, organic, and gluten free, they would have never known. Eating healthy doesn’t mean that you have to scrimp on taste.
I hope you and your family enjoy this cake as much as our family has. It is a great sweet treat for evening coffee, after dinner dessert, or even a breakfast treat. For now, God bless from the mountains of Kentucky. Feel free to like, share, subscribe or comment. If you’re enjoying our recipes and adventures in homesteading, go check out our podcast, Homesteading in the Mountains on Apple Podcasts. Have a wonderful week and weekend!
Good morning from the mountains of Kentucky. As I writing we are awaiting and preparing for the biggest winter storm for Kentucky this season. Meteorologists are calling it a crippling storm of rain, snow, ice, and freezing temperatures. In the natural we began preparing, we made a quick run to the store to pickup a few things, filled our gasoline jugs with gas for the generators to be ready if needed, picked up extra feed and straw for the animals, and made sure our water reserve tanks were full. I spent yesterday baking extra bread in case we lose electricity. I think we are as prepared as we can be. Now comes the wait.
Radar this morning. Screenshot credited to Kentucky Weather Center.
With that being said, I awoke this morning, looked out the window to see if the expected storm had arrived. The land was and is very still and quiet other than the stirring of our chickens, and a couple crows calling. It’s almost eerie quiet as the winds have made their presence known for the past couple of days and have totally ceased this morning. The roads are very still with no traffic moving at all. It feels like the world has stopped in expectation for the storm that is predicted to hit our little community this morning.
With that thought, I began to think about our spiritual preparation. The word tells us that Jesus is returning to take those who have prepared through accepting Him as their savior, and are ready to go home to be with Him for eternity. But yet, many are not preparing for His returning as they are preparing for this winter storm. This leaves me to ponder and reflect on my own efforts. Am I doing enough? Am I preparing daily for His returning? Have we heard of His returning so often that we are taking it nonchalantly? Am I spreading the word enough about His returning? These and other questions and thoughts stirred my mind.
As the new year is still fresh and new, instead of making resolutions that are often not kept, or insignificant, I feel compelled to take the time to ensure daily preparations for His returning. To spread the word to others about this glorious day just as the meteorologists hype the public up about the physical storm that awaits us. They are blasting the news on television, the radio, through text messages, and social media. Should we not be doing the same thing? Indeed we should! For His returning will be a glorious day for those who are ready. We, as Christian’s, must help spread the word, He is coming, in effort to help everyone be prepared and ready for His coming!
Matthew 24:27 For as the lightning cometh out of the east, and shineth even unto the west; so shall also the coming of the Son of man be. (KJV)
Matthew 24:36 But of that day and hour knoweth no man, no, not the angels of heaven, but my Father only. (KJV)
Matthew 24:37 But as the days of Noe were, so shall also the coming of the Son of man be. (KJV)
Snow in the mountains!
The snow has begun to fall on the homestead and in within a matter of moments has covered the tops of buildings and sticking to the trees. I am so very thankful today to be prepared both physically and spiritually. Be safe, stay warm, prayers for all during this uncertain weather event, but most of all, prayers that everyone will be ready for His returning. God bless from the mountains of Kentucky. Feel free to like, comment, and or subscribe.
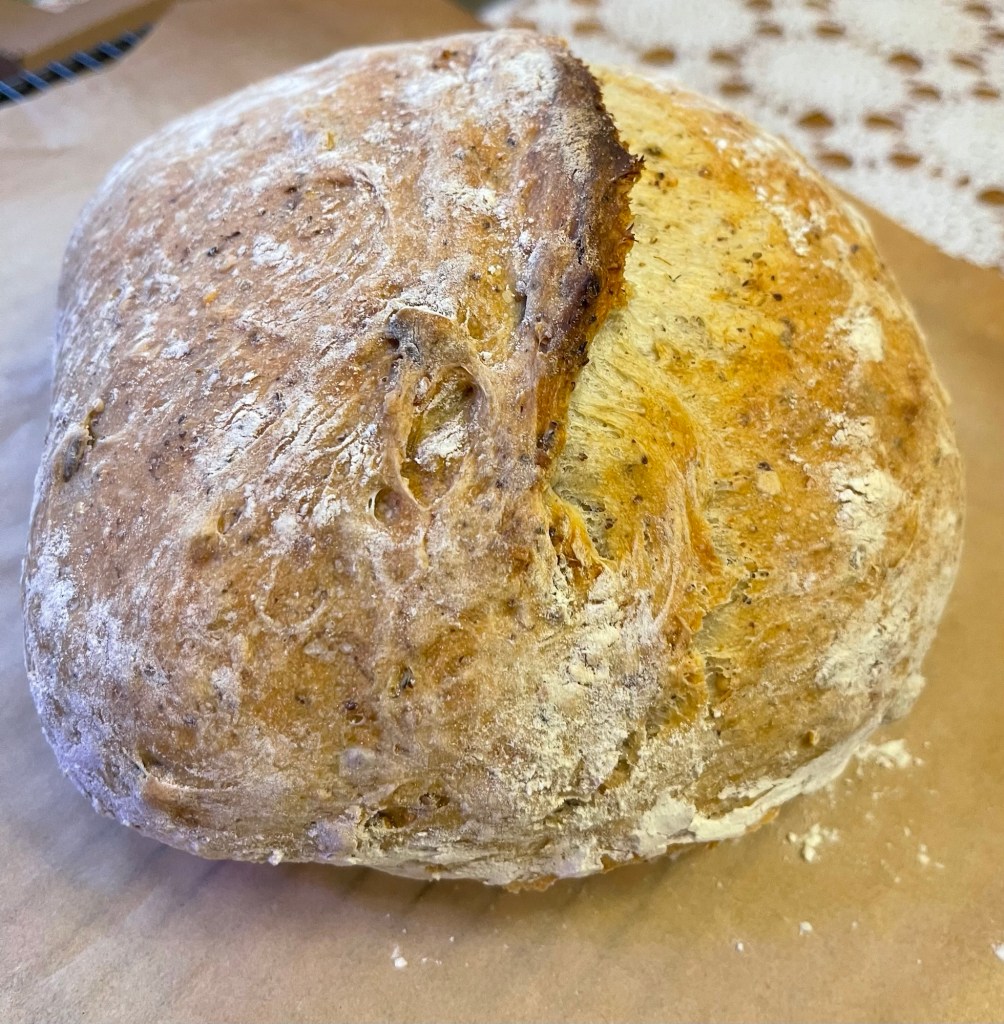
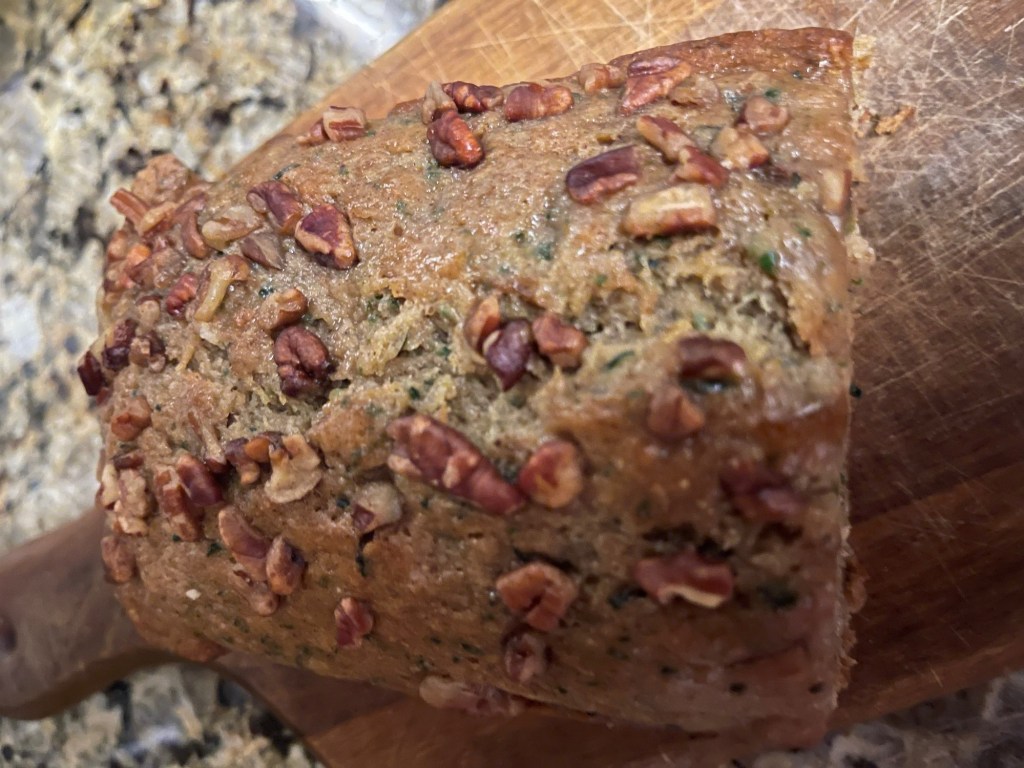
Hello from the mountains of Kentucky! I hope your Thanksgiving was amazing and your Christmas will be even better. It’s been busy in our little part of the world as we finish our Christmas shopping, and decorating for our family celebration as Christmas is only days away. With preparing for the festivities I decided to bake some rustic herb bread using two of my top ten herbs, rosemary and thyme. I love experimenting and trying new flavors, new breads, and new recipes. I am excited to share a few of my favorite recipes and uses for my sixth favorite herb in my top ten posts, Rosemary. But first a little information about Rosemary.
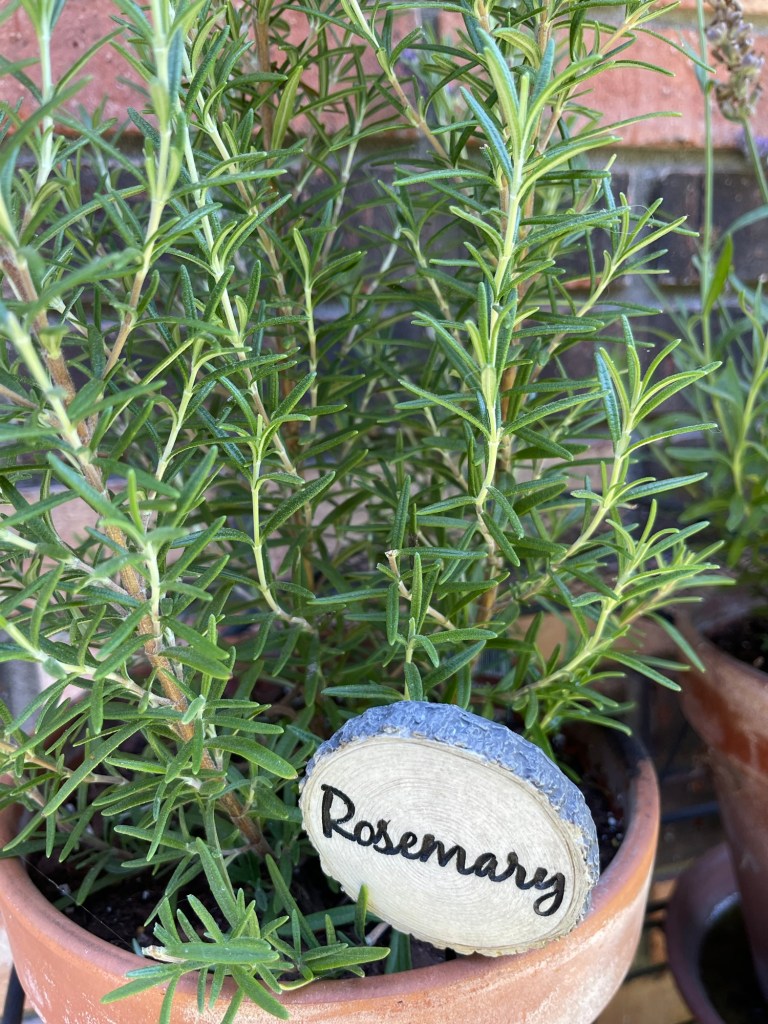
One of our smaller pots of rosemary .
Rosemary is an evergreen type of perennial herb that derives from the Mediterranean region. It is reasonably hardy in cooler temperatures as well. I usually pot some each year for quick access for recipes. I also grow several plants in our raised bed that winters over very well as we cover our bed during the winter months. It is easier to start the plant a plant than from a seedling. Rosemary is difficult to start from seed, but not impossible. This aromatic plant also withstands drought quite well. Keeping the rosemary pruned prevents the plant from becoming woody and stiff. Pruning will also help the plant to become more bushy and promote new growth.
Rosemary is a member of the sage family. It has a wonderful aroma that unique and pleasant. It flowers in the summer, but can flower more often in warmer climates. The flowers are small and light pinkish or white blooms. The height of this woodsy plant can vary in size, depending on the location and the amount of pruning. It’s fairly easy to grow, dry, and store. Its aromatic needles have many culinary and medicinal uses as well as uses for personal hygiene. Let’s get started with a few ways that we use rosemary on the homestead.
Rosemary can be used fresh or dried. I dry my rosemary by pruning the plant and washing the sprigs well to remove soil and possible insects that might be hiding. Gently pat to dry and place the herb on a white cloth in a shallow pan. If I have a larger amount, I add the herbs to my hanging rack, which hold much more. Place the herb away from direct sunlight and leave to dry until the sprigs are crisp. I store my dried rosemary on the stems in quart jars and strip the leaves as I need them.
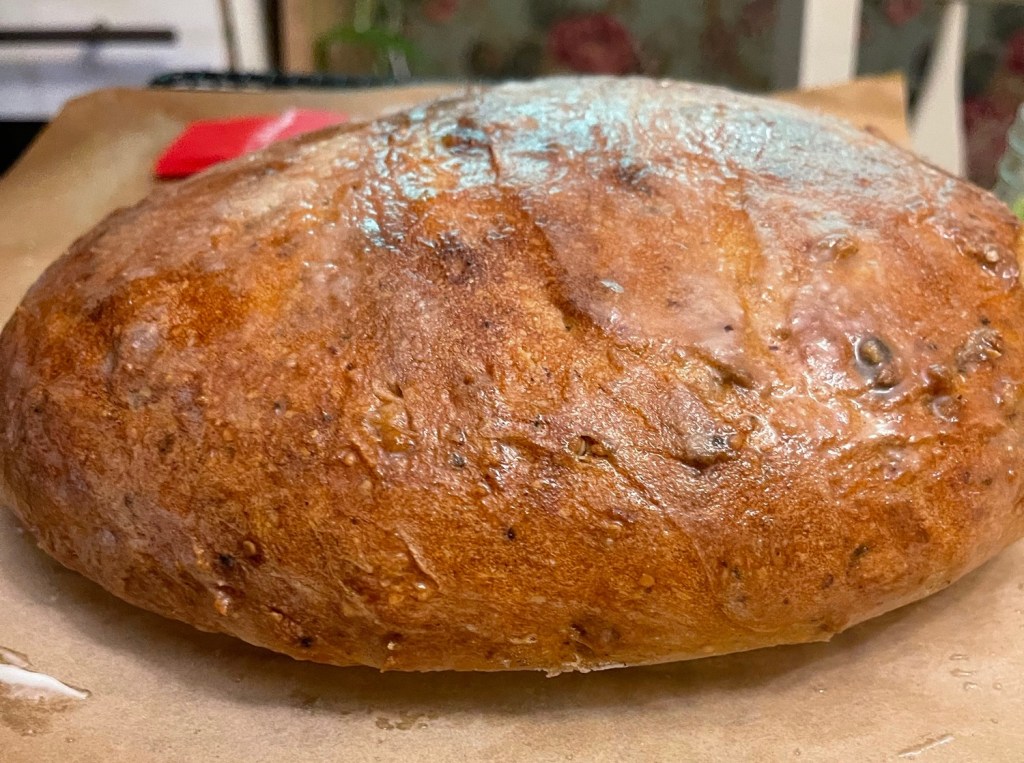
One of my favorite recipes for dried rosemary is my crusty herb bread. A small amount of this delicious crusty bread packs a punch of flavor. I use the following basic bread recipe Give Us This Day Our Daily Bread: Homemade Crusty Vegan Bread and add a tablespoon and a half of finely chopped rosemary and a tablespoon of dried thyme finally chopped as you add the seeds. The dried herbs work great as they are already dried and do not add any moisture to the bread as fresh herbs have the potential to do. This delicious bread is great toasted with most any Italian meal, or toasted to use as a dipping vessel for red pepper hummus. The possibilities are endless.
Seeded herb bread
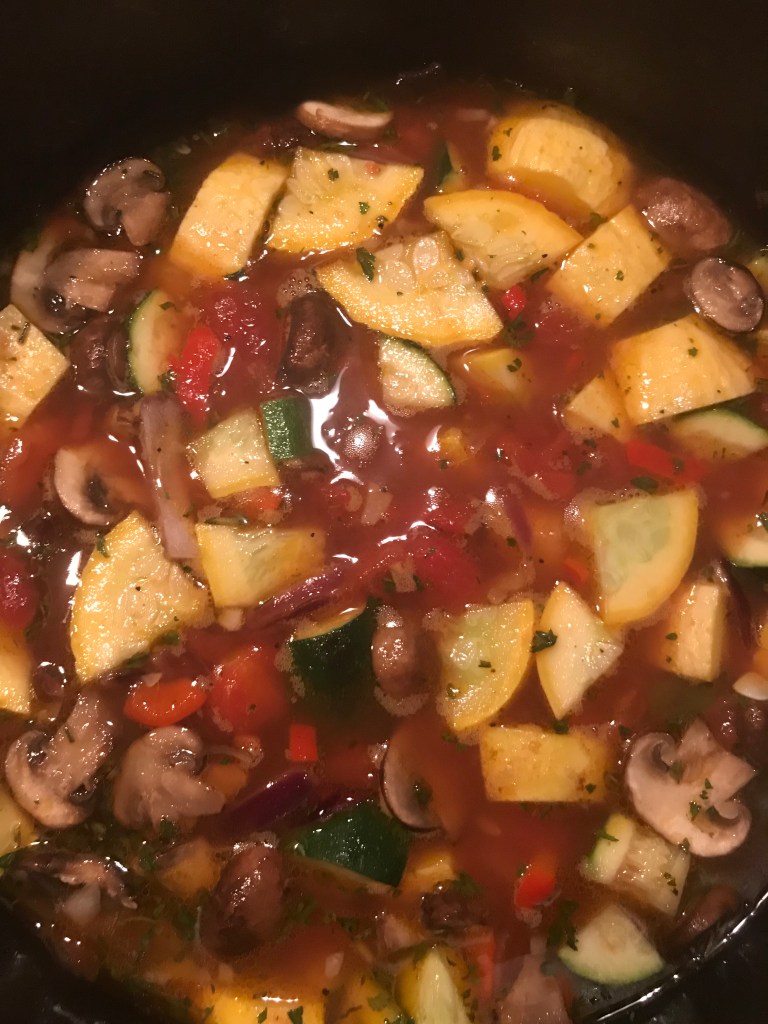
A second recipe that includes rosemary is our clean vegan summer squash soup. It is delicious year round, but tend to enjoy it most early fall or in the summer months when summer squash is at its peak. The following link will take you to this light , yet hardy soup. The herb bread above is a wonderful addition to this delicious soup. Clean Vegan Summer Squash Soup I also like to melt a slice of plant based provolone cheese on the herb bread for a little extra rich taste.
Summer squash soup
Rosemary makes a great flavoring for salt as well. This is an easy way to preserve the final sprigs of rosemary of the season and make a few stocking stuffers or gifts for those who love to cook with herbs. This delicious recipe can be prepared several ways, but my favorite is simply equal parts of fresh-cut rosemary and course kosher salt. Strip the leaves from the rosemary and add salt, pulse the mix in the food processor 8-10 times or you may use a spice grinder. You may also substitute the kosher salt with course sea salt. Pink Himalayan salt can also be used, but the shelf life doesn’t seem quite as long.
Once you add the fresh rosemary with the salt and grind set it aside on a parchment lined pan for about six hours to air dry. Add to a jar with a lid. Keeps indefinitely. Another method is to use dried rosemary pulsed in the spice grinder until desired consistency is achieved and add the mix to the preferred salt. This eliminates the drying process with fresh rosemary. Using this method allows you to use the salt immediately as the rosemary is already dried. Rosemary salt is a great addition to tofu scrambles, soups, and potatoes. For those that don’t follow a plant-based diet rosemary salt is great on eggs, pork, chicken, or lamb. The possibilities are endless. The ratio of salt to rosemary can be modified to taste.
I like to hand chop the rosemary. I’m a bit old-school. For this recipe I used 1/4 chopped rosemary.Shake the rosemary salt before each use to ensure it is distributed evenly.
Finally, rosemary has been thought to be a nourishing herb for strengthening and thickening hair. Rosemary can also be used in a variety of ways cosmetically. However, hair care is one of our favorites. Sprigs of dried rosemary can be added to a spray bottle of filtered water for rosemary water that can be sprayed daily on hair dry or damp hair to promote thickening and shine. Using dried herbs helps prevent mold from gathering in the bottle. I also prefer to use amber glass spray bottles. The dark color helps preserve the water and protect it from sunlight while also helping to eliminate plastic. Once you add the sprigs of dried rosemary to the water, allow it to sit for at least a week to intensify the aroma and the water to absorb the nutrients from the herb. Use as a refreshing spray to your hair, scalp, or skin.
Rosemary oil can be made from dried rosemary as well. Using throughly dried rosemary, add the sprigs to a glass bottle of oil. I prefer organic fractionated coconut oil for topical use. Seal the bottle and place in a dark cabinet for at least two weeks. After two weeks, strain the oil using cheesecloth adding the oils to either an amber colored glass spray bottle or dropper bottle. The rosemary oil can be used directly on then scalp to nourish the scalp and help promote hair growth. Once the oil is applied, massage scalp evenly for five-minutes then wrap hair with a towel or shower cap. Leave the oil on the hair for at least thirty minutes. Wash and rinse hair as usual. You may also spray hair lightly throughout to help mange dry or damaged hair. Finally, you can add a few drops of the rosemary oil to your favorite shampoo and or conditioner.
These are only a few of the great ways to use this powerhouse of an herb. Because of its diversity, I think a book could be written about rosemary. Other uses of rosemary include adding it to homemade body butter, laundry detergent, sachets, teas, and more. I hope to add more rosemary recipes in upcoming days. For now, God bless and Merry Christmas from the mountains of Kentucky. Feel free to like, share, subscribe and or follow our blog. Your support is appreciated. God bless!
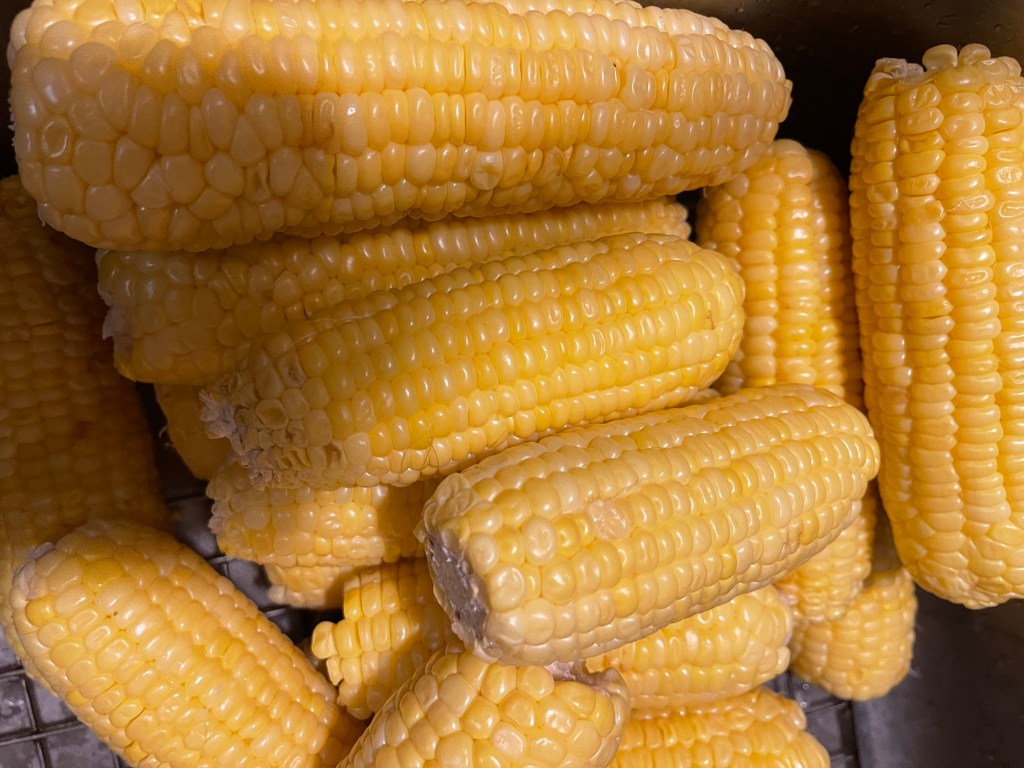
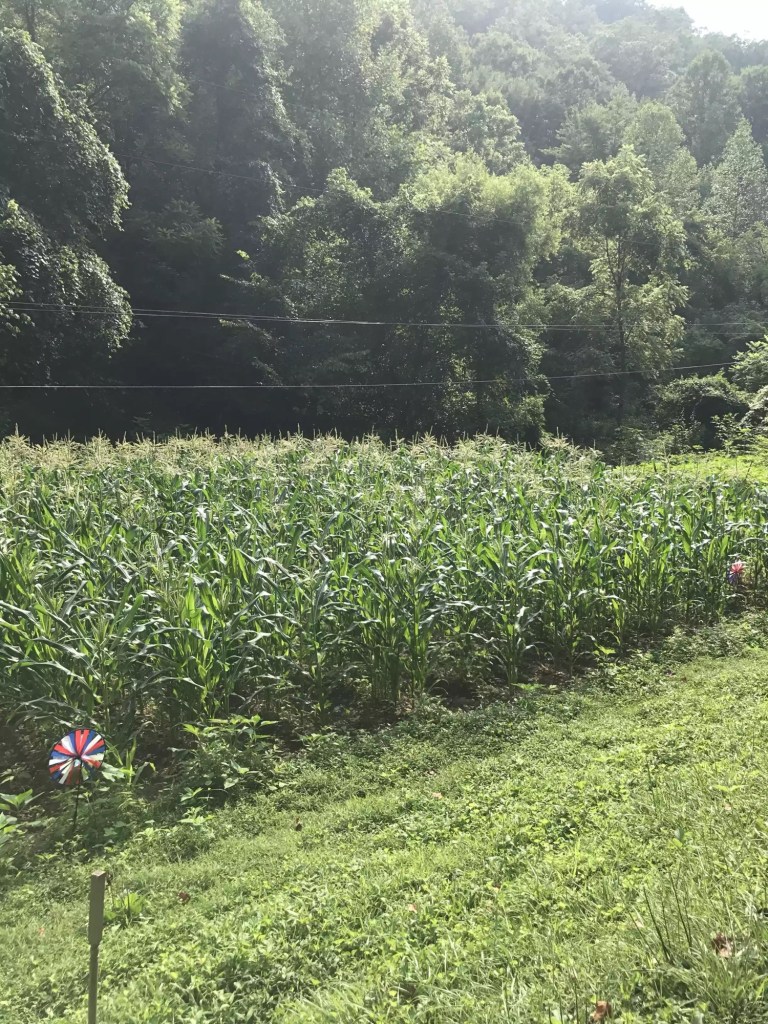
Good morning from the mountains of Kentucky. It’s the time of year that most are cleaning up the remainder of the remnants left in the garden. We too, are at that point. We have scattered tomatoes, and peppers still clinging to the vines and potatoes to yet to dig. Our corn is exhausted and finally put away in the freezer for the cold days of winter. I am excited to share how we preserve our corn so we have corn year around. Grab a cup of coffee or tea and discover how we preserve our corn.
The last ears of corn if the season.
Preserving corn was a tradition handed down to me by my mom and grandmother. I remember sitting on the porch helping them shuck corn in large quantities. Memories like those are vivid in my mind and remind me of the blessings of the knowledge of working the land. I cherish the memories and the gift of rich traditions and knowledge of homesteading and farming. Our heritage helps us save money, be self-sufficient, and provides fresh homegrown food for our family year around.
Our grandson enjoying roaming through theyoung corn.
Corn can be preserved on the cob or off the cob. Below is the steps for both methods.
Tools required:
Sharp knife
Large bowl or pan
Large Dutch oven
Vacuum sealer
Vacuum seal bags
Ingredients:
Corn
Butter
Sugar
Evaporated milk
After picking the corn, find a cool pace to shuck the corn. we usually clean ours on the porch in the evening shade. We then discard our shucks into the compost bin, which in turn later becomes fertilizer for our garden. We use a damp cloth to wipe down the corn as we shuck it to help remove stray silks. We freeze anywhere from 50 to 60 ears of corn per family each year. To freeze corn on the cob, we simply vacuum seal anywhere from four to eight ears and add it to the freezer. The key is vacuuming raw dry corn. It’s amazing how fresh the corn is when thawed and prepared. It tastes almost like fresh from the stalk! Do NOT boil corn prior to freezing! Raw is the best method of preserving.
Mid-season corn.
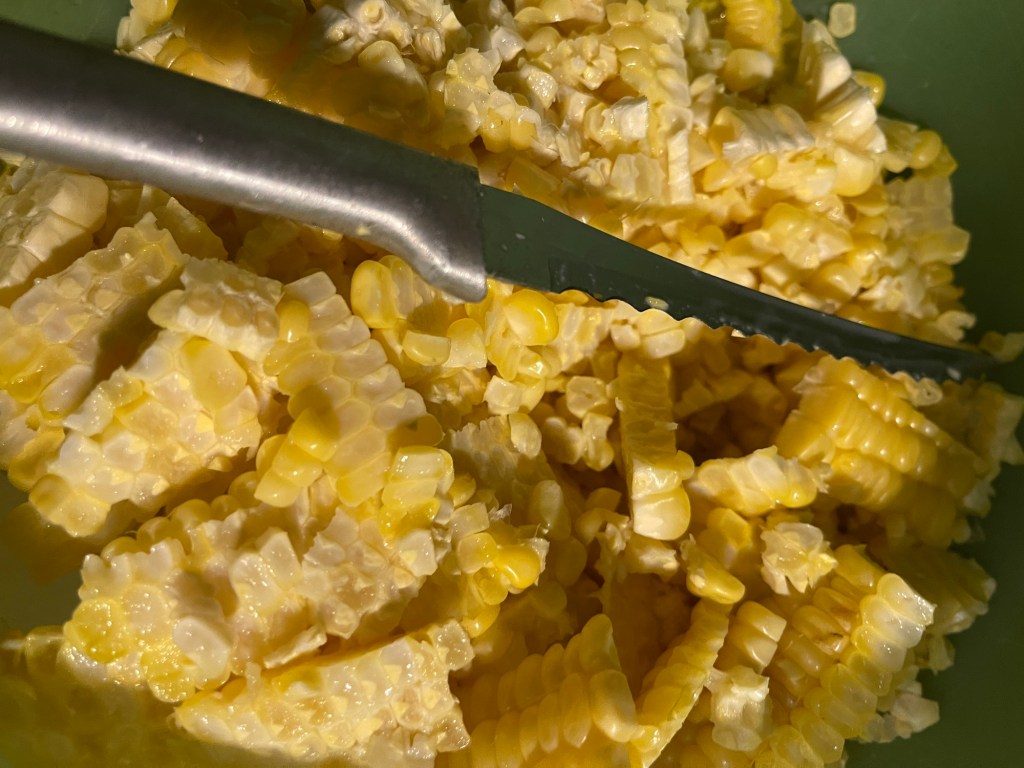
For cream style corn, the method is a bit more complicated but well worth the process! Once the corn is shucked the cutting begins. I like to used the knife picture below to cut the corn off the cob.
Cutting fresh corn from the cob.
I hold an ear of the corn with the larger end down in a large bowl and cut down the cob to remove the corn from the cob in large sections. Be sure to get all the corn off, including the creamy bits left beneath the kernels of corn as this is what creates the creaminess in the fried corn. Once the bowl or container is full pour the cutoff corn into a large stockpot. Heat on low heat to prevent the corn from scorching. I usually use 6-8 quart cast iron Dutch ovens to prepare corn. Add one cup of organic cane sugar, one large spoon of butter of choice. I use plant butter, but any good quality butter will work. If the corn is not creamy enough, add evaporated milk or plant milk for a vegan option until desired consistency is achieved. Allow corn mixture to cook on very low heat until kernels are tender. I usually simmer my corn on low for about ten minutes stirring frequently. Remove from heat. I allow my corn to cool and place in a covered bowl in the fridge overnight. Allowing it to cool makes it easier to handle when sealing in vacuum seal bags.
Simmering the cutoff corn.
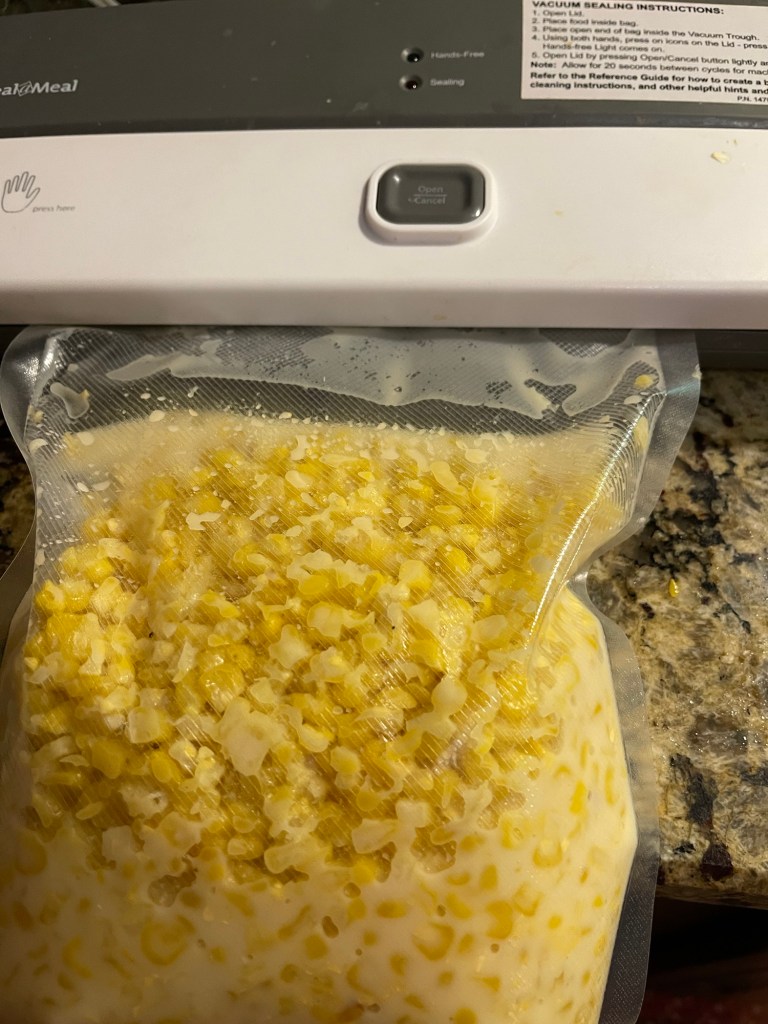
After the corn has cooled over night in the refrigerator, place the corn in desired size vacuum seal bags. Allow enough room between the corn and the edge of the bag for the seal to seal without pulling the liquid from the bag. I typically use quart and gallon bags. This allows me to have a variety of sizes. Either size I choose, I leave a couple of inches free from corn and press the air out and seal the edge of the bag with the vacuum sealer. If the bag begin vacuuming, you can remove a little of the corn and wipe the bag clean and start the sealing process over. The seal prevents air from gathering in the bag while in the freezer, thus allowing it to last longer. I have used zipper quart bags and they work okay, but the corn is not as fresh tasting as it is almost impossible to keep air out of the zip style bags.
TIP: to help with storing multiple bags of corn is to place a piece of wax paper or parchment paper between the bags before placing them in the freezer to prevent them from sticking or freezing together.
Sealing the bag, not vacuum sealing, just sealed. One batch finished.
We’ve kept corn frozen for a couple of years and found it to be as good on the third year as it was the first year. The key to great corn on the cob is not over boiling it. I have found that dropping the thawed ears of corn in warm water, bringing it up to a boil, and turning it off works best for me. I also thaw it sometimes and wrap a damp paper towel around an ear of corn, and microwave for one minute for a quick tasty ear of corn. I prepare the fried corn by thawing and warming it slowly in a skillet or pan.
I am sure you’ll love it either way you choose to prepare it. Corn is a staple in our home. We eat creamed, fried, boiled, grilled, and add it to soups and other delicious dishes. We enjoy eating what we have grown from seed to the table and knowing we are not putting artificial fertilizers into our body and saving money while eating our own fresh produce. God bless from the mountains of Kentucky. Feel free to like, leave a comment, or subscribe. Also, check out our podcast for more about our homestead. God bless!
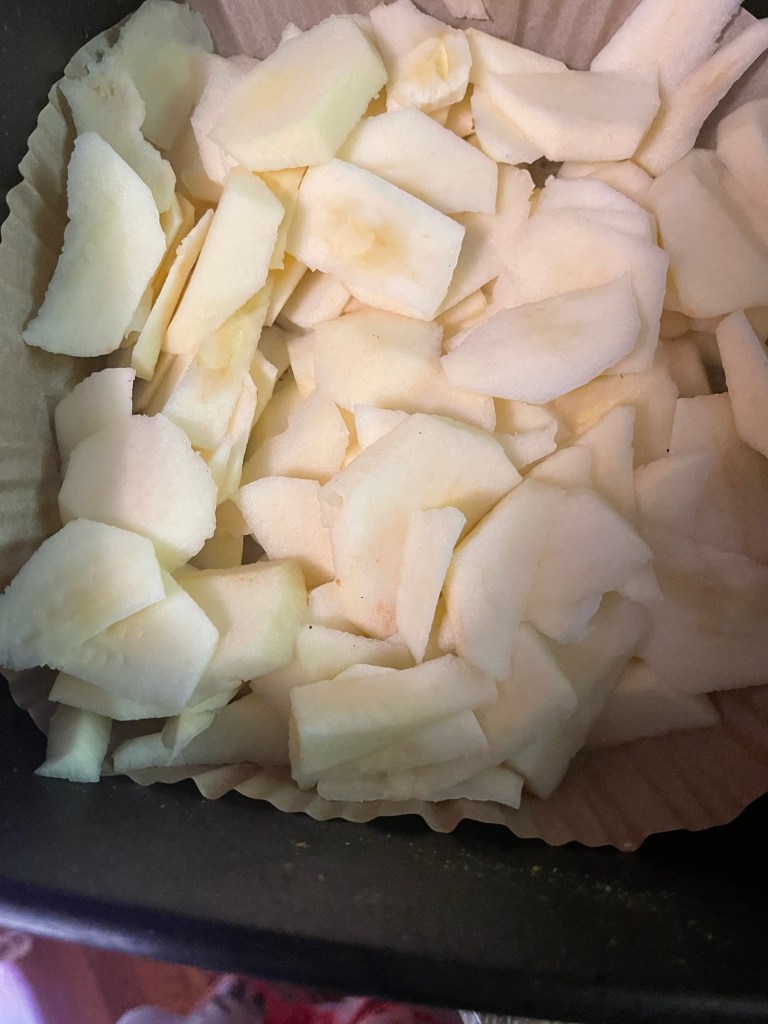
Good morning, from the mountains of Kentucky! It’s the time of year that I am typically dehydrating apples. This year many of my harvesting plans have not gone as planned due to spending much time with my elderly mom in the hospital for the past five weeks. While at home yesterday, I noticed a small bowl of neglected apples sitting in the kitchen. They were long overdue being sliced, fried, or dehydrated. After sizing the situation up, I determined there wasn’t enough apples to unbox the big dehydrator, I didn’t want to fry them, so I decided to dehydrate them in the air fryer! There were just enough apples to make a small batch of dried apples! Here’s how I did it.
Ingredients:
Apples
Tools:
Air fryer & liner
Process:
Wash, dry, and peel apples. Slice them to suit your preference. I prefer them to be sliced rather than cubed. Place a liner in the air fryer for easy removal and easy cleanup. Close the drawer, turn the air fryer on, press dehydrate, and push start.
My air fryer temperature for dehydrating is preset. So, I decided to experiment and use the suggested temperature and time. All I had to lose was seven or eight apples.
Ready to dry. Preset temp and time.
After about two hours, I checked the apples and they were doing wonderful. I continued to check the apples each hour until they reached the desired texture that I like. I stopped the apples at 5 1/2 hours. They were perfect to my liking. Delicious!
Delicious dried apple chips.
Dried apples can be seasoned prior to dehydrating by adding cinnamon, sugar, or whatever spice or seasoning you prefer. My family and myself prefer plain dried apples. They’re rich, sweet, and a bit tart. I used honey-crisp organic apples, because it’s what I had and what needed to be used. Dried apples make a wonderful healthy snack to take to work, school, long car rides, or on vacation. I also like to rehydrate them for frying, and they make an awesome apple stack cake. I typically dry a bushel in September in multiple batches in our large dehydrator, but for small batches, the air fryer was perfect. It doesn’t heat the kitchen up, doesn’t take too much space, not very noisy, and is a great way to salvage apples that may have lingered in the kitchen too long. It’s a money saver! With the price of groceries continually on the rise, cost cutting ideas are always appreciated!
I want to leave you with a scripture that has always blessed me. Zechariah 2:8 For thus saith the LORD of hosts; After the glory hath he sent me unto the nations which spoiled you: for he that toucheth you toucheth the apple of his eye. KKV
For now, God bless, from our homestead in the mountains of Kentucky. I hope you enjoy this short post, time saving, and money saving delicious recipe. Feel free to like, share, subscribe or follow. Head on over to listen to my podcast, Homesteading in the Mountains, on Apple Podcasts. My latest post is about growing, using, and dehydrating oregano.
Hello, from the mountains of Kentucky. I hope this post finds you well and blessed. It’s a busy time in the mountains! Homesteading is a way of life with great rewards, but also a lot of hard work! We spent most of the day Friday picking beans before the rain moved in. Our house was filled with the wonderful summer aroma of green beans simmering on the stove! While we worked to string and break beans to can. See the link below for our canning recipe. Canning Green Beans the Time-Tested Way However, it’s never too busy to take time to go to church for Friday’s hour of prayer and Bible study. Our topic was very interesting. Do you trust God? The study/conversation was filled with testimonies, scriptures, advice, and wonderful fellowship. It was a great reminder of how much we truly need to trust God, especially in the uncertain times that we are living in.
The first of what we anticipate to be many jars canned!
Friday was also a day for baking. When you have an abundance of zucchini, you flash freeze them and transfer the frozen zucchini to a bag to use for frying later, shred them for winter zucchini bread, make pancakes for the freezer, fry tasty fritters to vacuum seal, and batter fry a few to have with supper. Again, it’s a busy time in the mountains. I can’t complain. It’s one of my favorite times of the year. We are richly blessed to live in the mountains, have land that allows us to garden and have fresh vegetables to enjoy all summer, and an abundant crop to put away for winter.
I didn’t get a picture of the entire loaf before a chunk was already eaten!
Homesteading for us is a healthier way of life. Not everyone in our family follows a plant-based diet, but that doesn’t mean they do not enjoy some of the delicious plant-based dishes or work toward improving their health. A lot of people are prone to think of plant-based or vegan food as bland, dull, and tasteless. But, this zucchini bread is far from that. Our entire family loves it, even those who don’t follow a plant-based diet. I think you’ll enjoy this bread recipe as well. It is moist, sweet, and delicious.
Ingredients:
Line a mixing bowl with cheese cloth or unbleached paper towel. Shred two small or one large zucchini using a fine hand grater into the lined bowl, or two cup measuring cup. Squeeze the liquid from the zucchini. It should equal a cup or a cup and half after the liquid is squeezed out.
1 to 1 & 1/2 cups of shredded zucchini
1 1/2 cup of all purpose unbleached flour (I prefer King Arthur)
1/2 cup organic light brown sugar
1/2 cup organic white sugar
1/2 tsp pink Himalayan salt
1/2 tsp non-caking organic baking soda
1/2 tsp organic baking powder
1-2 tbs organic cinnamon (I usually use two)
1/2 tsp nutmeg
1 tsp ginger
1 tsp pure vanilla
1/2 cup unsweetened applesauce
1//4 cup organic coconut oil
1/4 cup extra virgin olive oil
2 tbs of unsweetened almond milk
1 tbs pure maple syrup
1-2 tbs chopped pecans
Preheat oven to 350. Line loaf pan with unbleached parchment paper. I like to use a cast iron loaf pan. Give the parchment paper a quick spray with organic cooking spray. Mix dry ingredients, other than pecans, add wet ingredients including the shredded zucchini. Do not add the maple syrup or the milk yet. Mix gently. The batter will be thick. Add milk to create a smoother mix that will pour into the pan. You can use more milk if needed. Pour mixture in lined pan, sprinkle the chopped pecans or nut of choice over the top of the mix then drizzle the maple syrup over the top. I like to bake my bread on the middle rack to prevent the bottom from becoming too brown. Set the timer and bake for 50-55 minutes. Ovens will vary and the thickness of your pan can also determine the baking time. For the cast iron loaf pan, 55 minutes is required.
Remove the bread from the oven. I test the bread for doneness with a wooden screwer. If the tester comes out clean, the bread is baked through. Place the pan of bread on a cooling rack. Allow to cool for at least ten to fifteen minutes and lift the loaf out by the parchment paper and place back on the rack to cool. I allow mine to cool about fifteen more minutes and then cover with a clean dish towel to cool an additional thirty minutes before slicing. A bread knife works best for slicing.
This bread is great as a moist treat, or toasted and lightly buttered. For vegetarians, this bread is great dipped in whipped milk and eggs or egg whites, then fried on the griddle for a tasty French toast served with maple syrup. I like to slice the bread and vacuum seal individual slices to go in the freezer for a sweet treat when you don’t have time or don’t want to bake an entire loaf. The possibilities are endless. I hope your family enjoys this bread as much as our family does.
Monday was spent rescuing our corn after rain and wind damage. While one held the corn and the other hoed and heaped fresh mounds of dirt around the base of the stalks. It was a laboring job, but one that had to be done. Fourteen rows of corn was wearing to the ground from excess rain and wind. A lot of hard work, but after a day of two of some sunshine, it is now standing tall. I think we may have lost four stalks. God is good.
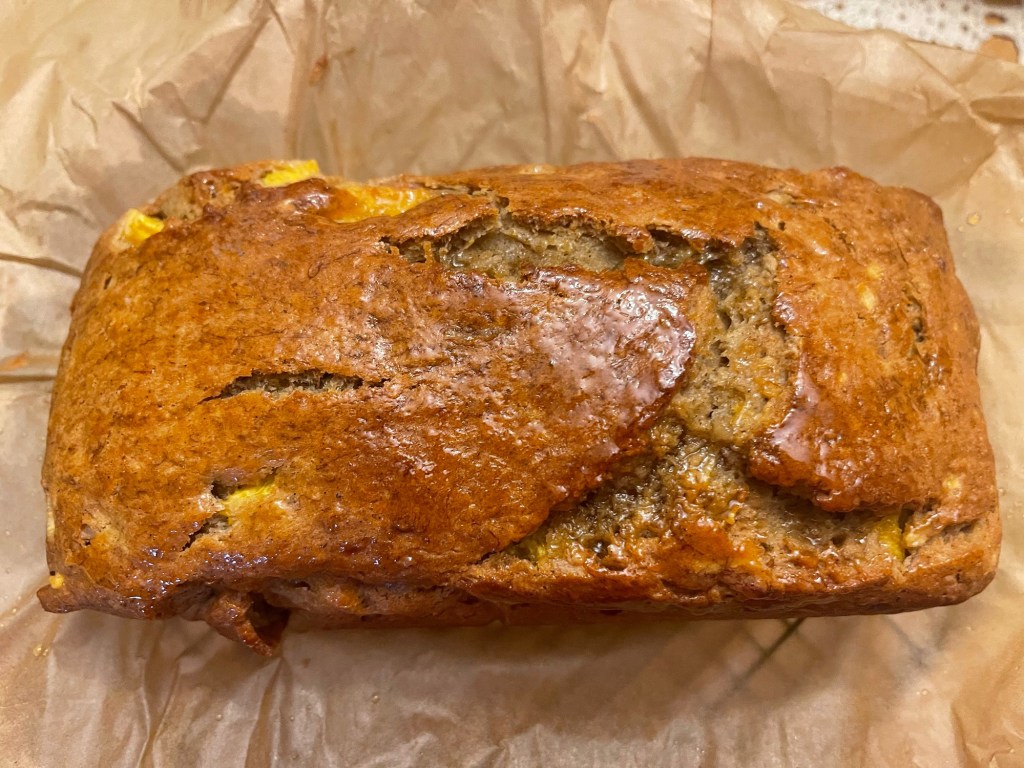
I am also excited to bring to you a new recipe for banana-peach bread! Oh my, it is delicious! If you love a good peach cobbler, I think you’ll like this bread! Stay tuned, and watch for this delicious recipe!
I will add this recipe soon! Banana – peach bread!
I hope you and your family enjoy this recipe as much as our family does. For now, God bless from the mountains of Kentucky where homesteading is a way of life. Feel free to comment, like, share, subscribe, and or follow.
Hello, from the mountains of Kentucky! It’s surely been a hot June in our part of the world. The heat has presented us with challenges on our small farm. We’ve been hand watering our garden a couple of times a week to prevent the plants from turning yellow. We are blessed to have a flowing creek beside our garden to ensure the plants receive fresh water free from chemicals. The 90 degree weather also presents the challenge of battling the heat while we work in the garden and other outdoor projects. But, we’re making the best of the situation and praying for some rain.
I am excited to share another favorite herb. Remember, I’m not posting my favorites in any particular order, just sharing a few of my favorite herbs, a little history of each, how I plant them, cut them, dry them, and use them both fresh and dried.
One of my small pots of lavender.
Lavender is another favorite herb in our household. Lavender has been used for centuries for various health benefits, its beautiful aroma, and its mild flavor. Lavender is a perennial herb that if planted in the ground will return each year. You might be able to weather over lavender in pots for it to return in the spring. Much of its return will depend on your zone, winter temperatures, and how you protect the pot from the elements.
Lavender is known for its beautiful purple blooms. Bees love the bloom, so it works well as a pollinator near veggies. Butterflies love the blooms as well. Lavender grows best in a sunny location and in well drained soil. Lavender is not an invasive plant, so there’s no need to worry about it over growing your garden. If you are planting lavender, Its best planted in late spring after there’s no danger of frost. Lavender grows well in pots if the location is sunny and the pot has good drainage. I have lavender in my herb bed and in a pot. I love its fragrance and enjoy having it on our porch near where sit in the mornings as it also helps repel mosquitos. The leaves, stems, and blooms smell equally as good. The fragrance is intoxicating.
Butterflies love the English lavender blooms.
There are several varieties of lavender. Spanish lavender has an open upright bloom at the tip of the purple bloom on the end of the stem. Spanish lavender is used for making essential oils and is often referred to as butterfly lavender. English lavender is the most common lavender. It is often referred to as common lavender. It is pictured above. There are other varieties of lavender including Portuguese and lavandin. The most common for our area are English and Spanish.
Lavender blooms, stems, and leaves are all edible. Dried lavender makes a nice addition to a cup of hot tea. Drying lavender is not a difficult task. I clip and dry small amounts at a time throughout the year after May. It seems easier to dry small amounts often than large amounts at once. I clip the blooms leaving a length of stem and place them on a drying rack in a spot away from direct sunlight. Sometimes I lay them on a white paper towel and let them air dry on the table or bind the stems with a rubber band and hang them to dry. The blooms of the English lavender make the best tea. Spanish lavender can be used, but it is a bit too strong for my taste. The dried leaves and stems can also be used in tea. Taste testing is the best way to determine how much dried lavender is enough for a cup of tea.
Dried lavender leaves make great sachets for closets, drawers, automobiles, or any closed in space. The scent and taste of lavender is relaxing and has the potential to relax and to lower blood pressure. I have found that a cup of lavender tea before bedtime helps me relax and sleep better. The dried leaves or blooms are a great addition to chai tea.
Lavender oil is another favorite in our household. We love essential oil but do not make it as it takes special equipment to extract the oil. I order lavender essential oil from doTERRA oils. I use it for soothing a burn, restful sleep, and bee stings. Infused oil on the other hand, is relatively easy to make. For infused oils it’s best to use dried lavender to prevent molding from fresh lavender. Dry the leaves, stems, and blooms of English lavender. Place them in an airtight jar, amber colored glass is my preferred glass. Add your choice of oil. I use coconut oil or jojoba oil for topical use and olive oil for cooking. Keep the oil away from direct sunlight and it should last for months. A few drops of the lavender oil can be added to conditioners to enhance hair growth. It can be used to moisturize dry skin. It can be used at night as a moisturizer to help you relax or used as ointment on sore joints to promote relaxation. The possibilities of lavender are endless!
We love lavender butter! Feel free to check out my recipe by following the link Vegan Lavender Butter: A Sweet Herbal Treat From the Mountains… it’s great on fresh baked bread, rolls, and delicious on toast. Lavender makes great tea cookies and scones. I’ll share those recipes soon.
Dried lavender blooms
Overall, lavender is a beautiful plant, helps repel mosquitoes, relaxes the senses, tastes great, and can fill your house with a wonderful relaxing fragrance. There are so many uses for lavender that one post cannot even scratch the surface of the many uses of lavender.
I hope you have enjoyed this post and I have enticed you to plant, grow, and harvest your own lavender. Feel free to like, follow and or comment.I would like to hear from you. How do you use lavender? For now, God bless from the mountains of Kentucky!
Hello, from the mountains of Kentucky. It’s a beautiful day in the mountains today. The sky is clear, which I’m so thankful for. It’s been a very rainy May in our part of the world. Hard storms wreaked havoc on our mountains Sunday. Many are still without power, cable, telephone, and Internet. Ours was restored yesterday. One thing about loss of Internet… is it’s a great time to catch up on reading, writing, housework, and yard work. Today’s post is the second post of my top ten herbs. Keep in mind that these posts are not in any particular order. Check out my first post My Favorite Top Ten Herbs (part one – mint)
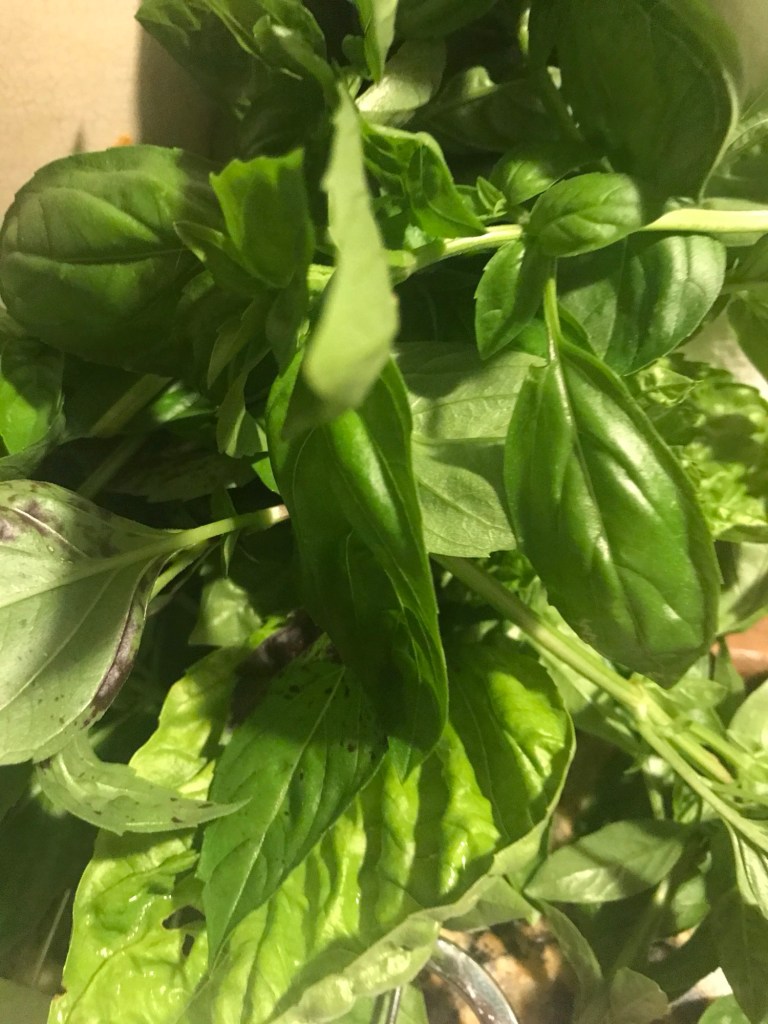
Pictured above is Italian basil
Basil is a must have for our pantry and spice cabinet. It is low maintenance, easy to grow, tastes great fresh, easy to dry for spices to use when cooking, fresh it adds wonderful flavor to dishes, makes great tortillas, makes great aioli, delicious pesto, it helps repel mosquitos, it tastes great in salads and so much more. Let’s get started!
Basil is a spicy herb that is commonly found in Italian dishes. It is actually a member of the mint family. It is a native plant of Africa and Asia. It loves plenty of sunshine, rich soil, moderate watering, and it loves to be pruned! It can tolerate some shade as well. Its wonderful taste can be identified in spaghetti sauces, pesto’s, on pizza, and in lasagna and many more delicious cuisines such as Italian tortillas. Vegan Italian Spinach Wraps. There are many types of basil. Believe it or not there are over one hundred types of basil. However, my two favorite types of basil are Genovese also known as, Italian basil it is often confused with common basil. The leaves of common basil is typically lighter than Italian basil. Another favorite of ours is lemon basil. I will address them in this post and might make a post about other types of basil at a later date.
Basil of all kinds is fairly easy to grow. It is an annual plant, which means it will need to be replanted each year if you live in a zone that has cold winters. In Kentucky, I plant basil each spring after the last frost. Don’t worry about expense. A good quality organic basil plant is only a couple of dollars. I typically purchase three to four plants per year, which is still more economical than buying fresh basil at the grocery store. One small packet of fresh basil, that may or may not be fresh, can cost nearly five dollars. I would prefer to have enough basil to enjoy fresh from spring until fall, and then harvest it for the winter.
I harvest and use it throughout the year and harvest the remaining plant before the hard frosts come to the mountains. Basil grows well in the ground, or in large pots. I prefer to plant mine in large pots within my herb garden. I also keep a pot of basil on my back porch for easy access for fresh basil. And again, it also helps deter mosquitos. Your basil will require good drainage, if you grow it in pots. I water my basil when the soil feels dry. I typically water daily when the temperatures are high. If the soil is damp, skip the watering. Over watering can be detrimental for basil. I like to add a looser potting mixture in the bottom of the pots. I enjoy caring for and growing orchids. So, I normally have an extra bag of the orchid potting mid on hand. It is a great addition to the bottom of the pot, and it helps the soil drain. I prefer to use a good quality organic potting soil for my potted herbs. If I’m going to eat them, I don’t want toxins from additives in the soil. Both lemon and Italian basil love and thrive in sunshine! I give my herbs an occasional spritz of Neem oil to prevent insects from building nests, primarily spiders, in the herbs. I also feed my herbs an occasional drink of weakened herb tea. The antioxidants are a great fertilizer. I do not add traditional fertilizer due to the additives in the fertilizer. Natural is always best!
Italian basil. Close up of lemon basil.
Again, basil likes to be pruned. Trimming your basil on a regular basis allows the basil to become fuller and less leggy and promotes lots of new growth. I also keep the blooms pinched back on my basil to help promote growth and prevent a bitter taste in the herb. If you are not harvesting to eat, basil blooms a pretty white flower that is a nice addition to a flower garden. I harvest basil throughout the season by clipping stems of leaves to add to a glass of water, much like you would flowers, for fresh basil for cooking. I usually only do this if I do not want to harvest to dry but want to prune the basil. For dying, I prune the stems, rinse well, and pat dry, then pick the leaves from the stems, and allow them to air dry on cookie sheets that are lined with white or unbleached paper towels. If i want to dry the basil by hanging it, I prune the stems, rinse, pat dry, and tie small bunches of the herbs together and hang from a drying rack or hook in my kitchen. Either way that you choose to dry basil, the aroma will fill your house. Herbs can be dried in a dehydrator, the oven, or even in an air fryer. It’s quicker, but I find that it lowers the quality of taste. Air drying is my personal preference.
Basil typically takes at least two or three weeks to completely dry. Once the basil is dry, I add the whole dried leaves, which will be much smaller than fresh leaves, to a glass jar. I prefer amber jars, but clear will work. The jars are then added to a dark corner of my spice cabinet. I add the dried basil to dishes by using a mortar and pestle to grind it as I need it. I also grind some of the leaves into a finer powder using a coffee grinder. This method of storage eliminates a step in the cooking process, but still packs great flavor. The shelf life of fresh dried basil is one to two years. I usually have almost completely eliminated my dried basil from spring to spring, especially if I make many of the spinach Italian tortillas. See the link above.
A few clippings for cooking. I’ll add them to a glass of water after removing any damaged leaves.
Both Italian and lemon basil are great for pesto’s, aioli’s, makes a nice additions to salads, great on pizza, and delicious fried for a crispy bite of deliciousness for any Italian dish, or a salad topper. I also like to add fresh basil to omelets or tofu scrambles, spaghetti, and lasagna. I find that it adds an interesting taste to fresh baked bread, especially with the addition of garlic. Lemon basil is also a great addition to Asian dishes. I will try to add the recipe that is pictured below soon.
Vegetable stir fry with basil and garden veggies.
Basil not only helps deter mosquitoes and other unwanted pests on or near the porch, but it makes a great companion in the vegetable garden to help deter pests from tomatoes, and other plants. Crushing the leaves can also act as soothing compress for bee stings.
These are only a few ways that I use basil at our house. I could write a book on basil alone. I hope to include a post soon about the other types of basil that we use on frequent basis. The smell of fresh basil is intoxicating. I love to brush my hands over the basil and enjoy the vibrant invigorating aroma.
Feel free to leave a comment or question. Check back next in upcoming days for my third herb post. Also, feel free to subscribe or follow. For now, God bless from the mountains of Kentucky!