Depression Potato Cakes

If you’ve shopped for groceries lately, you have felt the pain of the price of groceries when you checked out at the register. It’s ridiculous how the price of food has increased. So, what are we expected to do? Clip coupons? Use savings apps? Grow as much of our food as possible? Yes, to all the questions above and also learn to be frugal with what we have.

I grew up in the sixties and seventies in a single parent home with two siblings. We didn’t know it at the time, but our mom, who was also a working mom, was very frugal and could make delicious dishes from leftovers. Left over vegetables became delicious vegetable soup. Popcorn was transformed into delicious caramel corn. The list could go on and on. But, one of my favorite transformations was left over potatoes, which became scrumptious potato cakes! I am excited to share my version of my mother’s delectable potato cakes.

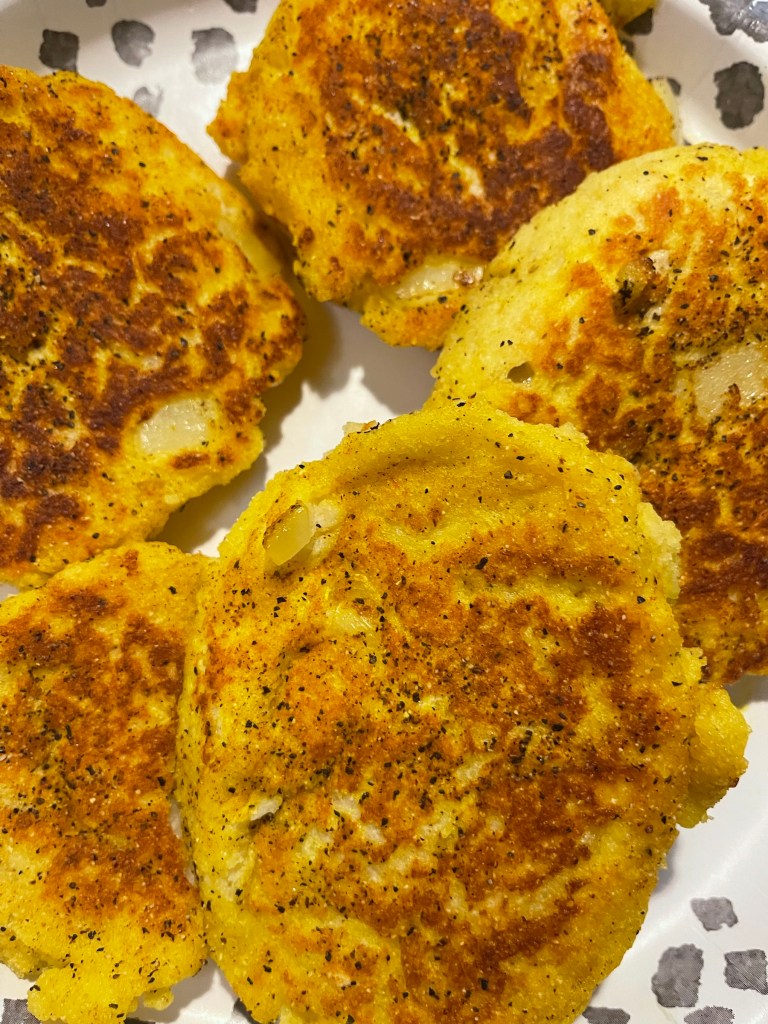
After our children married and left home, we have more leftovers than ever before. Leftover mashed potatoes and the dread of emptying them to the dogs, or just going to waste inspired me to make potato cakes! My mom always made what she called depression potato cakes. I remember watching her in the kitchen mix the delicious mix and then frying it to perfection! After pondering on the delectable cakes, I determined that I could make a heather version. As the mix started coming together, I was sure this transformation dish would quickly become a renewed favorite. And so, the experience had begun with cherished memories, a desire, and a little creativity. Finally, the cakes were complete. I was too eager to wait for dinner to try the golden potato cakes. Yummo! They were delicious! I am so excited to share this delicious recipe with you. I hope you enjoy these delicious plant-based or vegetarian potato cakes as much as my family.

Ingredients:

  • Leftover cold mashed potatoes ( I used two cups)
  • Two tbs diced sweet onion
  • 1/2 cup self rising flour of choice
  • 1 cup yellow corn meal
  • Either one egg white or a flax egg (flax egg is I tbs finely ground flax seed and 2 1/2 tbs water mixed)
  • Salt and pepper to taste

Process; mix all ingredients together. The mix will be stiff. The stiffer the better. If your mix is not thick enough, add a little meal and flour. Once mixed, set aside and add a little extra virgin olive oil to frying pan. Allow the oil to heat and then either form patty’s or drop by large spoon fulls into the pan. Allow to fry on one side while adding a little extra pepper and or salt. I like to add a sprinkle of turmeric, just because I love the flavor and it’s good for you! It also gives the potato cakes a nice color. Flip, season, and fry the other side until golden brown on both sides of the potato cake

This is a delicious side dish for pinto beans, green beans and also makes a great side for breakfast. My family loves them with ketchup as a side. You can add diced bell pepper in the mix for a bit of Mexican style potato cake. I like to add a little plant based cheese as well for a cheesy potato cake. The possibilities are endless and it allows you to use leftovers to make delicious food that saves money all the while.

I hope our renewed favorite will become a new favorite of yours! God bless from the mountains of Kentucky! As always feel free to leave feedback, ideas, and or comments. Have a blessed week!

Keeping All of Those Veggies Fresh!

It’s been quite some time since I last posted. I’ve been one busy professor, wife, grandmother, mother, etc. and all of the other hats that I wear. My apologies to my readers for neglecting you. However, I am back with good news! Yes, that’s right some good news. We can all use good news and a fresh break away from all of the negativity that floods our news, news feeds, and often our conversations. I like to be an uplifting and positive person who spreads cheer, hope, love, and joy as much as possible. So, today I am going to share something with you that sure brought a smile to my face, a little relaxation on my grocery budget, and also hope for all of you that love a plant-based diet and have a vast amount of veggies in your fridge!

For the majority of my adult life I have always been frustrated at how quickly the veggies in the refrigerator go bad. I was tired of throwing away peppers that had suddenly developed soft places, cucumbers that became soft and mushy, and mushrooms that were slimy. Yes, that’s right they get slimy. You know they do. All of this is especially true if you buy organic fruit and vegetables. Why, you may ask. It’s simple reasoning actually when you think about it. Organic produce hasn’t been genetically modified and are not full of unnatural preservatives. I did a little test a couple of months ago. I purchased a couple of non-organic bell peppers, which I must say was a hard thing for me to do, as I always use homegrown veggies, or organic vegetables from the grocery in off seasons. I also bought a couple organic bell peppers. I placed them both in the same vegetable bin and discovered that the organic peppers did not have the same shelf-life that the non-organic peppers had. As a matter of fact, the non-organic pepper is still in my vegetable drawer after three weeks and is still firm. Now, that was an eye opener. My analysis of the experiment is as follows; non-organic veggies last longer due to preservatives and being genetically modified, whereas organic veggies have a true shelf life because they are in their natural state, and haven’t been preserved in some manner. I also am a firm believer that organic produce is healthier and always tastes better. That’s my spill on organic produce. Now for the big reveal…

I have always been guilty of washing and drying my produce when I came home from the grocery store, and then proudly putting them in their appropriate bins in the fridge. They looked colorful and the bin was full with a lot of choices. However, the veggies just didn’t last very long. It was a struggle to either dehydrate, make stock, or try to use the veggies to prevent from throwing them away or feeding them to our farm animals. Now for the good news! What I discovered was this; when I bring produce home, I did not and I repeat, DID NOT wash it, but simply wrapped the beautiful veggies in a good quality white paper towel, the veggies had a longer fridge life! I prefer Viva paper towels as they are thicker and more absorbent.

The paper towel absorbs moisture that often collects on the produce and prevents it from spoiling as quickly. For those organic mushrooms that were always a chore to keep and or use before they went bad, I now simply line the paper bowl they come in, or use a natural basket with a white paper towel, empty the mushrooms in the container, and then cover them with another paper towel. It’s hard to believe, but I have kept organically grown mushrooms for up to three weeks this way. Now, that’s a big deal as the organic mushrooms never seemed to have a long shelf life and I was stopping several times during the week to buy more. Now, they stay dry, firm, and they don’t get slimy in a few days. They are also still fresh and delicious. Now, that is a bargain money saving tip or what?

Preparing to roll these beautiful baby cucumbers in white paper towel.

I house carrots, broccoli, and cauliflower the same way that I store my mushrooms. My vegetable drawer is not as colorful as it once was, but instead filled with odd shapes of vegetables wrapped in white paper towels. But, I know that two weeks after I put cucumbers away with each being individually wrapped, they’re still fresh and crisp!

I individually wrap each cucumber as I roll them into one big bundle. This prevents the cucumbers from touching and also ensures that the paper towels absorb the moisture from each cucumber. 

I love unwrapping vegetables and feeling the firmness of their skin, the freshness of their smell, and holding crisp firm veggies in my hands. I also love the freshness of vegetables while I am preparing them. The taste of the vegetables is still fantastic and their integrity is still top quality. One more advantage about this fabulous discovery is that the vegetable drawer remains dry and requires much less cleaning as opposed to just placing the veggies in the drawer. I know you know what I’m talking about. That veggie drawer can get nasty, but not with this really simple trick. It only takes a few minutes out of your time when putting your groceries away. It will save you a small bundle on your groceries at the register and allow you to have quality vegetables available for all of those wonderful plant-based recipes that you love cooking! Oh, I didn’t mention how delicious, fresh, and crisp that salads are after wrapping the veggies!

I hope you enjoy this wonderful bit of information and find it as useful as I did! Feel free to follow my blog, leave feedback, or comments. I look forward to posting an upcoming new favorite go to plant based soup that I am totally loving right now! I am excited for you to try my recipe for Three Bean Mexican Soup! For now, God bless, happy eating, and remember to always eat fresh and organic when possible. Until the next post God bless from the mountains of Kentucky!

Don’t Let Those Leftovers Go to Waste…Freeze Them!

Is your refrigerator like mine after Christmas each year? If so, it’s overflowing with dish after dish of delicious leftovers. However, if your family is like mine they are also tired of leftovers, even if they are delicious. The question is…what do you do with all those leftovers? I have asked myself this same question year after year. I usually resolve this problem by feeding the leftovers to our wonderful guard dog, Frosty, and of course the cats. I have also added them to the compost pile, but this year I decided to do something different with my leftovers.

image

This is Frosty…our faithful friend that guards chickens, cats, and our garden.

As I was shopping for groceries this week I reached for one of my favorite foods, southwestern grilled chicken strips. To my surprise there wasn’t one bag left in the cooler. I thought about how I would miss this tasty addition to my salads, breakfast, and even as a side dish. I stood there staring at the cooler as if I could magically will a bag or two of my favorite salad fixing to appear in the cooler. Instead of the bag of chicken appearing I had a vision of adding the left over smoked turkey that still resided in my refrigerator to my salads. It was already pulled from the bone and stored in an air tight container. Smiling to myself I left the store with a plan, and a full cart of items to fill my pantry for a couple of months of clean eating. But, that’s a post for a later date.

image

Vacuumed sealed individual servings of turkey.

After researching how to freeze cooked meats, I decided that I would freeze my leftovers. The next day with my plan, the vacuum sealer and a large bowl of turkey I moved forward with my plan. I was excited as the smoked turkey would be a tasty and healthy alternative to the southwestern chicken strips. It would be delicious warmed up in salads, as a side, or on wraps. Why had I not thought of this before? Soon I had the turkey vacuum sealed, dated, and in the freezer. I was on a roll and wanted to add additional healthy choices to my freezer. I wondered about freezing other leftovers.

I decided after reading further about freezing foods that I would vacuum seal individual portions of the dressing, and slices of a pumpkin roll that my niece brought as a dessert for Christmas dinner. These would be great sides when our granddaughter, who loves both dressing and pumpkins roll, came to visit. These would also be great sides for my husband as well, and I admit, for myself when I have a cheat day.

Freezing foods is a quick and easy process. If you don’t have a vacuum sealer you can still freeze your leftovers. Below are directions for freezing turkey, pumpkin roll, and dressing.

Freezing Turkey:

Remove turkey from bone
Separate turkey into serving sizes
Vacuum seal or wrap in plastic wrap and place in zip lock freezer bag
Date bag with a permanent maker

Freezing Pumpkin Roll:

Slice the pumpkin roll
Place individual pieces on parchment paper in freezer for fifteen minutes
Either vacuum seal or wrap in plastic wrap in place in zip lock freezer bag
Date bag with a permanent marker

Freezing Dressing:

Cut into serving sizes
Place in freezer on parchment paper for fifteen minutes
Wrap in plastic wrap and place in zip lock freezer bag
Date bag with a permanent marker

I’m excited about being able to enjoy smoked turkey, dressing, a baked sweet potato, and a delicious slice of pumpkin roll any day of the year! The smoked turkey will also be great to make turkey wraps for lunch on the go, and a tasty addition to salads.  I love seeing the full section of leftovers in my freezer and the feeling of satisfaction of having little to no waste with Christmas leftovers, while also stocking my freezer with delicious food.

I hope that I’ve inspired you to freeze all of your tasty holiday leftovers. You don’t have to wait for holidays to try this idea…you can begin freezing leftovers any day of the week! It’s also a great way to plan ahead and meal prep for those busy weeks that we all have. Feel free to leave your feedback. I enjoy hearing from each of you. Be sure to check back next week for my New Year’s post where I will share ten inspiring achievable goals to improve your New Year and your life! Wishing you and your family a very happy and blessed New Year!

How I Saved 106.86 My Last Shopping Trip Using Apps and Coupons!

Okay, so when I embarked on this clean eating journey my food intake changed dramatically, as did my grocery bill. Many of the foods that became a staple in my pantry were on my husband’s list of favorite foods to eat. I found myself buying groceries for two different menus. To decrease the expenses we decided it was time to increases the produce in our garden. We both enjoyed the majority of the vegetables. I saved a bundle on zucchini, squash, cucumbers, and cantaloupe alone! As much as this helped our budget, encouraged me to eat healthy, and also provided vegetables for our family, there were some things on my grocery list that we couldn’t grow!

I had a desire and a need to reduce my grocery bill. I was determined to find ways to trim back, and cut corners. So, I decided that coupons would be my first choice. I’ve always enjoyed saving a little money here and there with coupons, but most of my coupon experience was limited to accidentally stumbling onto a coupon in the insert from the Sunday paper, or a magazine. I needed to get into some serious couponing. No, not extreme, but serious. I read as much as I could online about shopping with coupons, bought a few e-books, and watched the amazing show about extreme couponing. It all seemed complicated, but remember, I was determined to save money!

Before long, I figured out a system that worked for me. It wasn’t complicated, and it didn’t involve a lot of time, but I was saving money! I clipped coupons, scoured the sale papers, loaded online coupons to my Kroger card, printed free coupons, bought from coupon clipping services, and watched sale weekly sale papers. I also loaded a few apps to my phone that added to my savings. These apps worked with stores such as, Aldi’s, The Dollar Tree, Wal-Mart, Kroger, and The Dollar General. I frequently use Checkout 51, Ibotta, Wal-Mart Savings Catcher, and my Plenti card. The savings from these apps can really add up quick!

I love a day of savings! 106.86 total savings

I love a day of savings! 106.86 total savings

Over the past three years I have learned a lot about clean eating, using coupons, finding the best sales, and using them to stock my pantry. Today was a great day of savings. The day began at Wal-Mart when I purchased a 16.5 Purina Small Bites dog food for just 1.00. This was made possible through the use of a 4.00 coupon that I clipped from the insert in the Sunday paper and a 7.00 check from Purina. My husband saves circles from bags of Purina dog food that we mail to the Purina company in exchange for checks that are redeemable for more dog food. That’s instant money! Using the combination of the coupon and the Purina check I bought a 16.5 bag of dog food for just 1.00! A total savings of 11.00.  I purchased ten more of the 4.00 coupons from Klip 2 Save, which is my favorite coupon clipping service. Each coupon costs a couple of cents, but still reap a huge savings! My plans are to fill our dog food bin for the winter for only a few dollars! I left Wal-Mart and headed to Kroger for even more savings.

Checking my list, I carefully scoured the Kroger shelves, selecting items that were on sale, close out items, as well as items from the reduced price bin. The deals were fantastic! I found usable and worthy items in the close out and reduced items bin that I had coupons for! I was pumped! I made my way to the checkout line with a cart running over with super deals! I had set a dollar amount that I didn’t want to exceed! As the total quickly began to climb, I was a bit nervous about the cost before my Kroger card was swiped…it exceeded my goal. But, after swiping my card, and handing my stack of coupons…my total sale was far below my budget! My total savings for a huge haul of groceries was 59.76. I was pumped!

Now, on to the gas pumps for even more savings, just another reason that I love shopping at Kroger! When the computer at the pump ask if I wanted to use my full .20 of savings, I selected yes with a grin on my face! I would get my gas for 1.78. I hadn’t paid this little for a gasoline in quite some time! A total savings of 3.80.

I love saving at Kroger!

I love saving at Kroger!

The next stop on my route would be Rite Aid. I was on a mission to find hair color at the lowest price possible. I had a couple of 3.00 coupons and a few buy one get one free coupons, that meant I could get two boxes of color for 2.00. I picked up six boxes of hair color and strolled up to the check out counter. The price rang up and I swiped my Plenti card. I noticed my accumulated points and decided to use them. I was thrilled to discover that the six boxes of hair color that I planned to pay two dollars for…was totally free! This freed up my coupons as well for future purchases. I left Rite Aid with six boxes of hair color that I purchased for 0.00!  A savings of 28.00, and enough hair coloring to last for a year!

My final stop would be The Dollar Tree. Again, I went on a mission! I was going in to purchase Gain fabric sheets and Hall’s cough drops! Again, I presented paper coupons for the Gain fabric sheets. I paid 1.50 for the fabric sheets, instead of 3.00. As soon as I got in the jeep I quickly used the Check Out 51 app to scan the receipt receiving a 1.00 for one of the bags of cough drops! Total savings 2.50 on a 5.00 purchase!

Save with Check Out 51

Save with Check Out 51

Once I arrived at home, I was excited to share the huge amount of savings with my husband! As we put away the huge load of groceries, I scanned the bar codes for savings on items that were offered on Ibotta. With a full pantry of groceries that satisfied the needs of clean eating, healthy eating, grandchildren’s cravings, and my husbands midnight snacks, I sat down to scan the lengthy Kroger receipt for Ibotta. Cha-ching…1.80 was added to my Ibotta account!

Save more with Ibotta

Save more with Ibotta

It was a great day of shopping and a great day of savings…not to mention a full fridge, full pantry, full tank of gas, and enough hair color to last for a year! But, the best part of all…my total savings for the day was 106.86! Be sure to check out my post The Journey Begins to find out more about my journey to a healthier life style.